
Depending on how you've set up your Onflo page, customers may be selecting their Topic of choice from a menu-like Landing Page, or they may be sent directly to the Topic you've already identified for them. Either way, they'll almost definitely end up in the Ticket form. No matter how they get there, and no matter which Topic they select, your customers will see a form that looks something like this:
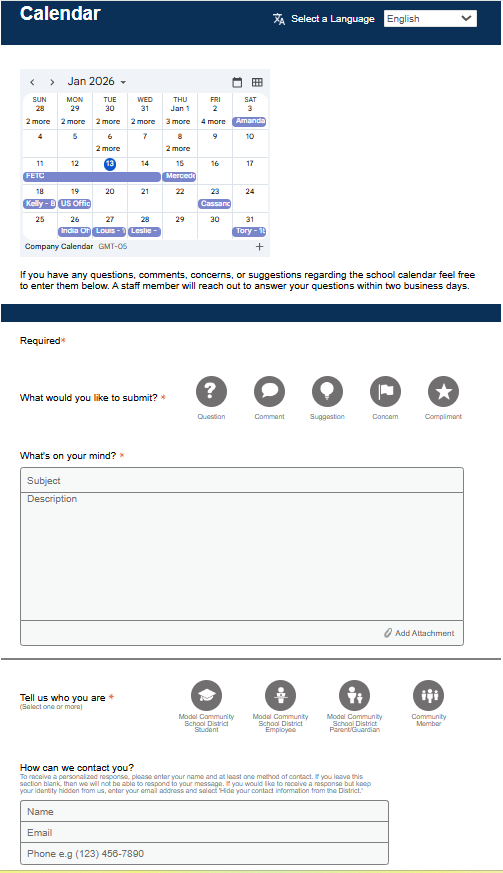
If the account has been set up in multiple languages, a drop-down menu will appear in the top right-hand corner of the form. Selecting a different language displays a translated form. For more on setting up multiple languages, see Translation.
The introductory message on this form can be customized by Topic. See more under Defining Form Messages - Introduction Messages.
While this form is fairly simple, a few items of note on the fields:
- Response Type: Customers may select only one category – Question, Comment, Suggestion, Concern, or Compliment. Mandatory.
- Subject: Usually the main topic, as with an email subject line. Mandatory.
- Description: Actual feedback, such as questions or comments. Mandatory.
- Attachments: A Customer may add a relevant picture, document, or video file. Accepted formats include .png, .jpg, .pdf, .mp4, .doc, .docx, .xls, .xlsx, .ppt, .pptx. Optional.
- Customer Type: One or more categories may be selected – Student, Employee, Parent/Guardian, or Community Member. Options may vary. Mandatory.
Contact Information
- To receive a response, a Customer must complete the Name and Email and/or Phone fields.
- A Customer may choose to remain hidden from the district by checking the "Hide your contact information from the district" box under the contact fields
- A Customer may choose to remain anonymous by leaving all fields blank.
What's the difference between hidden and anonymous? Read about it here.
Submit
- Clicking this button will submit the form to the Onflo system, where it will become a Ticket.
- The Topic Owner of the appropriate Topic will receive a notification, and the life of the Ticket has begun!
And we're off!
- The Customer receives one of two onscreen thank-you messages, expressing appreciation for the feedback and setting expectations regarding follow-up (if contact information was provided) or (if no contact info was provided) thanking the Customer for the feedback and reminding him/her that no follow-up is possible since the Ticket was submitted anonymously.
- Customers who have provided email addresses also receive follow-up thank-you emails as confirmation of their submitted Tickets. If they reply to these thank-you emails, any additional information will be collected in the same original Ticket chains.