
Importing assets, applying configurations, and building reusable configurations
This guide covers three related areas of Asset Import in Onflo:
1. Asset Import Wizard: used to bring asset data into the system
2. Saved configuration: to speed up an import
3. Configuration Wizard: to create and edit those reusable configurations
Each section includes an overview, key features, prerequisites, step-by-step instructions, a short FAQ, and troubleshooting tips.
Asset Import Wizard
Import assets into Onflo using the 4-step import wizard.
Overview
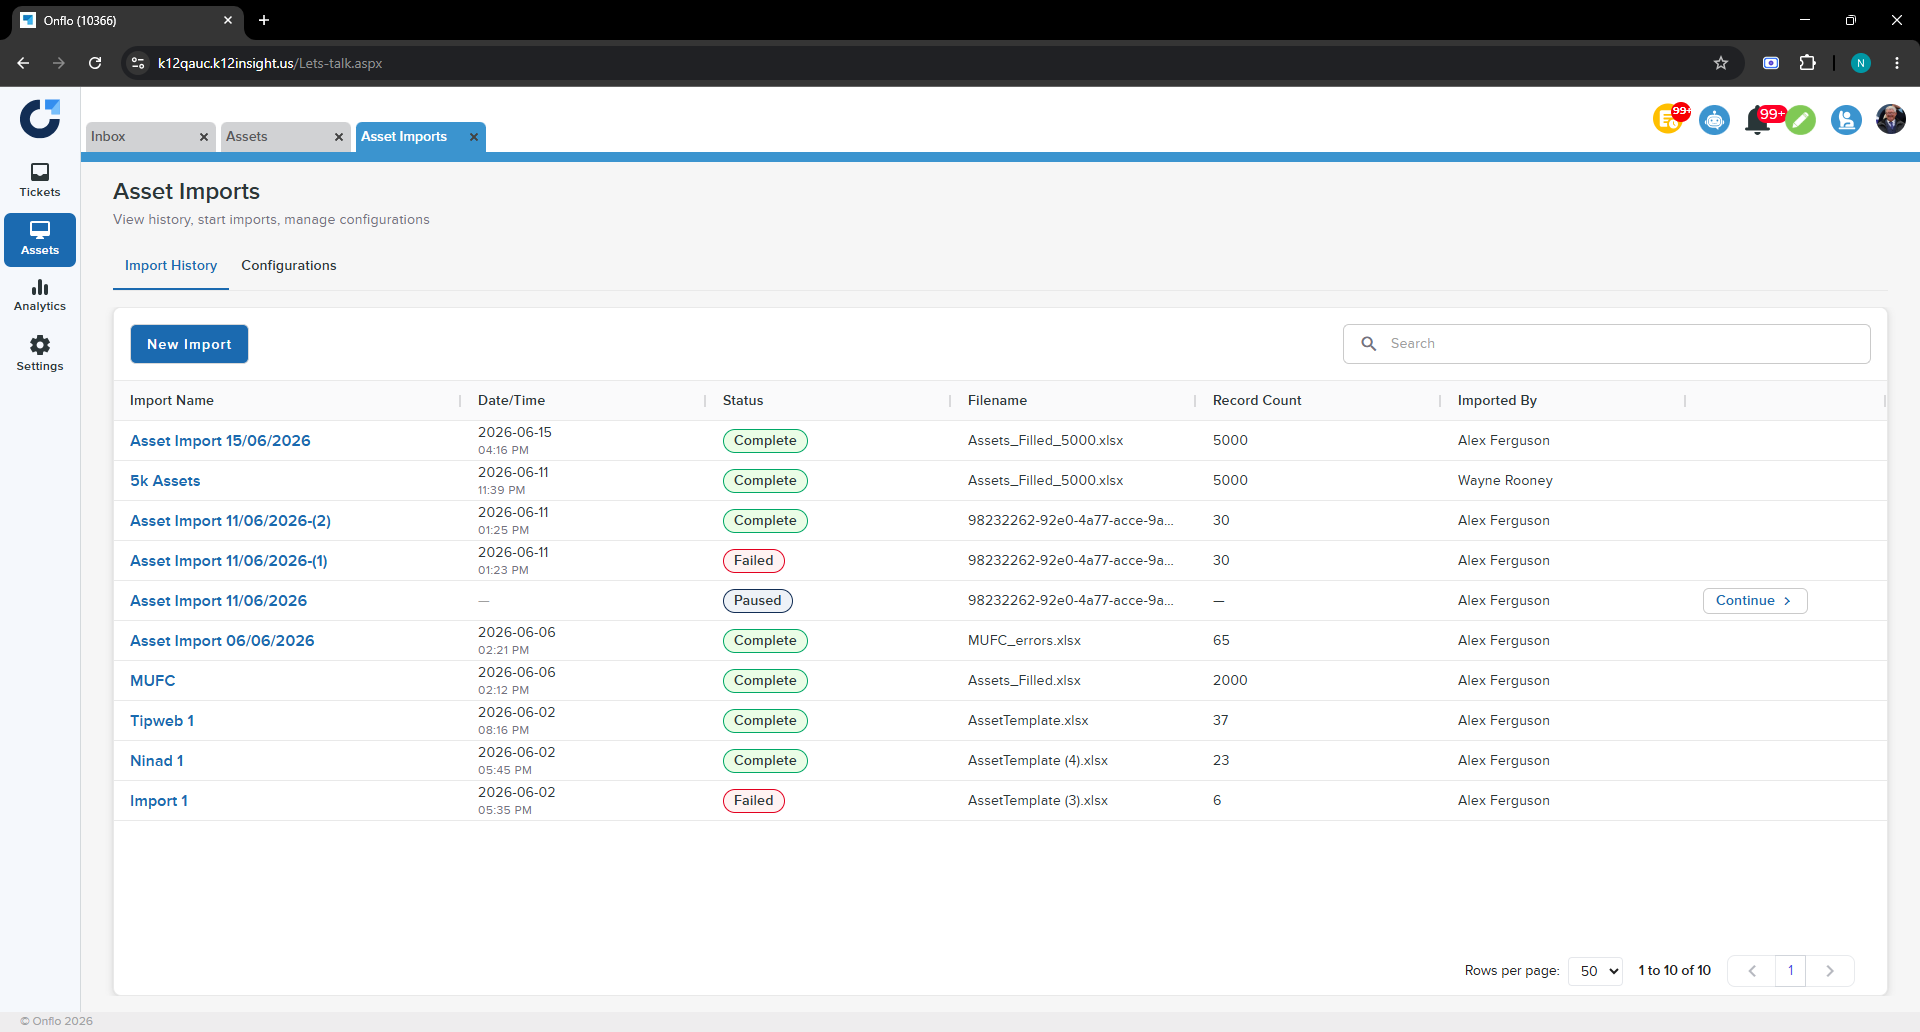
The Asset Import Wizard lets you bring a large set of assets into Onflo from a spreadsheet or a shared cloud link. You can find it under Assets → Asset Imports. The Import History tab lists every past and in-progress import; the New Import button opens the wizard.
The wizard moves through four steps, shown as a stepper at the top of the screen:
- File Upload - name the import, optionally pick a configuration, and upload your file (or paste a Google Sheet / OneDrive URL).
- Column Mapping - set the import rules and map each Onflo asset field to a column in your file.
- Data Mapping — match the values in your file (asset types, manufacturers, models, etc.) to the matching records that already exist in Onflo.
- Review - preview the first rows exactly as they will appear, check the import settings, then confirm and import.
Key Features
- Two ways to bring in data: upload a CSV / XLSX / XLS file, or paste a Google Sheet or OneDrive link.
- Optional configuration: apply a saved configuration to pre-fill all rules and mappings (see Section 2).
- Automatic column mapping: Onflo matches your file’s headers to Onflo asset fields, with optional text transforms (Title Case, Uppercase, Lowercase).
- Data (value) mapping: incoming values such as asset types, manufacturers and models are matched to existing Onflo records, with hierarchies respected (for example, a Model maps under its Manufacturer).
- Review preview: see all the rows as they will appear in Onflo, plus a full metadata summary before anything is committed.
- Pause and resume: pause an import part way through and continue it later from Import History.
- Completion email: Onflo emails the person who started the import once it finishes.
Prerequisites
- A data file in CSV, XLSX, or XLS format, up to 100 MB.
- If using a cloud link, the sheet’s sharing must be set to “Anyone with the link can view.”
- Columns for the required asset fields: Asset Name, Asset Type, Manufacturer, and Model.
- Optional: download the Sample Template from the File Upload step to start from the exact column names Onflo expects.
Assigning Assets
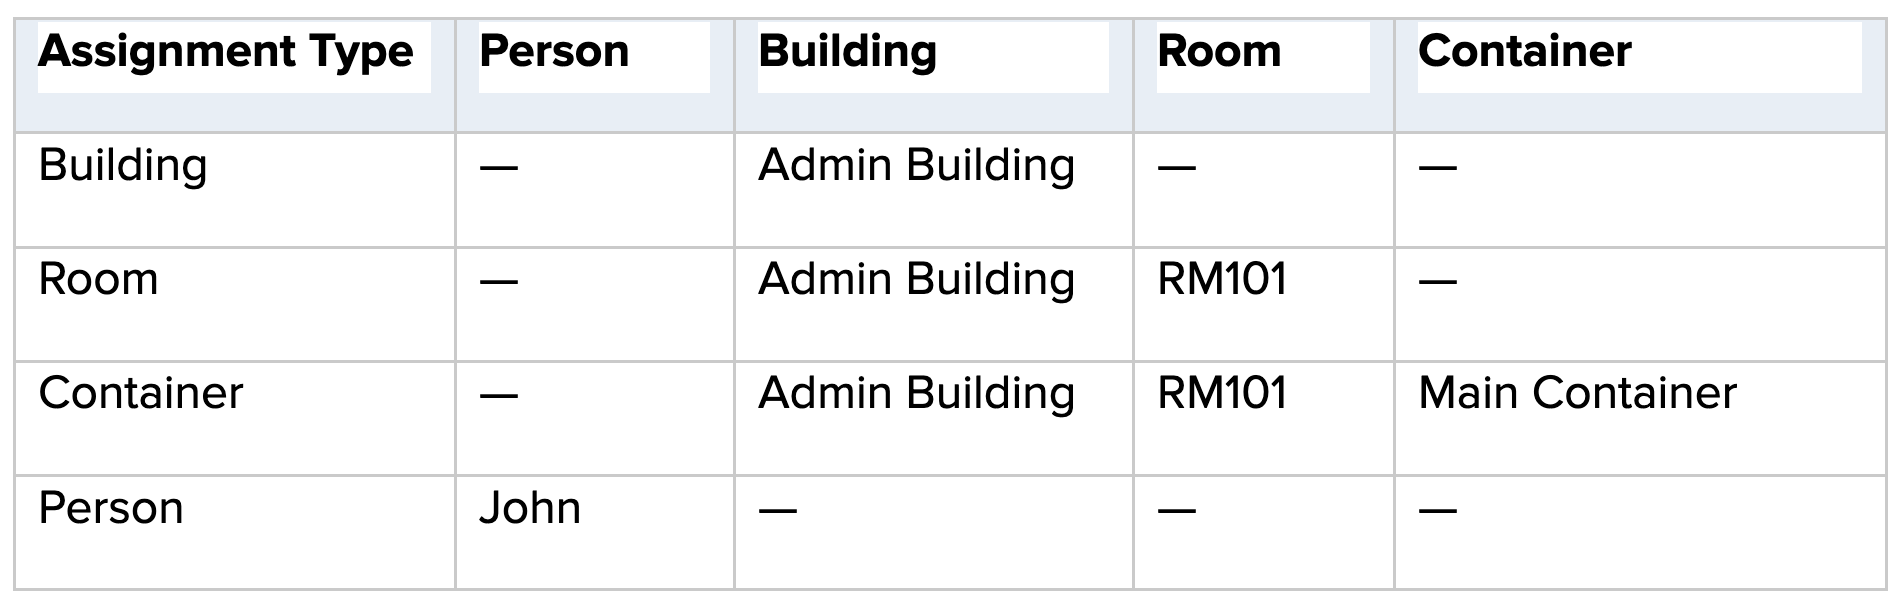
Onflo can assign each imported asset to a person or to a location. The asset template includes five columns for this: Assignment Type, Person, Building, Room, and Container. The value in Assignment Type tells Onflo what the asset is assigned to — you then fill in only the column(s) that match that type.
Locations follow a hierarchy: Building › Room › Container — so assigning an asset to a Room or a Container also requires its parent location(s).
Set Assignment Type to one of four values and fill the matching column(s):
- Person: enter the person’s name, email, or User ID in the Person column. This must match the name / email / User ID in your SIS data. Leave Building, Room, and Container empty.
- Building: enter the building’s name in the Building column (for example, “Admin Building”). Leave the other columns empty.
- Room: enter both the Building and the Room (for example, “Admin Building” and “RM101”), because a room sits inside a building. Leave Person and Container empty.
- Container: enter the Building, Room, and Container (for example, “Admin Building”, “RM101”, and “Main Container”), because a container sits inside a room, which sits inside a building. Leave Person empty.
Examples (from the asset template)
Tip:
Values must match the portal’s options exactly — watch for spelling and case. Assignment Type, Building, and Room are reconciled against existing Onflo records on the Data Mapping step (Step 3).
Step-by-step
Step 1: File Upload
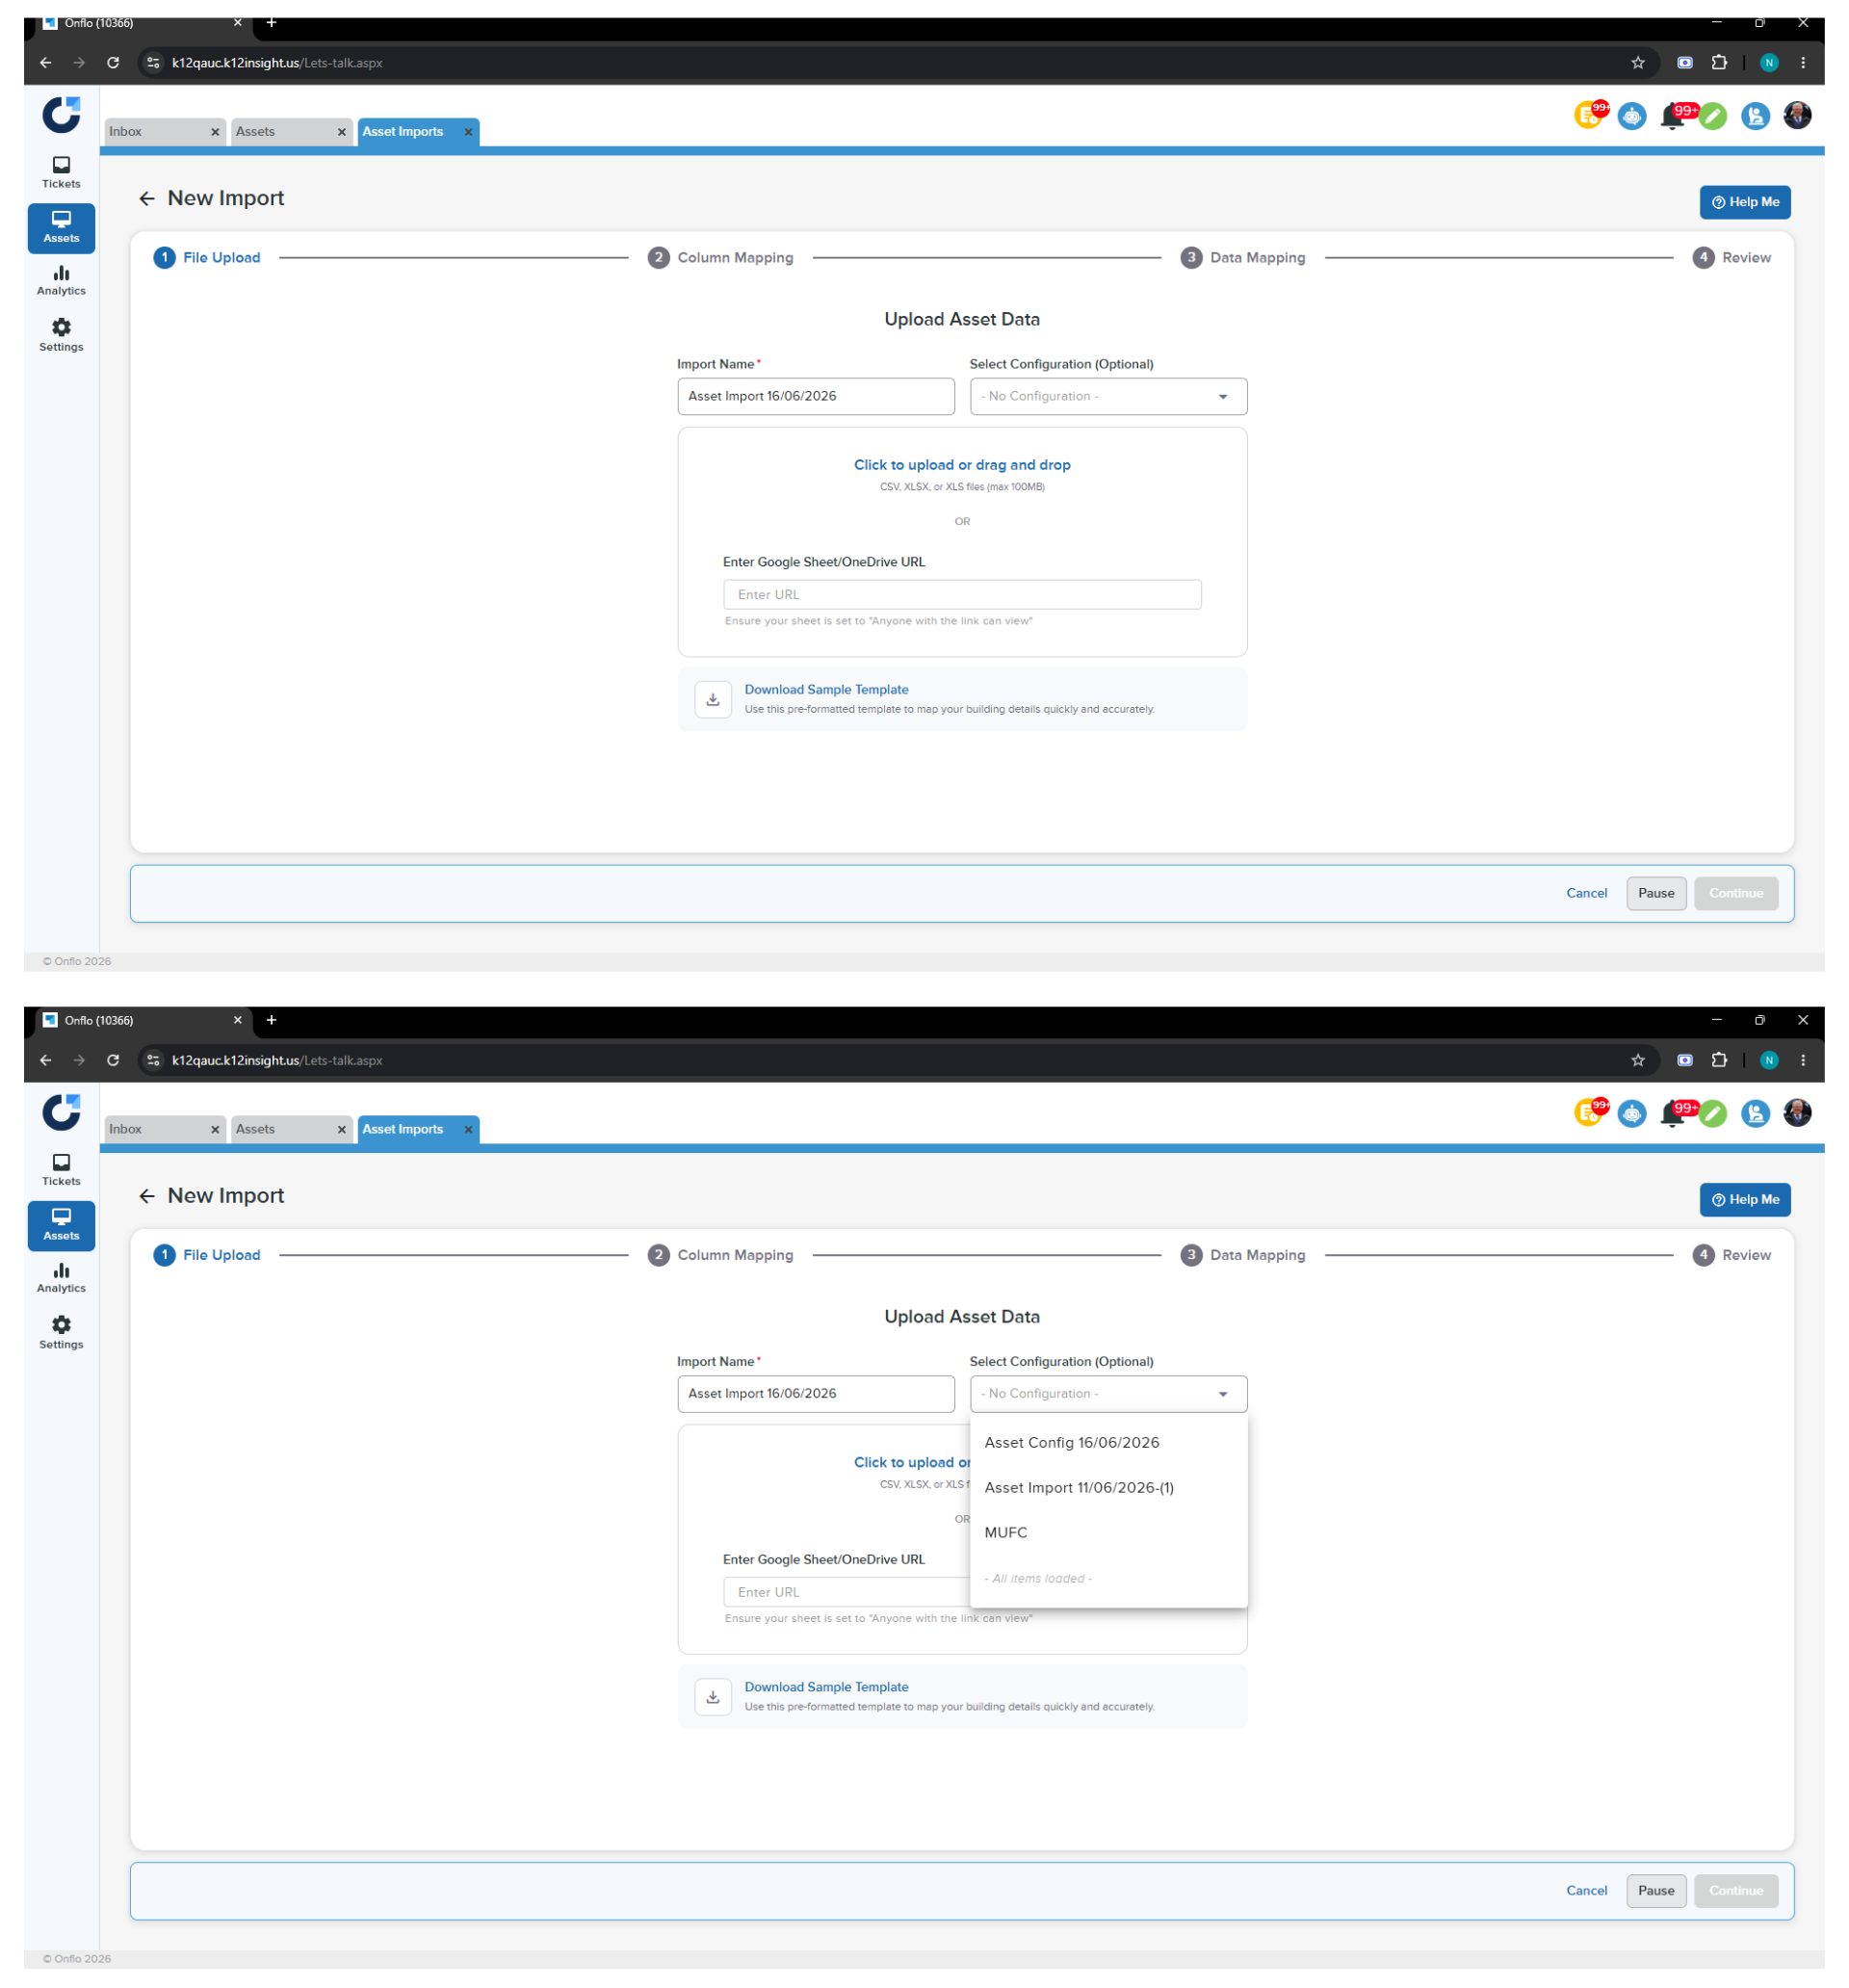
- Enter an Import Name. Onflo defaults it to “Asset Import [today’s date]” (for example, “Asset Import 16/06/2026”); change it to something you’ll recognize later.
- Optionally choose a saved configuration under Select Configuration (Optional). Leave it as “— No Configuration —” to map everything manually.
- Upload your data: either Click to upload or drag and drop a CSV / XLSX / XLS file, OR paste a Google Sheet / OneDrive link under Enter Google Sheet/OneDrive URL.
- If it’s your first import, click Download Sample Template for a pre-formatted starting file.
- Click Continue. The button stays disabled until a file is uploaded or a valid URL is connected.
Step 2: Column Mapping
This step has two parts: the Column Mapping Rules panel at the top, and the field mapping table below it.
Column Mapping Rules control how the import behaves:
- Update existing assets? — when on, matched assets are updated; when off, existing assets are left untouched and only new ones are created.
- Match Key — how Onflo decides whether an incoming row is the same asset that already exists. Options: Match by Serial Number, Match by Asset ID, or Match by Serial Number and Asset ID.
- Duplicate Rule — Merge updates only the fields that have a value in your file; Overwrite replaces every mapped field, including blanks.
- Run Workflow Rules on Import — when on, your automation rules run against the imported records.
- Max errors before aborting — a number plus an Errors / % of rows toggle. For example, set to 50 with % of rows selected and the import stops once 50% of rows fail validation.
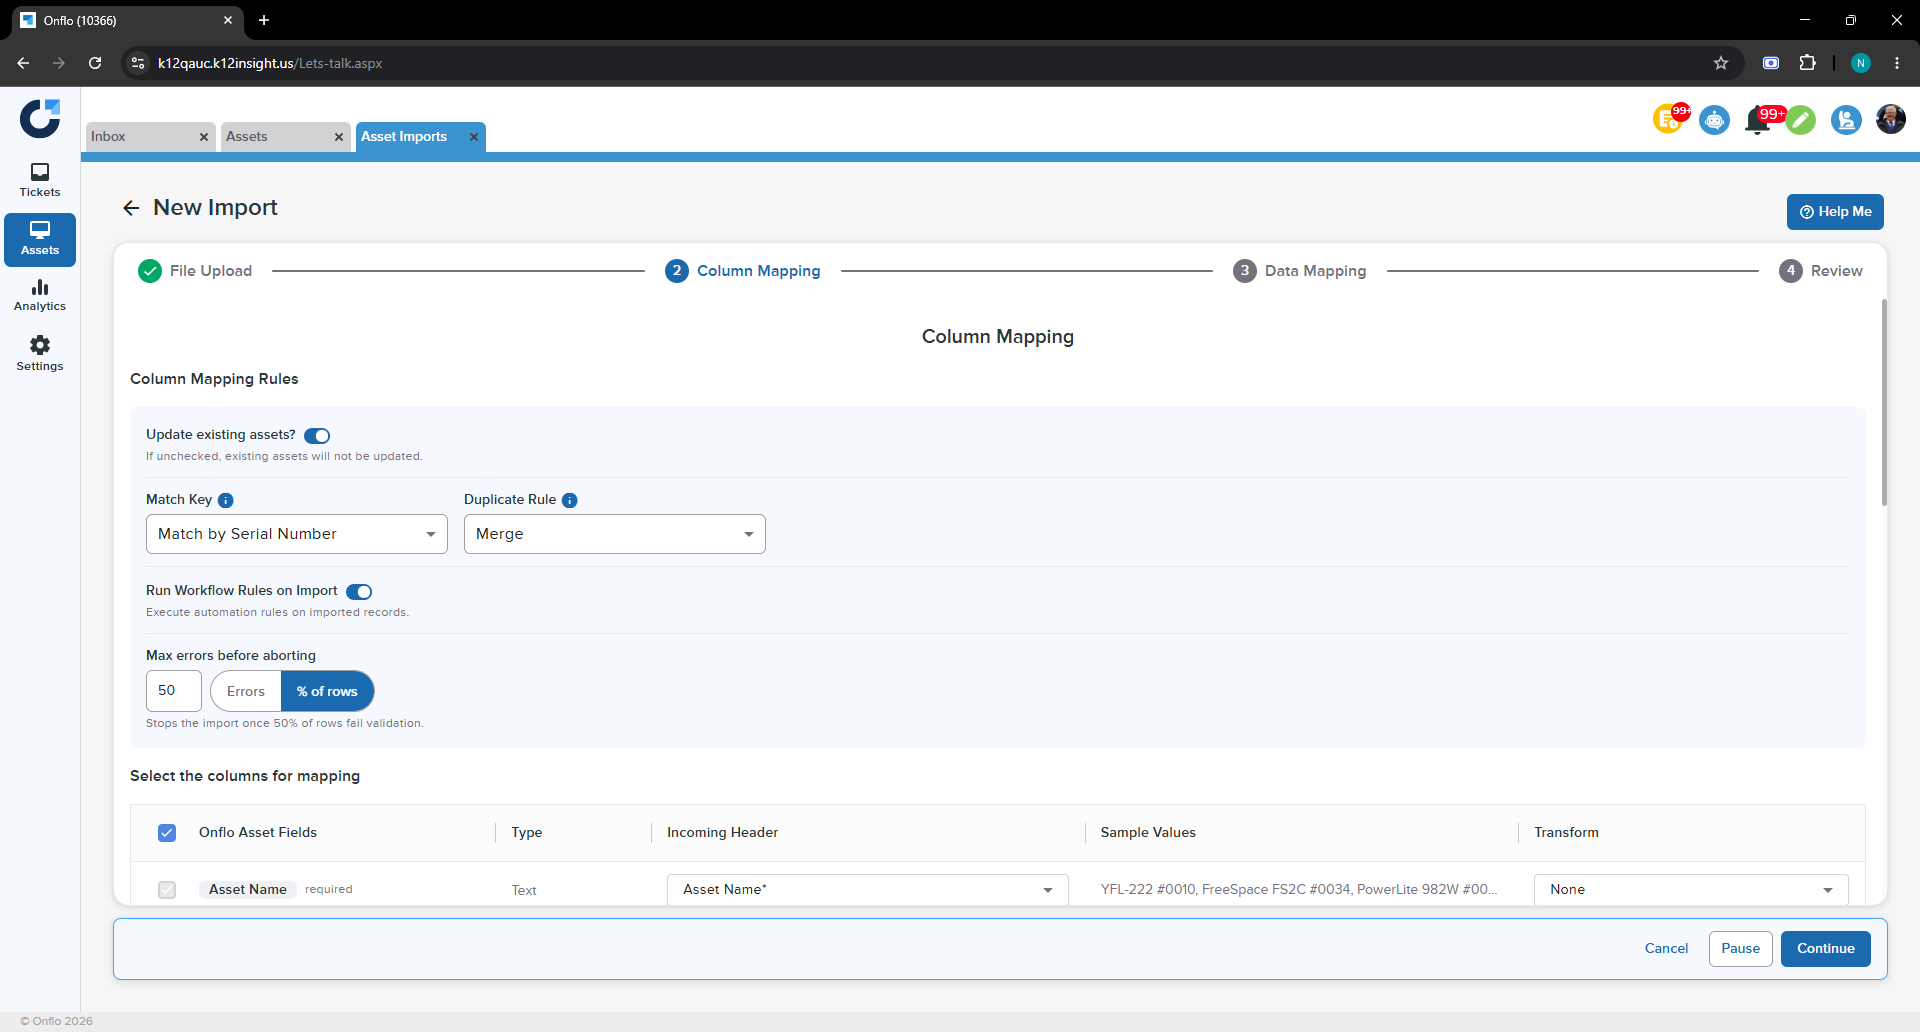
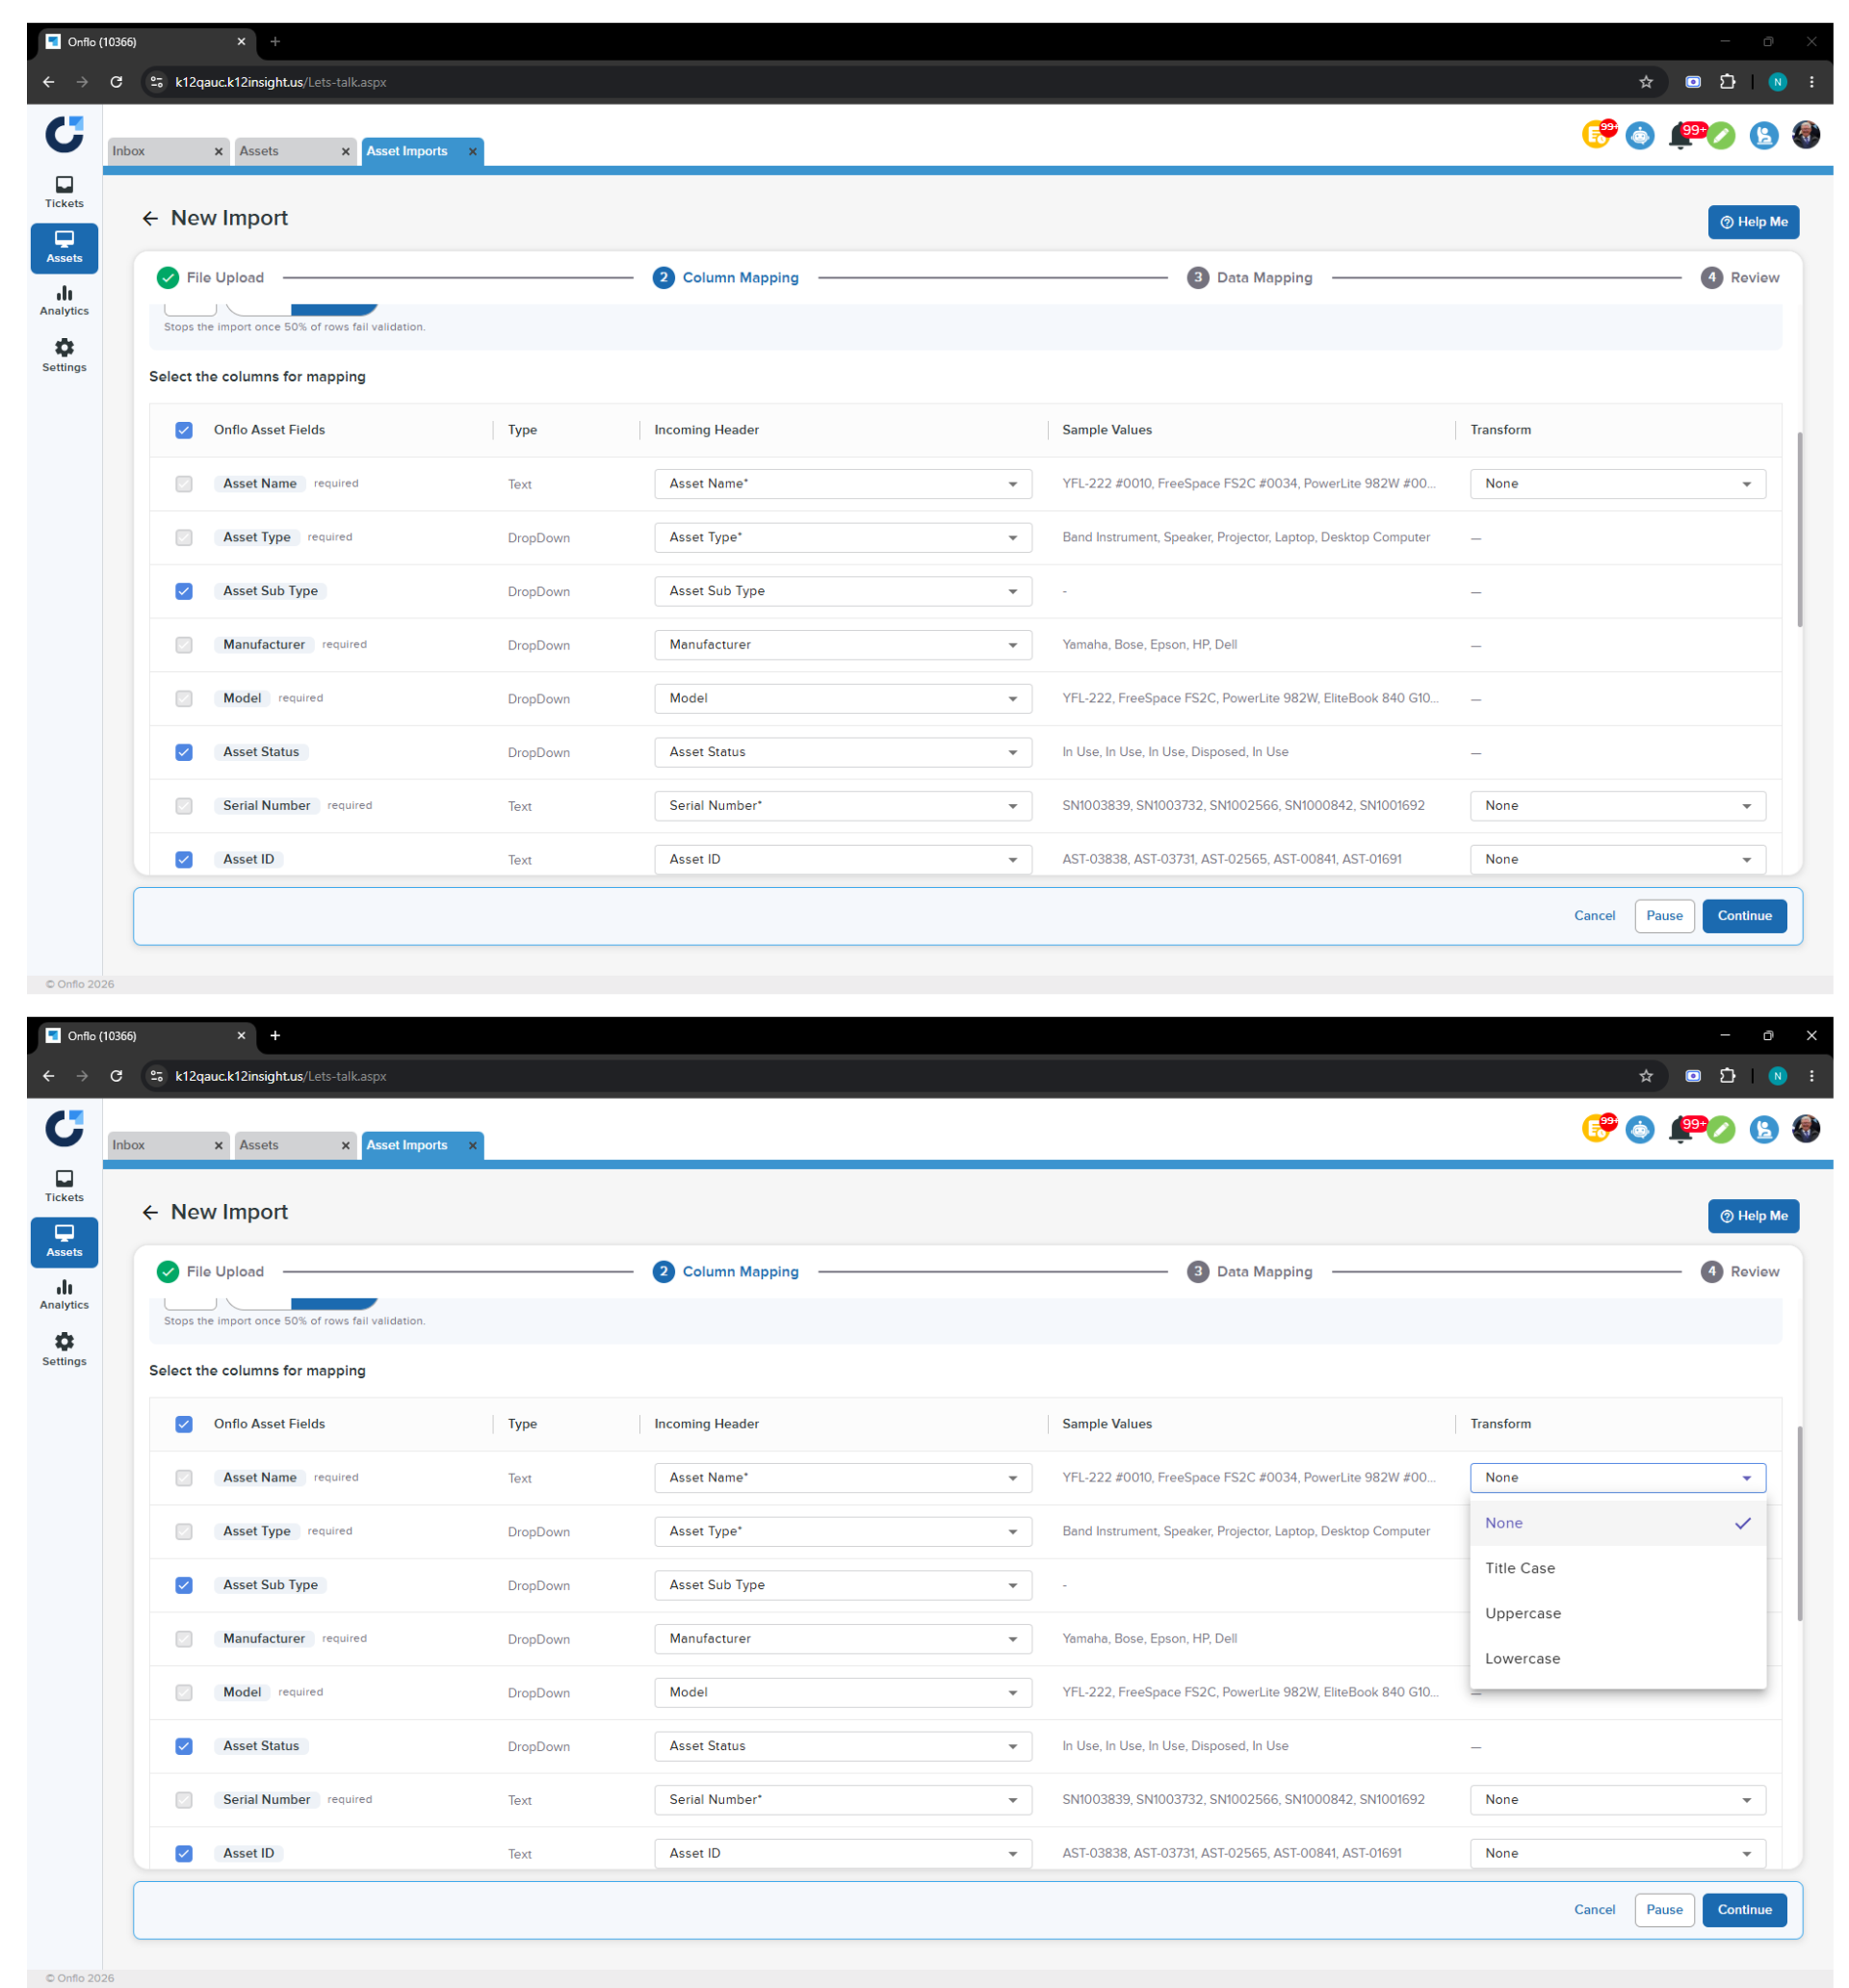
The mapping table lists every Onflo asset field with these columns: Onflo Asset Fields, Type, Incoming Header, Sample Values, and Transform.
- Use the Incoming Header dropdown on each row to pick the column from your file that feeds that Onflo field.
- Required fields — Asset Name, Asset Type, Manufacturer, and Model — are locked checked and must be mapped.
- Sample Values previews real values from your file so you can confirm the mapping is right (for example, Asset Status shows “In Use, In Use, Disposed…”).
- Transform is available on Text fields only and offers None, Title Case, Uppercase, or Lowercase. Non-text fields show “—”.
Example: when to use a Transform
If your file stores purchase orders inconsistently (“po-2023-03838”, “PO-2023-03838”), set the Purchase Order field’s Transform to Uppercase so every value lands in Onflo as “PO-2023-03838.”
Step 3: Data Mapping
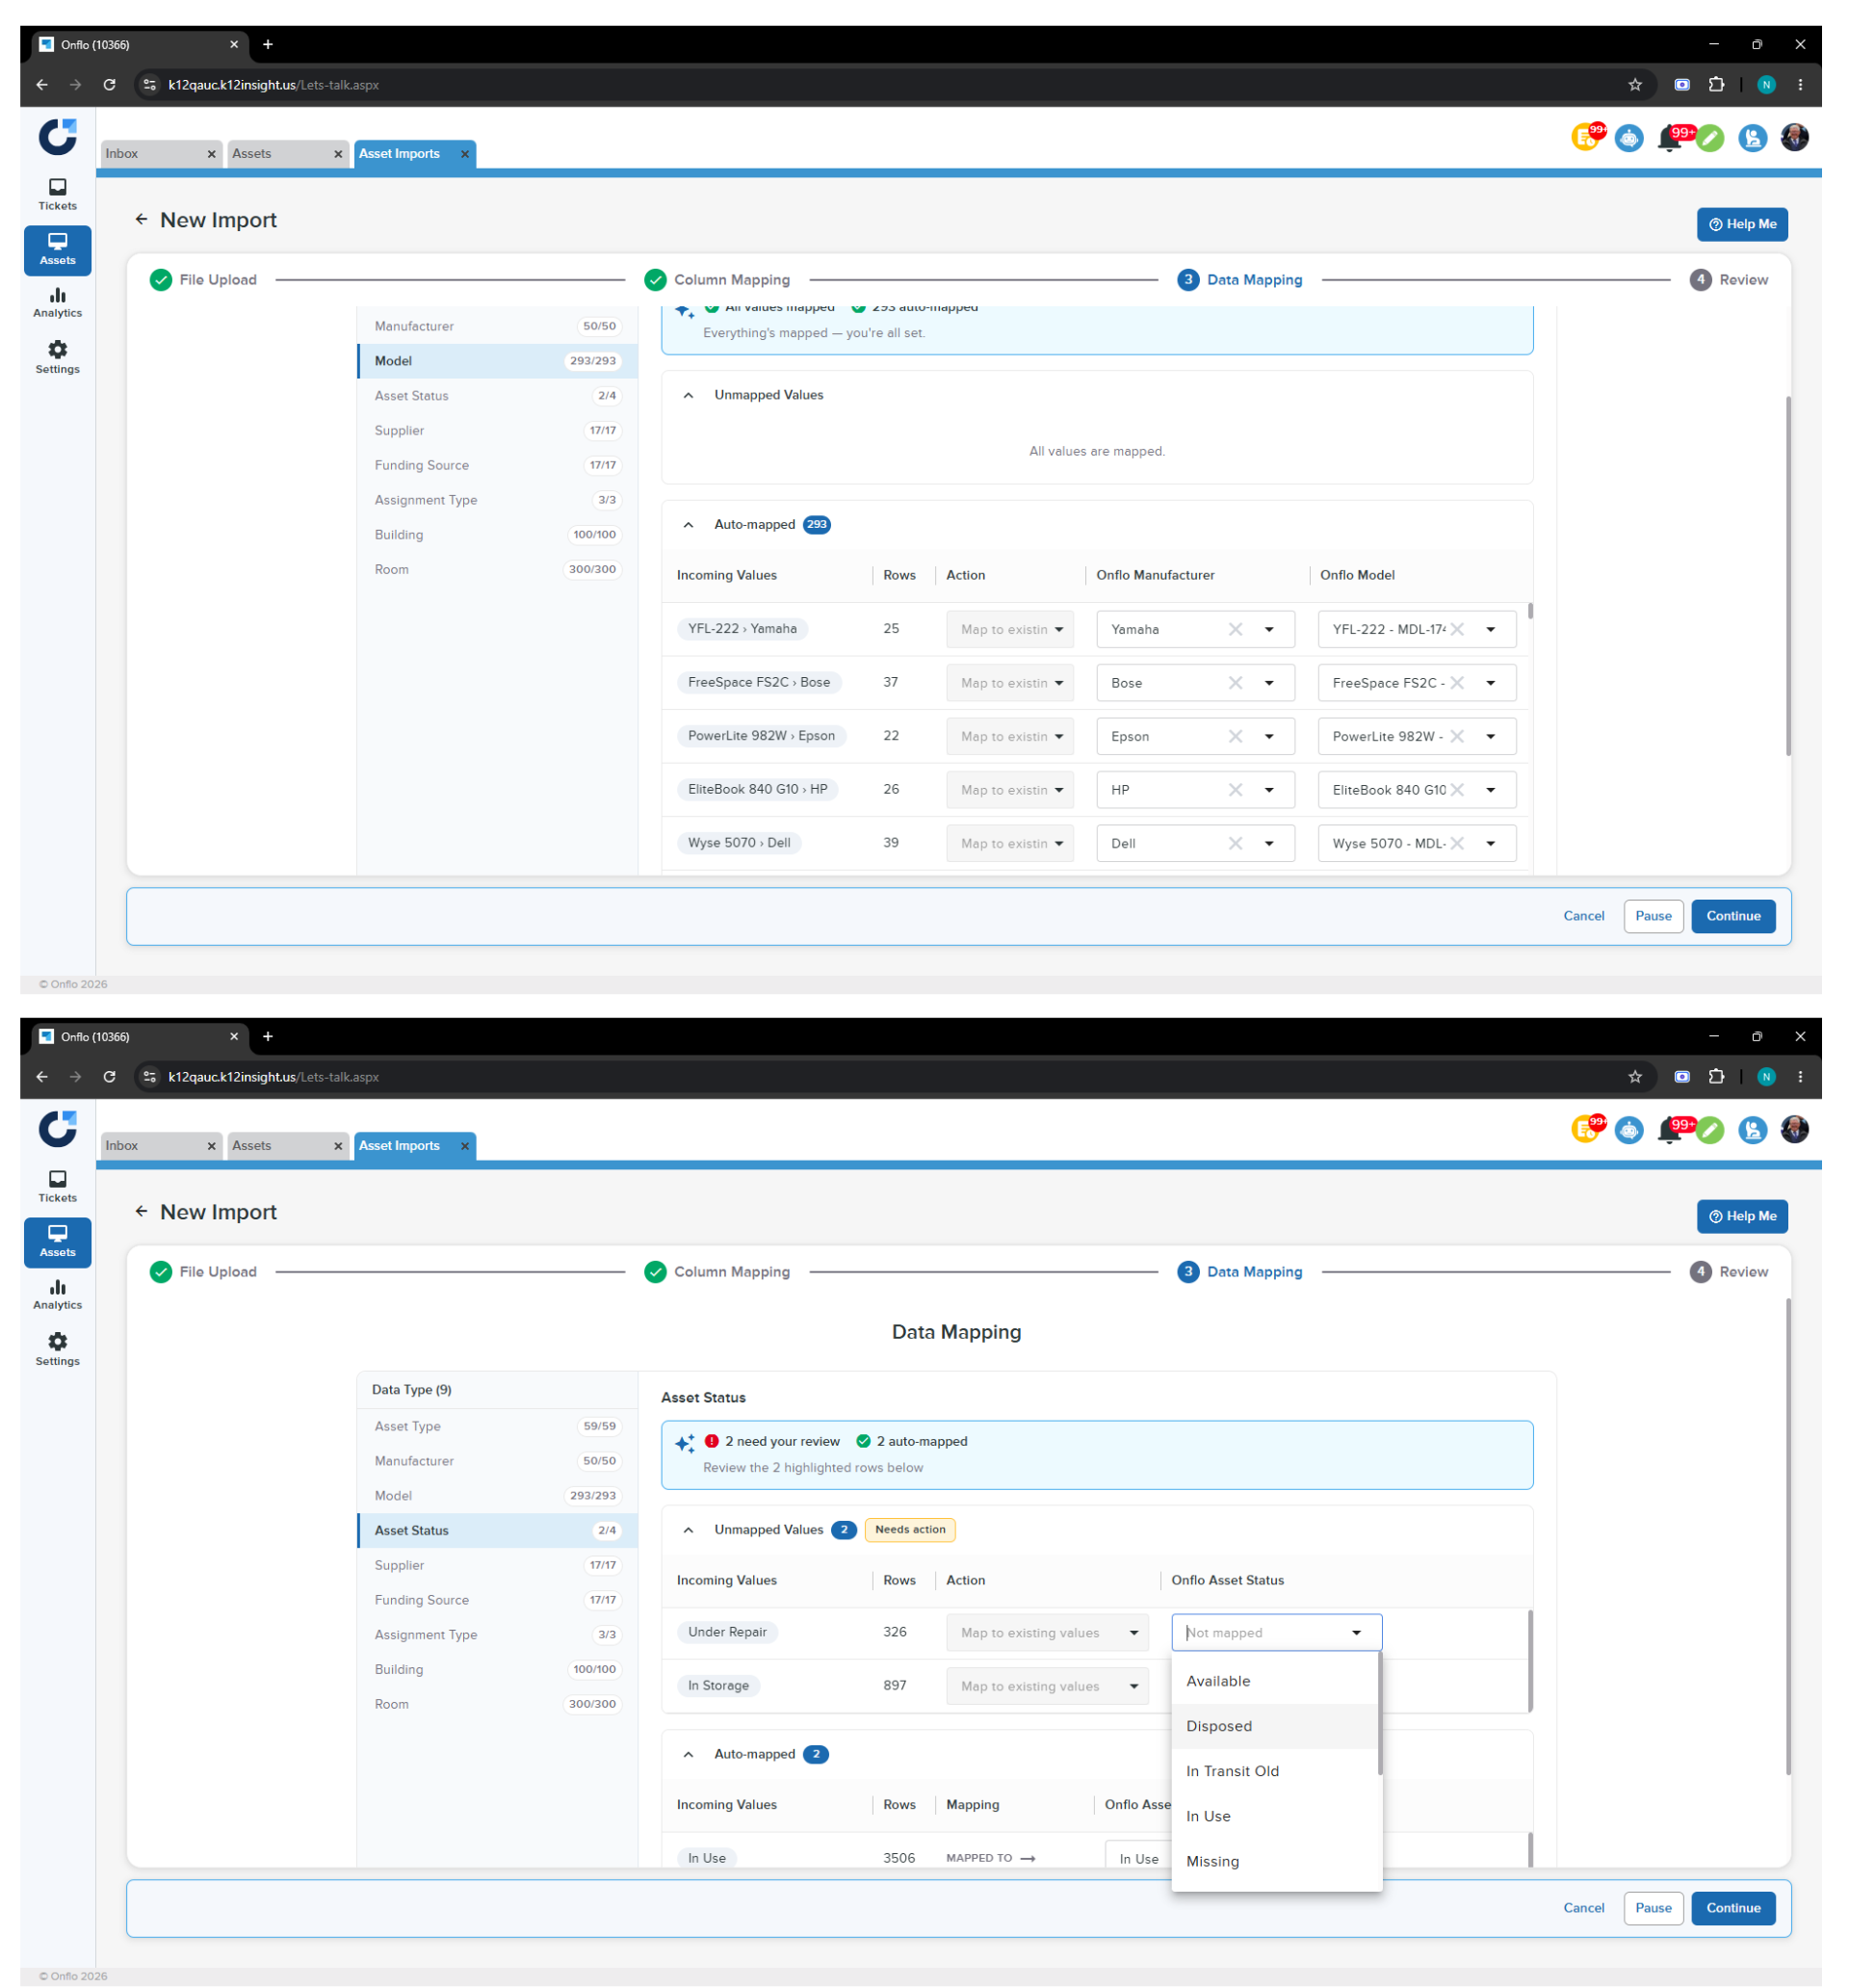
Data Mapping matches the values in your file to the records that already exist in Onflo. The left sidebar lists each data type (Asset Type, Manufacturer, Model, Asset Status, Supplier, Funding Source, Assignment Type, Building, Room) with an X/Y mapped count. Selecting a type shows its values on the right.
- Auto-mapped values are matched for you — for example, “59 auto-mapped” with the banner “All values mapped — you’re all set.”
- Unmapped Values lists anything Onflo couldn’t match, for you to map by hand.
- Hierarchies are respected: a Model is mapped under its Manufacturer (for example, the incoming value “YFL-222 › Yamaha” maps to Manufacturer “Yamaha” and Model “YFL-222”).
Step 4: Review
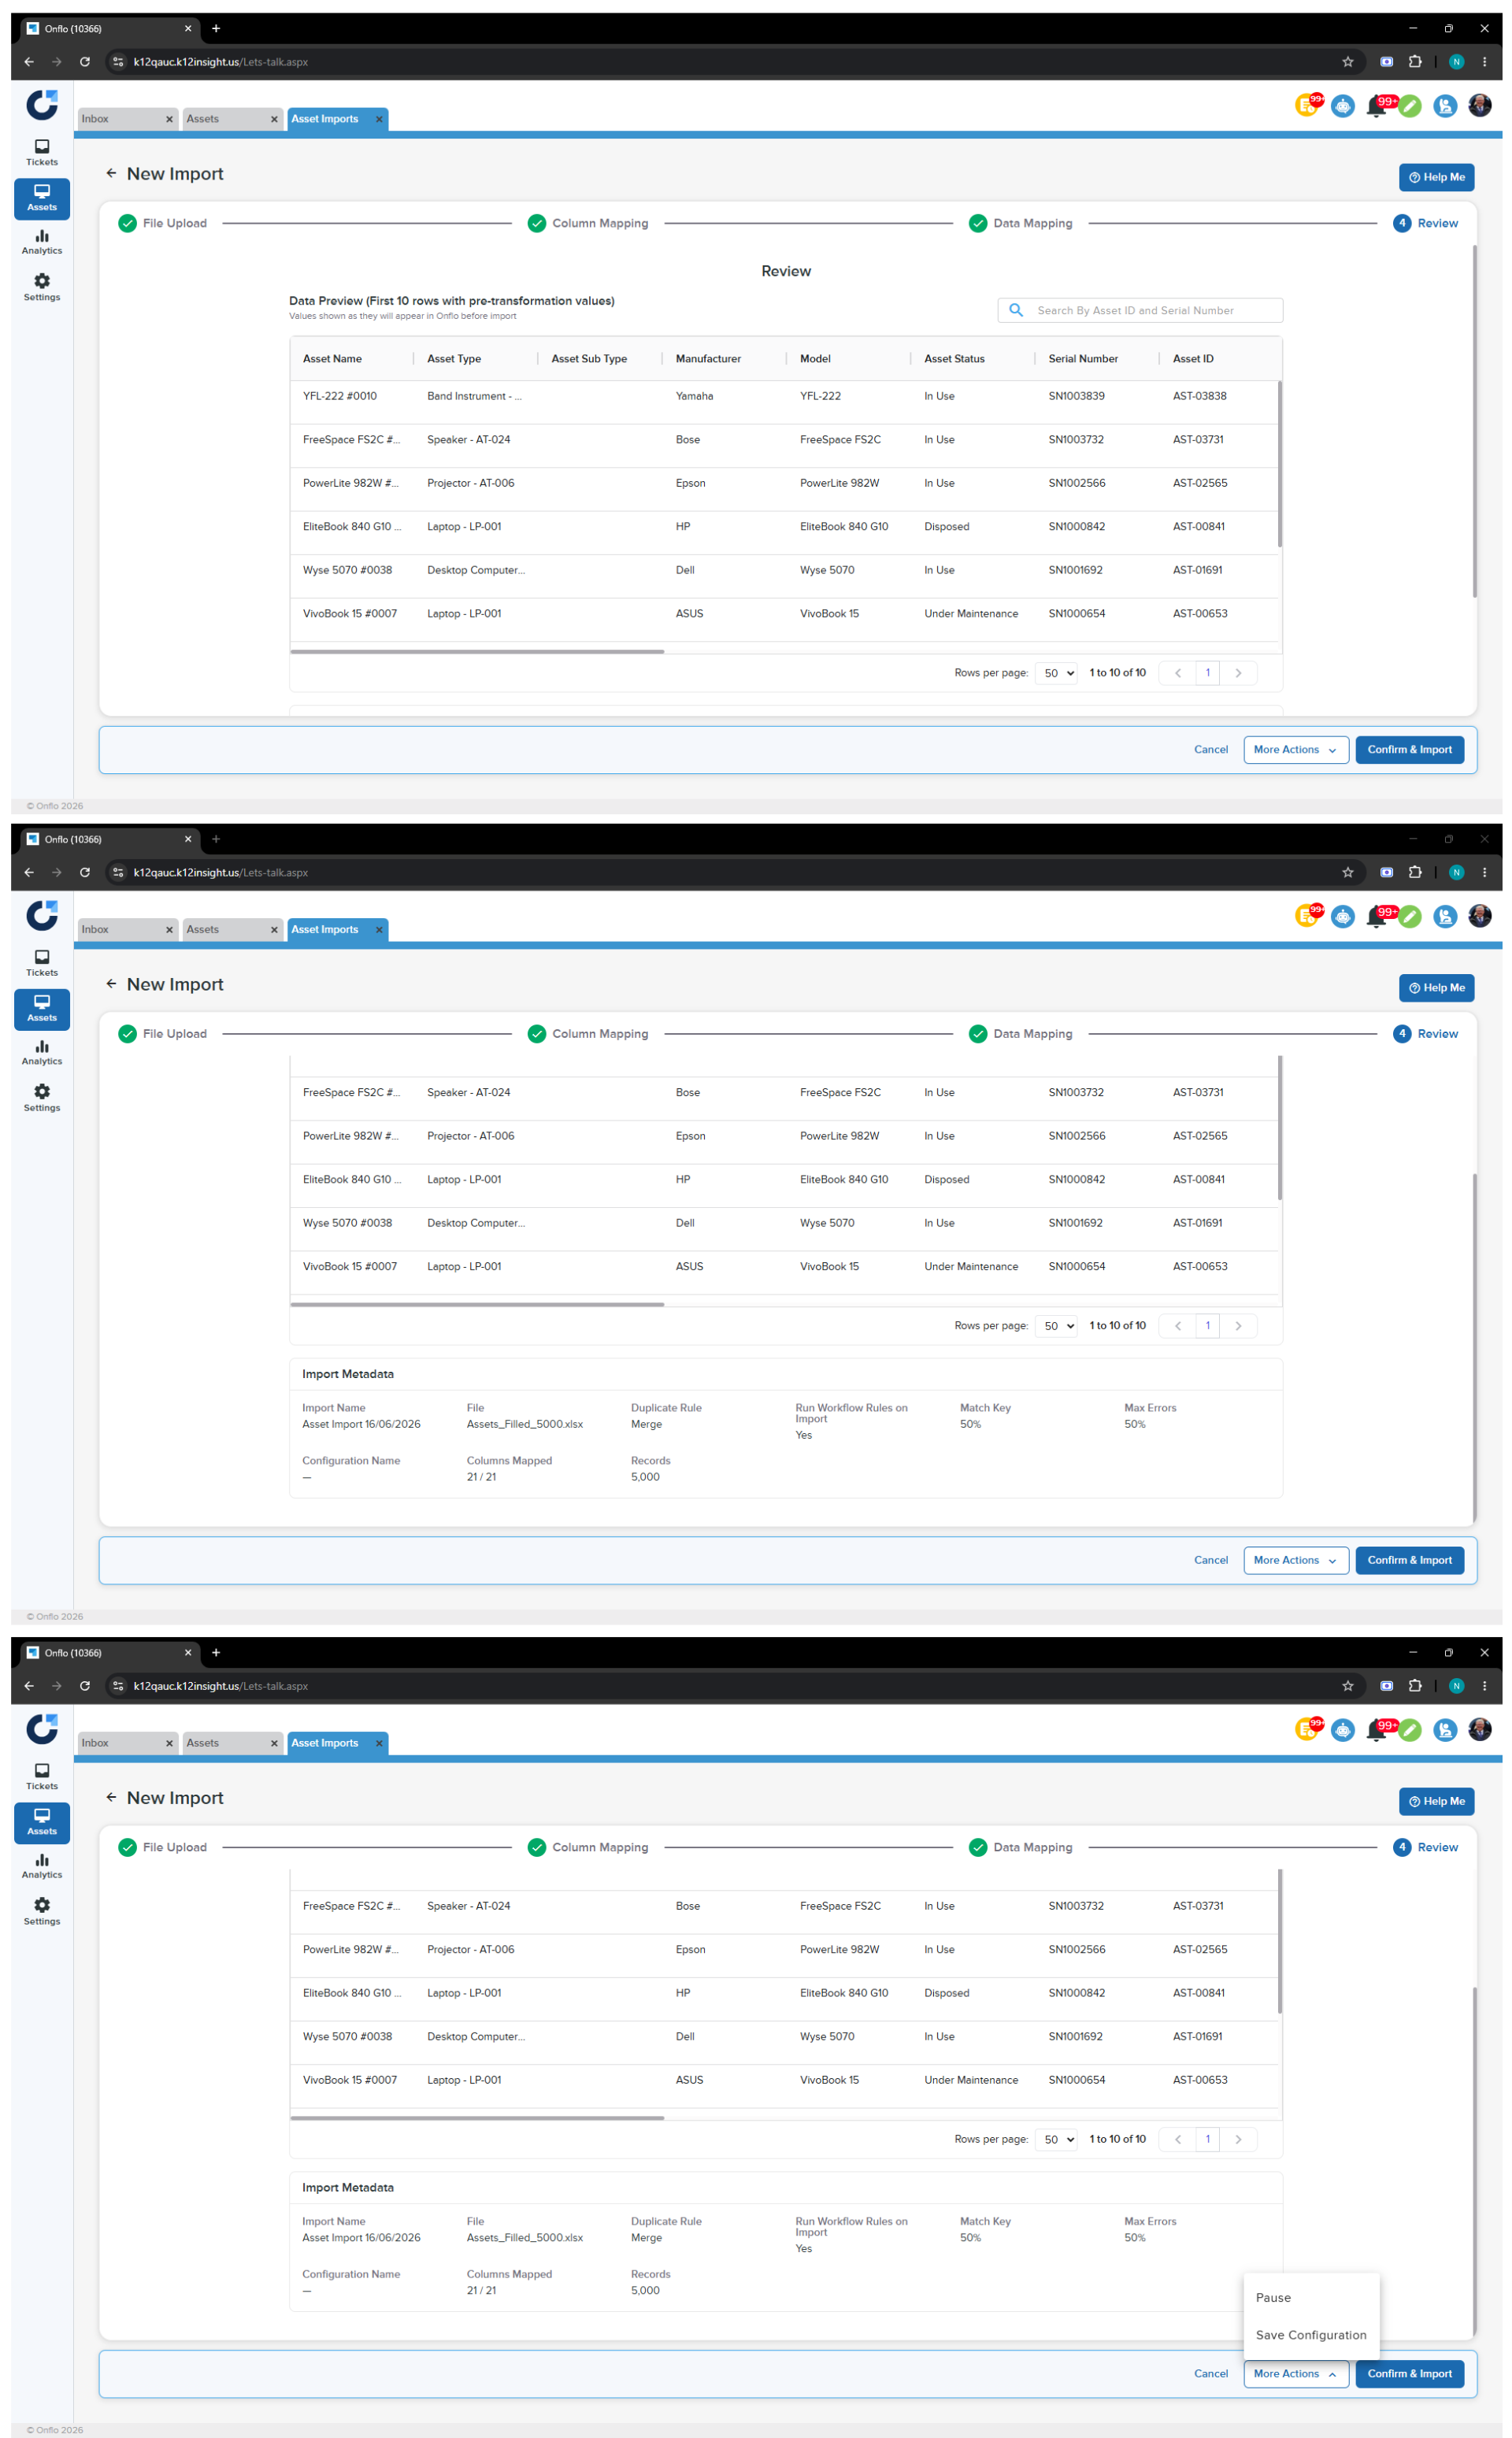
- Check the Data Preview — values shown as they will appear in Onflo before import. Watch for misaligned columns or unexpected blanks.
- Use Search By Asset ID and Serial Number to spot-check a specific record.
- Review the Import Metadata block: Import Name, File, Duplicate Rule, Run Workflow Rules on Import, Match Key, Max Errors, Configuration Name, Columns Mapped, and Records.
- Optionally open More Actions ▾ to Pause the import or Save Configuration (saves your current rules and mappings for reuse — see Section 3).
- Click Confirm & Import to begin processing immediately.
After the import
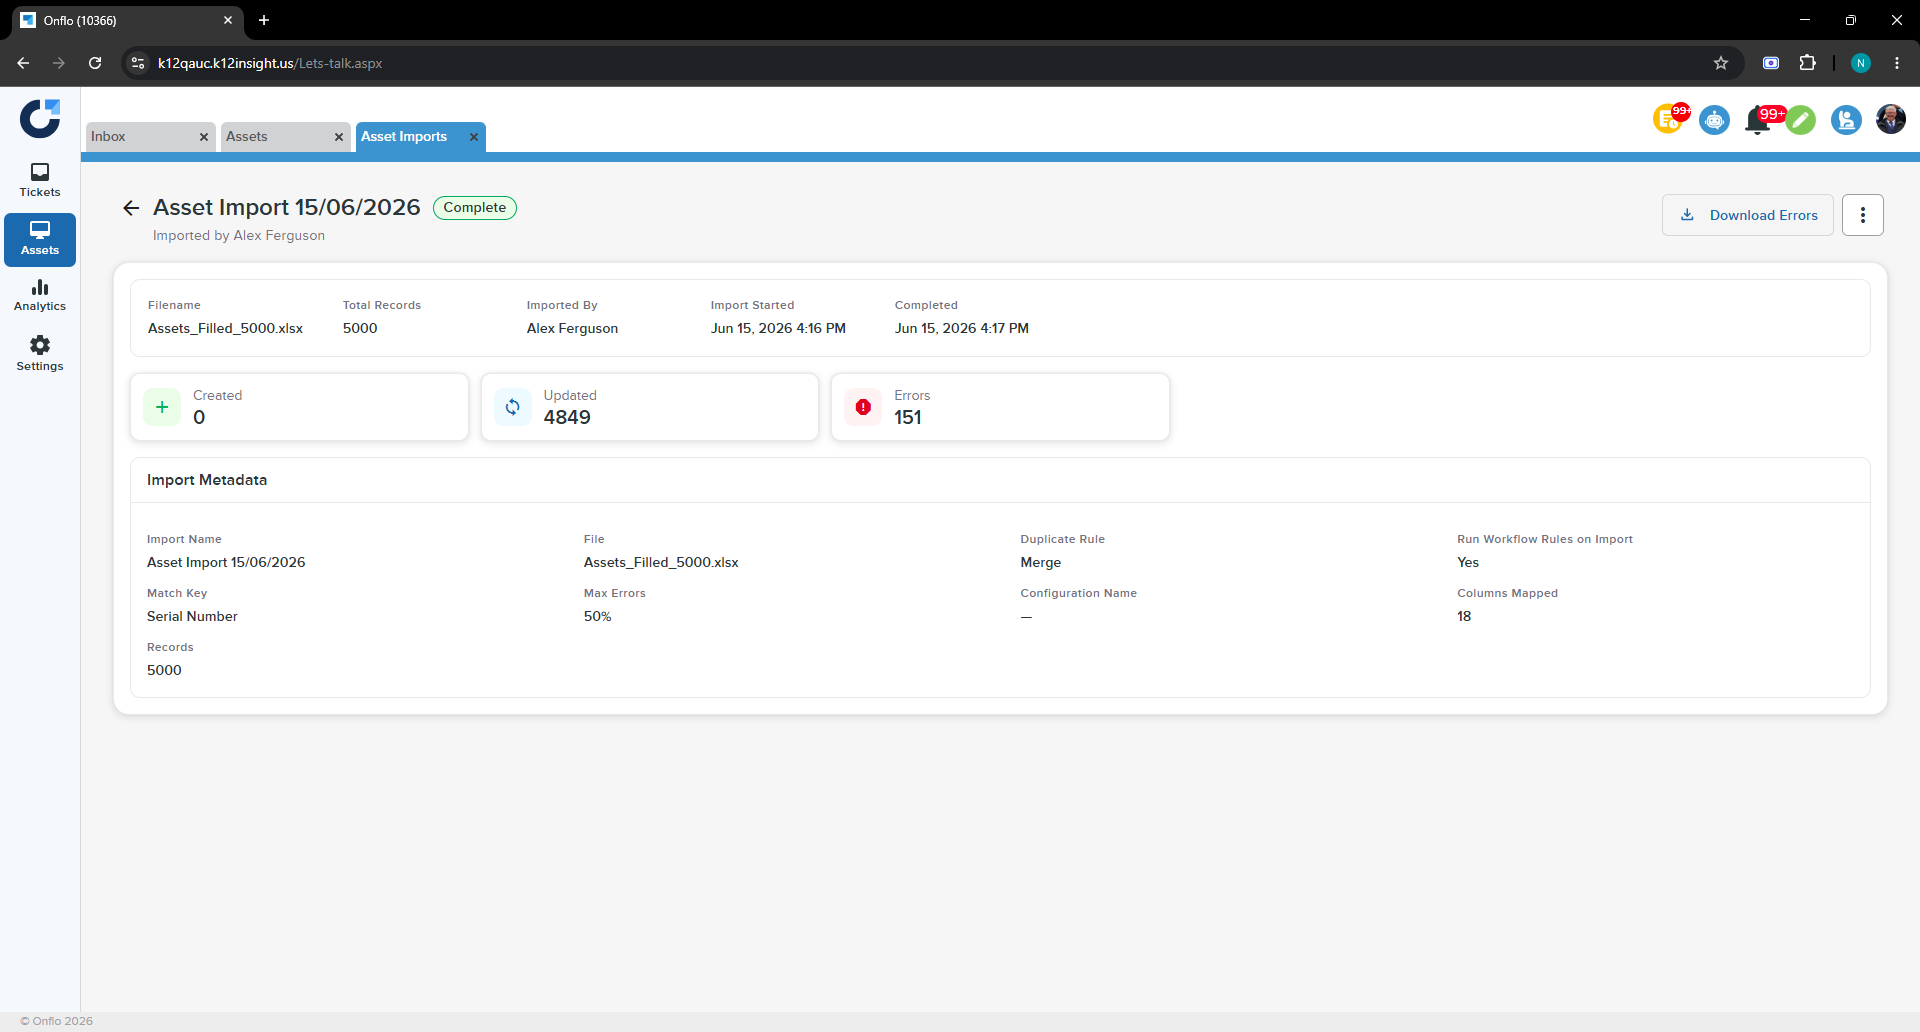
When the import finishes, its row in Import History shows a status of Complete (or Failed if it could not finish). Opening the import shows the Import Details page with three stat cards — Created, Updated, and Errors — alongside the full Import Metadata.
Example: reading the result
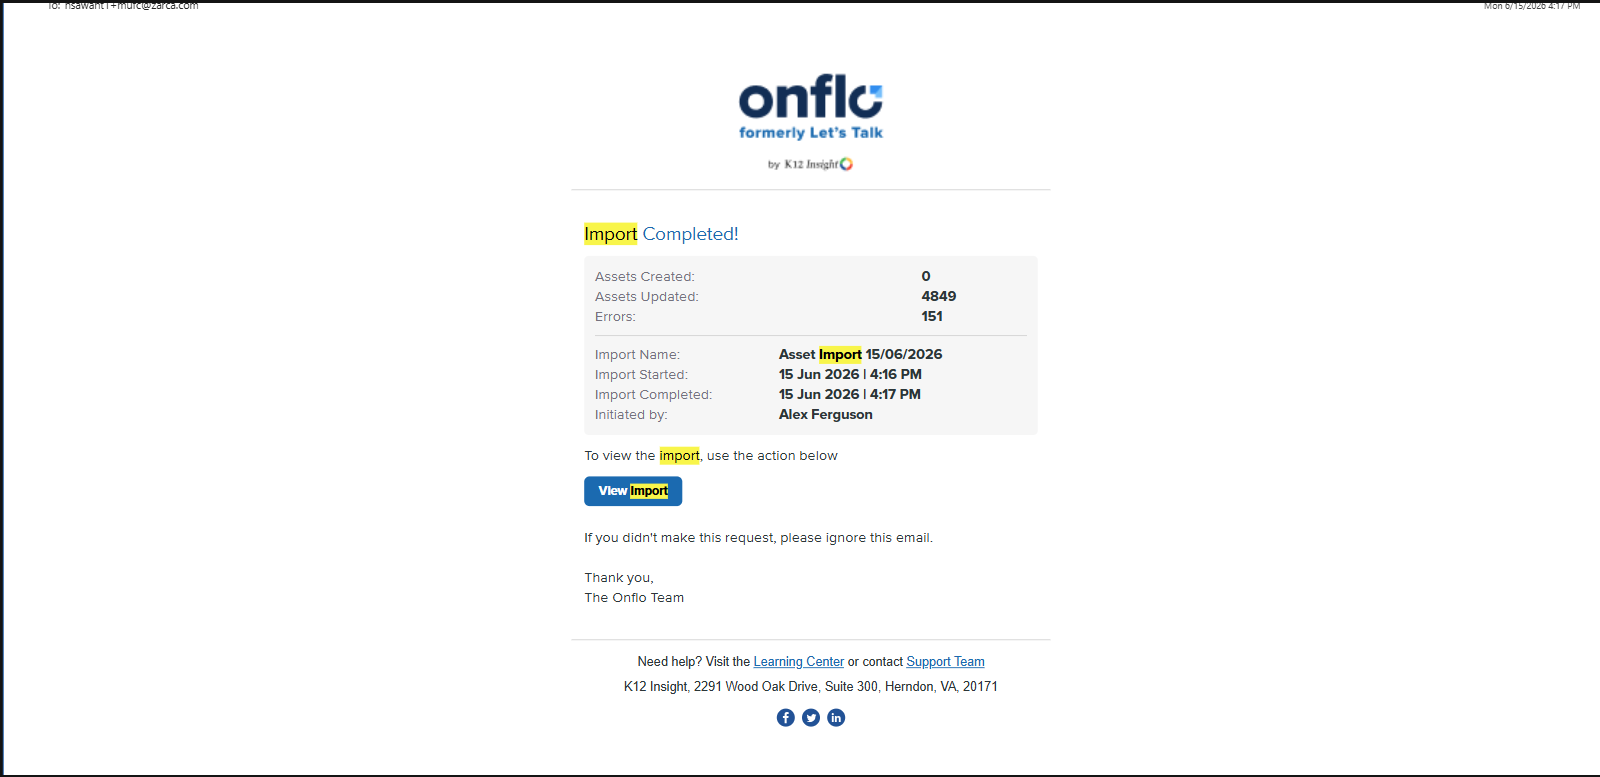
An import of 5,000 records that shows Created 0, Updated 4,849, Errors 151 means every matched asset was updated (none were new) and 151 rows could not be processed. Use Download Errors (top right of Import Details) to get the list of failed rows and the reason for each.
Onflo also emails the person who started the import a confirmation that includes Assets Created, Assets Updated, Errors, and a View Import button.
FAQ
Is choosing a configuration required?
No. A configuration is optional and simply pre-fills your rules and mappings. You can leave it as “— No Configuration —” and map everything manually.
What’s the difference between Merge and Overwrite?
Merge only updates the fields that have a value in your file, leaving everything else as-is. Overwrite replaces every mapped field, including ones left blank in your file.
What does the Match Key control?
It decides how Onflo recognizes an existing asset. If the Match Key is wrong, you’ll usually see it on the results — everything created (nothing matched) or everything updated (everything matched).
Can I pause and finish later?
Yes. Use Pause (in the footer or under More Actions). The import is saved as a draft and appears with a Paused status in Import History with a Continue action to resume it.
Where do errors go?
Failed rows are counted on the Import Details page and can be exported with Download Errors.
Troubleshooting
- Import shows Failed — open it from Import History and use Download Errors to see why rows failed; fix the file and re-import.
- “That doesn’t look like a valid link” — the cloud URL is malformed or not shared. Confirm sharing is set to “Anyone with the link can view” and re-paste.
- Import stopped early — you likely hit the Max errors before aborting threshold. Review the failed rows, then raise the threshold or clean the data.
- Continue button is disabled on Step 1 — no file is uploaded or no valid URL is connected yet.
- A required field can’t be left unmapped — Asset Name, Asset Type, Manufacturer, and Model must each be mapped to a column before you can continue.
Saved Configuration
Apply a saved configuration to speed up imports.
Overview
A configuration is a reusable bundle of import settings. Applying one during an import pre-fills the rules and mappings so you don’t repeat the same setup every time. A configuration includes the Import Rules (Match Key, Duplicate Rule, Run Workflow Rules, Max Errors), the Column Mappings (and any transforms), and the Data Mappings. It does not include the file itself or the file/URL — you still upload fresh data each time.
Key features
- Pre-fills your import. Rules, column mappings, transforms, and data mappings arrive ready to use.
- Reduces repeat work: ideal for recurring imports that always share the same file structure.
- Still editable: anything a configuration fills in can be adjusted before you import.
- Selected at upload: chosen from the dropdown on Step 1 of the import wizard.
Prerequisites
- At least one saved configuration with a status of Active (created via the Configuration Wizard — see Section 3).
- A data file whose structure matches what the configuration expects.
Step-by-step
- From Asset Imports → Import History, click New Import.
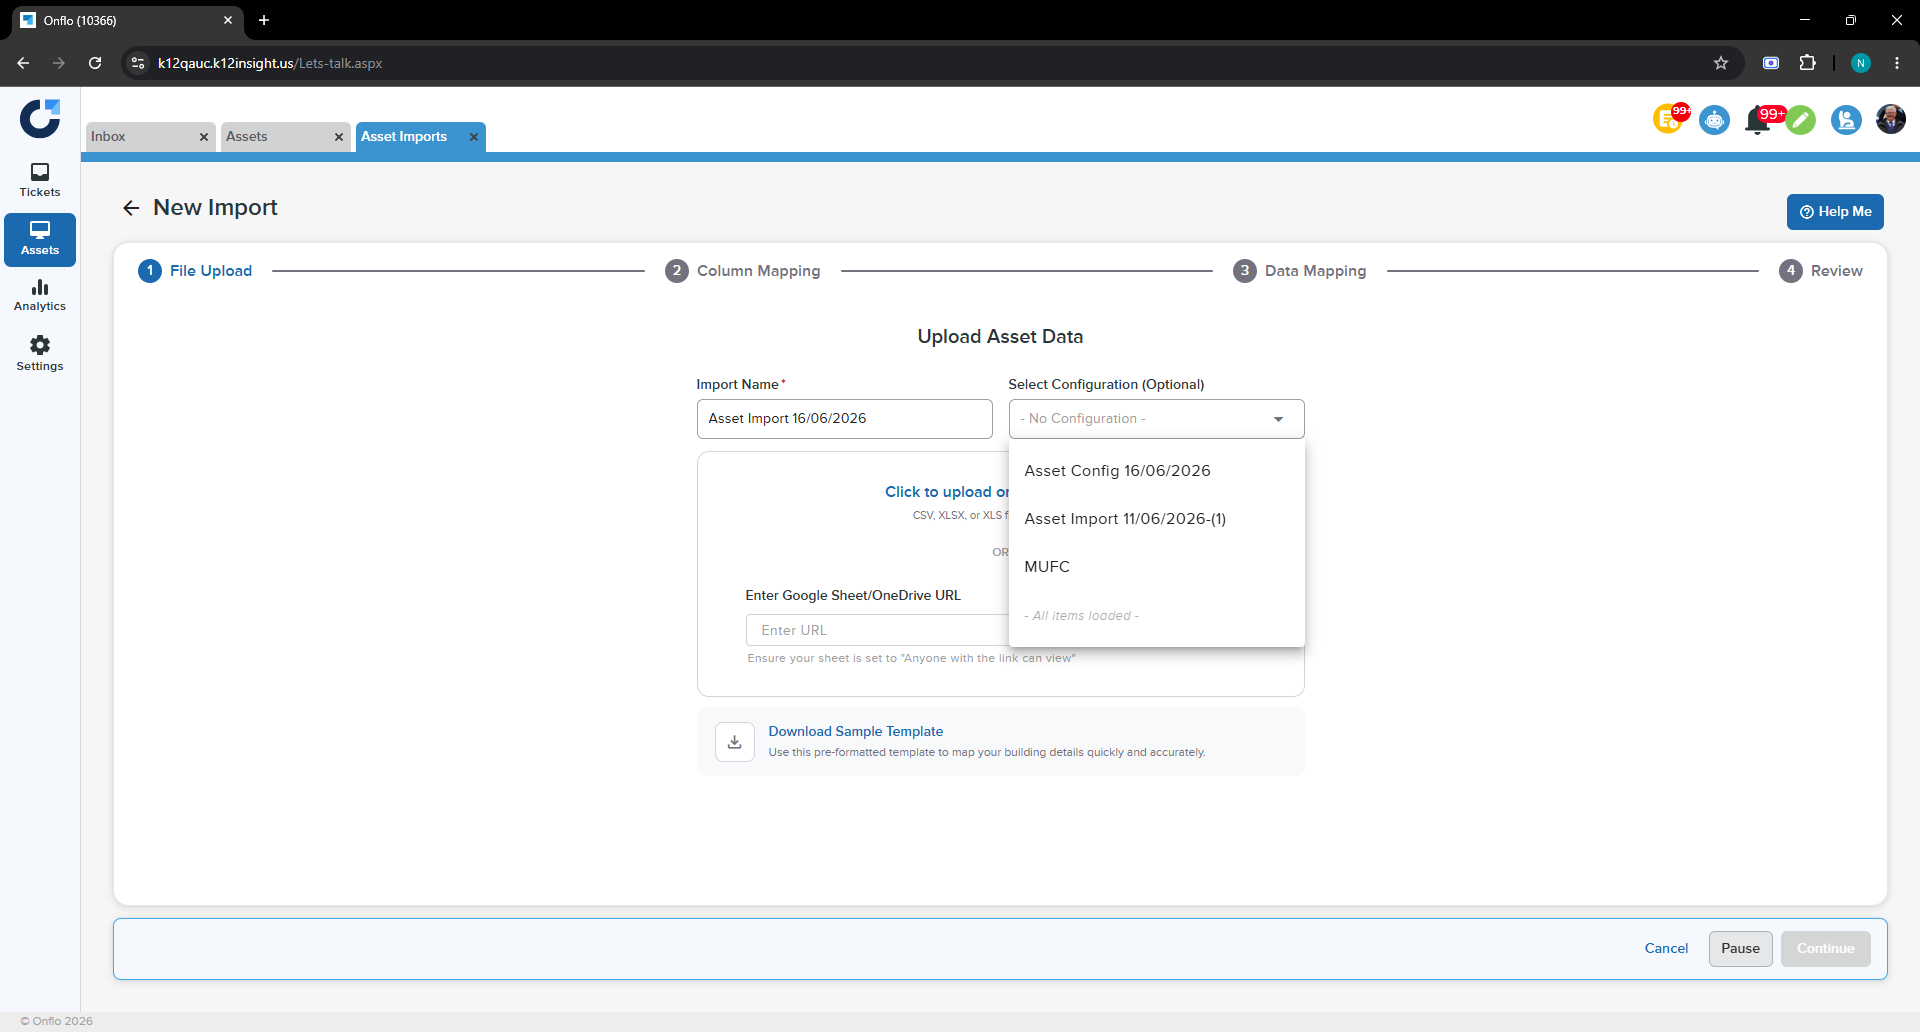
- Open the Select Configuration (Optional) dropdown.
- Choose a saved configuration from the list (for example, “Asset Import 11/06/2026-(1)” or “MUFC”).
- Upload your file or paste a cloud URL as usual, then click Continue.
Step 5: Mapping
- On Column Mapping and Data Mapping, the rules and mappings are already filled in from the configuration. Review them and adjust anything specific to this file.
Step 6: Review & Confirm
- Continue to Review and Confirm & Import.
Example
If you import the same warehouse spreadsheet every month, save its setup once as a configuration. Next month, pick it from the dropdown on Step 1 — your Match Key, Merge rule, column mappings, and value mappings are all restored, so you only upload the new file and confirm.
FAQ
Is a configuration required to run an import?
No — it’s optional. It just saves time by pre-filling settings you’d otherwise enter by hand.
Can I still change the mappings after applying a configuration?
Yes. Everything a configuration fills in remains editable for the current import.
What does a Stale configuration mean?
Stale means the asset fields have changed since the configuration was saved, so some mappings may no longer line up. Review the mappings carefully, or edit the configuration to bring it up to date (see Section 3).
What is NOT saved in a configuration?
The data file and the file/URL. You always upload fresh data for each import.
Troubleshooting
- The configuration isn’t in the dropdown — confirm it was saved and is Active on the Configurations tab.
- The configuration shows Stale — the asset fields changed since it was saved; review the mappings or edit the configuration before relying on it.
- Mappings look wrong after applying — the uploaded file’s structure may differ from what the configuration expects; adjust the column mappings for this file.
Configuration Wizard
Create and edit reusable import configurations.
Overview
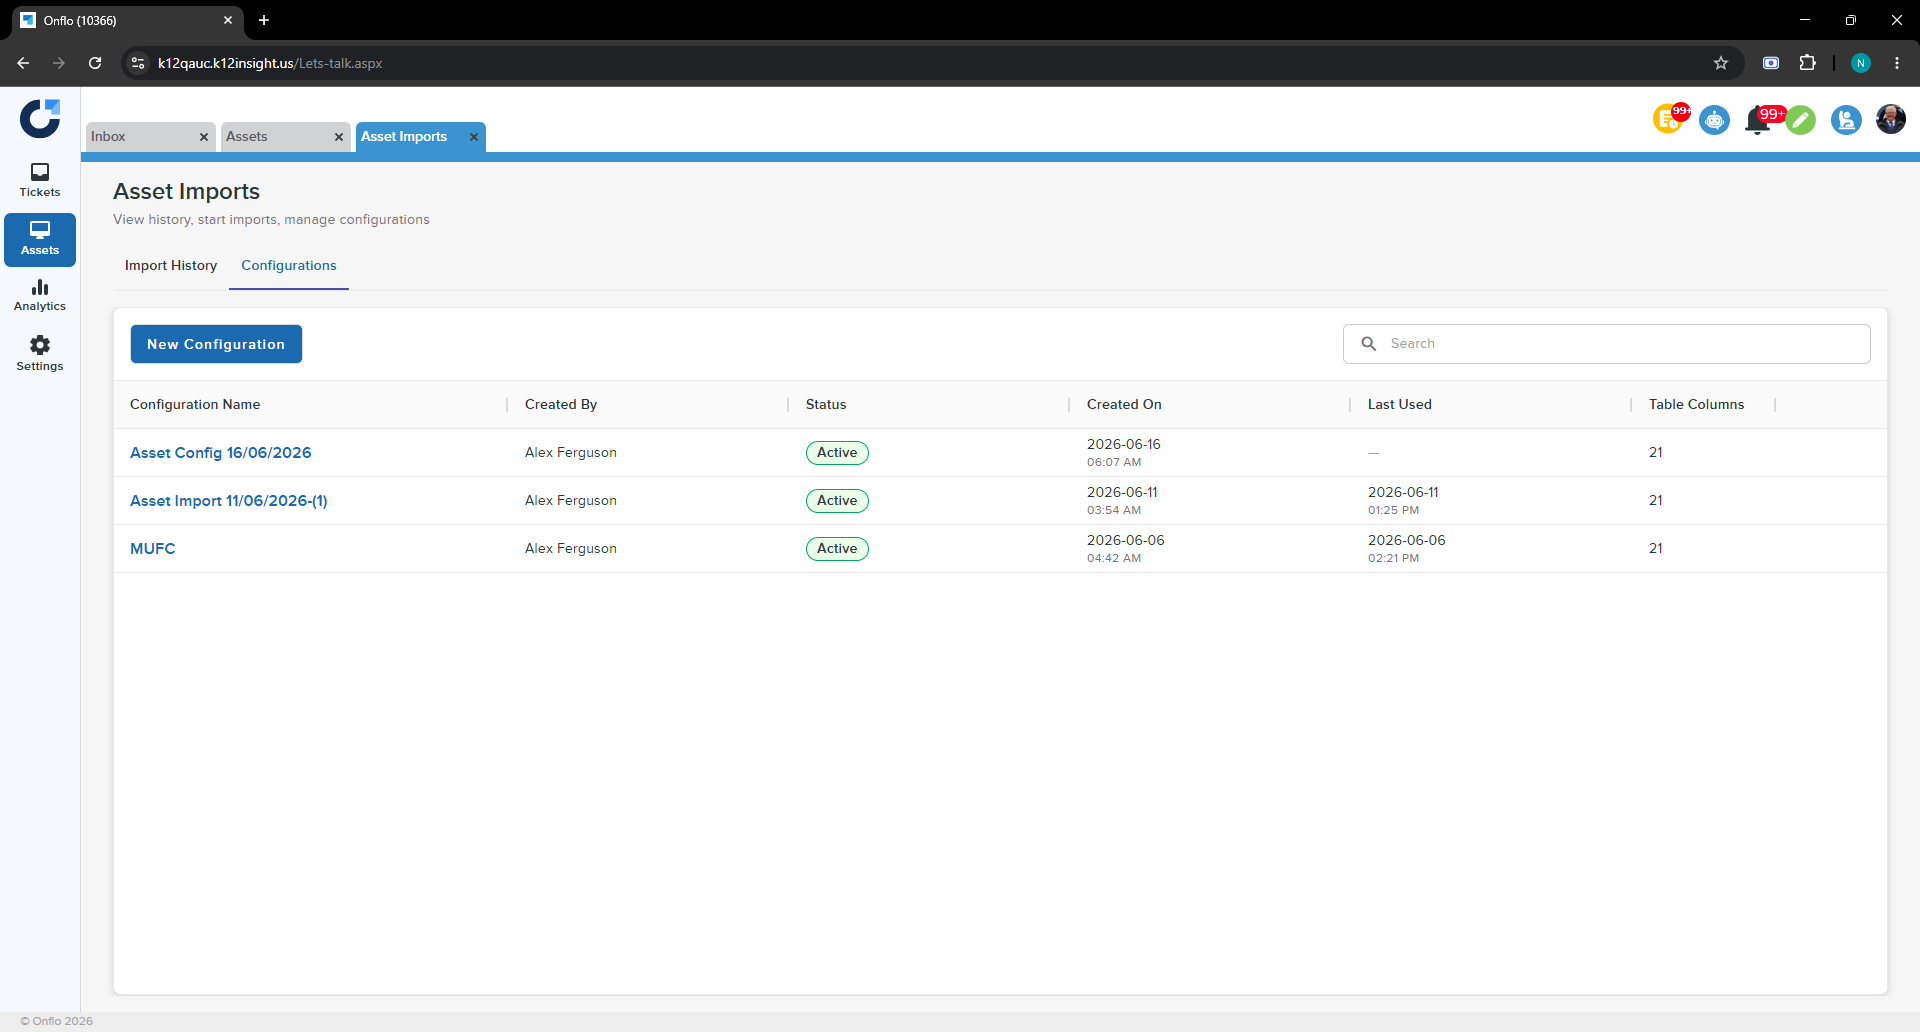
The Configuration Wizard is where you build and maintain the reusable configurations described in Section 2. Find it under Asset Imports → Configurations, where saved configurations are listed with their Created By, Status, Created On, Last Used, and Table Columns. The New Configuration button opens the wizard.
The wizard has two flows. The New flow (from New Configuration) starts mostly empty. The Edit flow (from Edit on an existing configuration) opens with every step pre-filled and is titled “Edit Configuration.” Both flows move through five steps:
- Basic Details — name and describe the configuration.
- Import Rules — set the same rules used by the import wizard.
- Column Mapping — choose which fields map to which incoming columns.
- Data Mapping — map incoming values to existing Onflo records.
- Review — confirm the summary and save.
Key Features
- Required-first mapping — the New flow’s Column Mapping starts with only the required fields; + Add Column for mapping reveals the rest.
- Relevant data types only — Data Mapping shows only the data types tied to fields you actually mapped.
- Edit flow is pre-populated — editing an existing configuration opens every step pre-filled.
- Reusable across imports — saved configurations appear in the Step 1 dropdown of the import wizard.
- Statuses — a configuration is Active (ready to use) or Stale (asset fields changed since it was saved; mappings may need review).
Prerequisites
- Access to the Configurations sub-tab under Asset Imports.
- A clear idea of the field-to-column mapping you want to reuse (often easiest to base on a real file you import regularly).
Step-by-step
Step 1: Basic Details
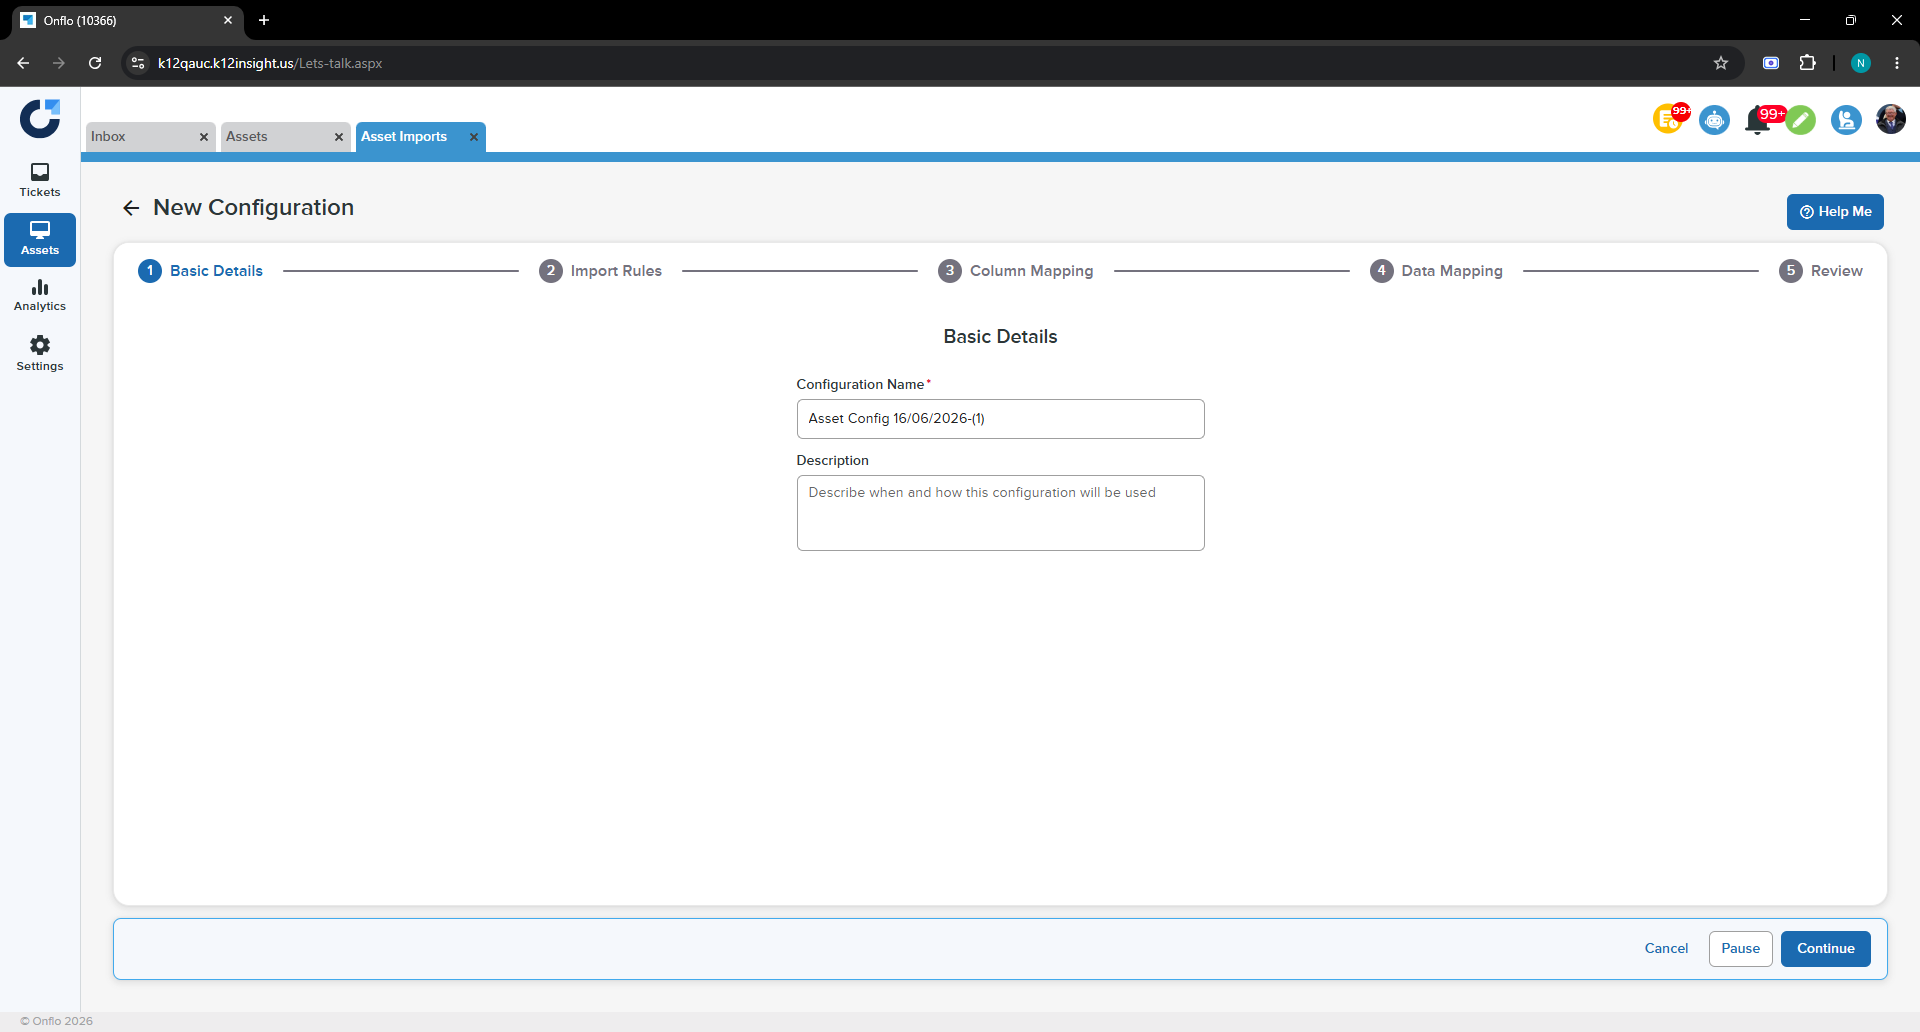
- Enter a Configuration Name (required). Onflo defaults it to “Asset Config [today’s date].”
- Optionally add a Description explaining when and how this configuration should be used.
- Click Continue.
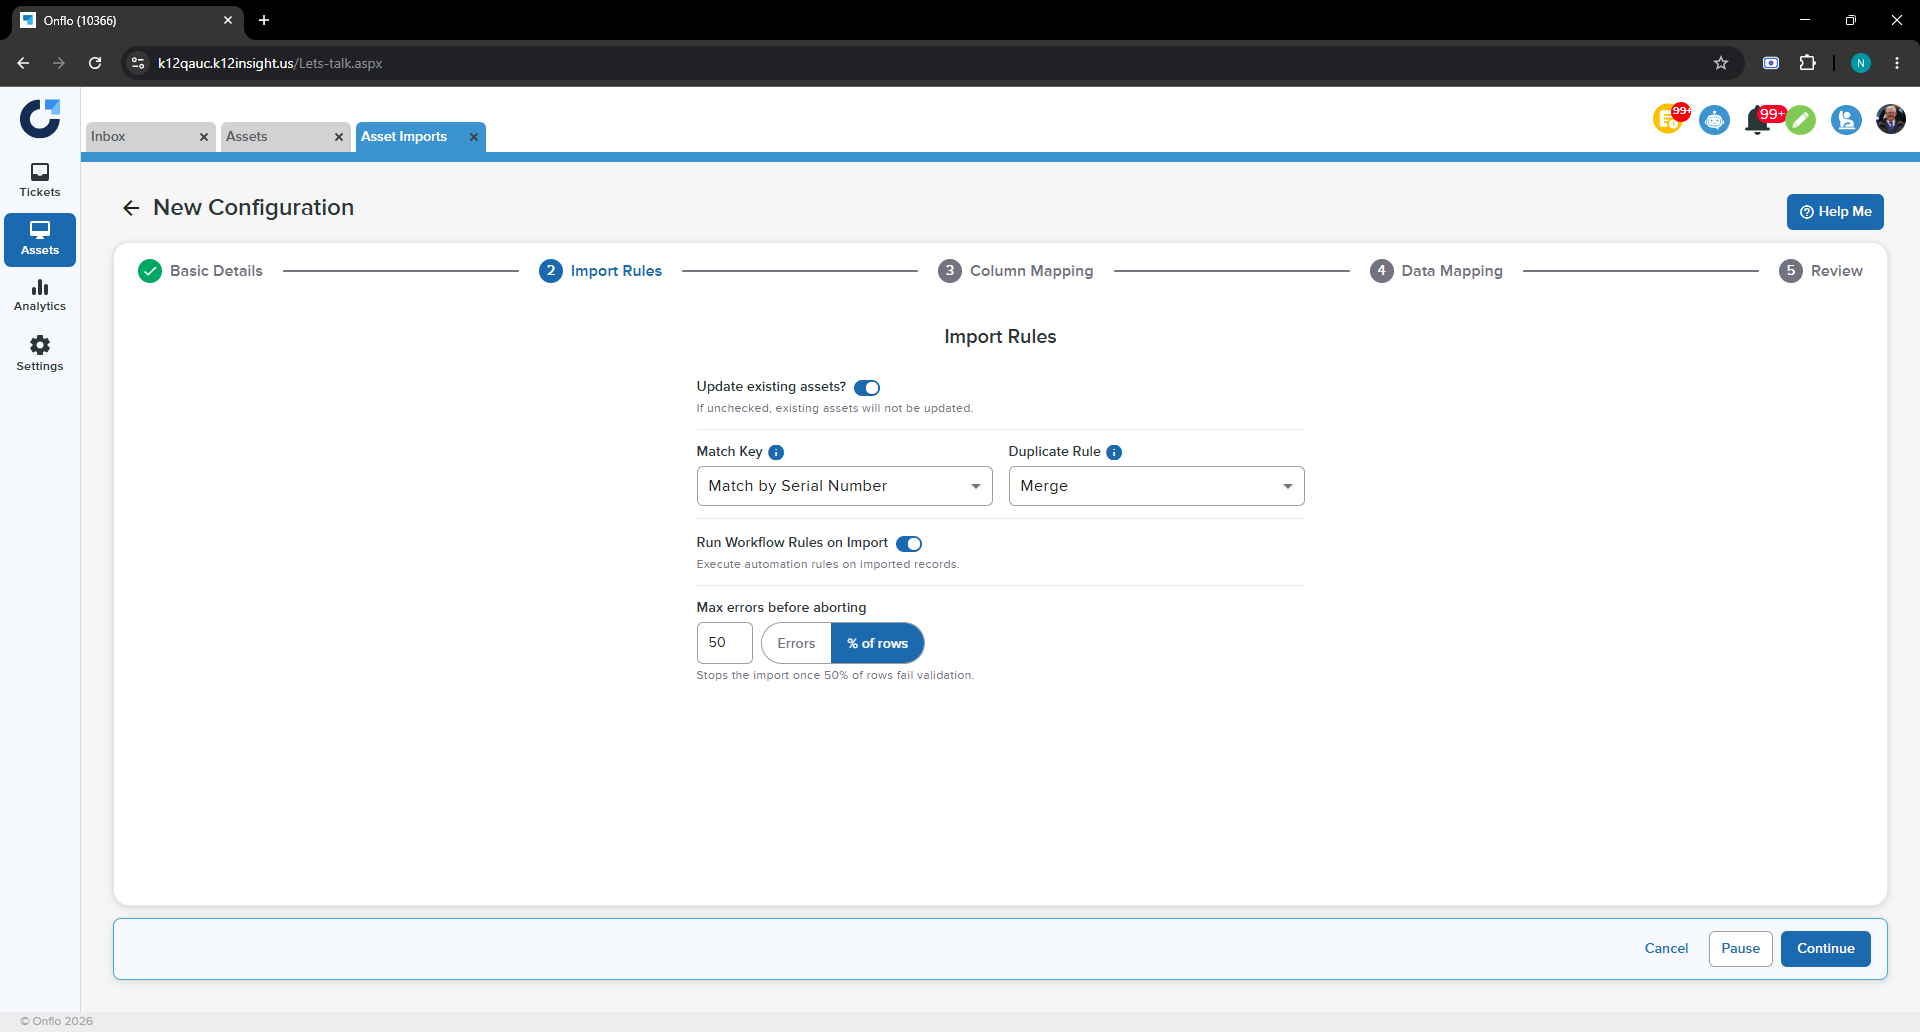
Step 2: Import Rules
- Set Update existing assets? on or off.
- Choose the Match Key: Match by Serial Number, Match by Asset ID, or Match by Serial Number and Asset ID.
- Choose the Duplicate Rule (Merge or Overwrite).
- Set Max errors before aborting with the Errors / % of rows toggle.
- Click Continue.
Step 3: Column Mapping
In the New flow this table starts with only the required fields. Click + Add Column for mapping to add any other field you want the configuration to handle. Required-field rows are locked and cannot be removed. The Transform column behaves exactly as in the import wizard (Text fields only).
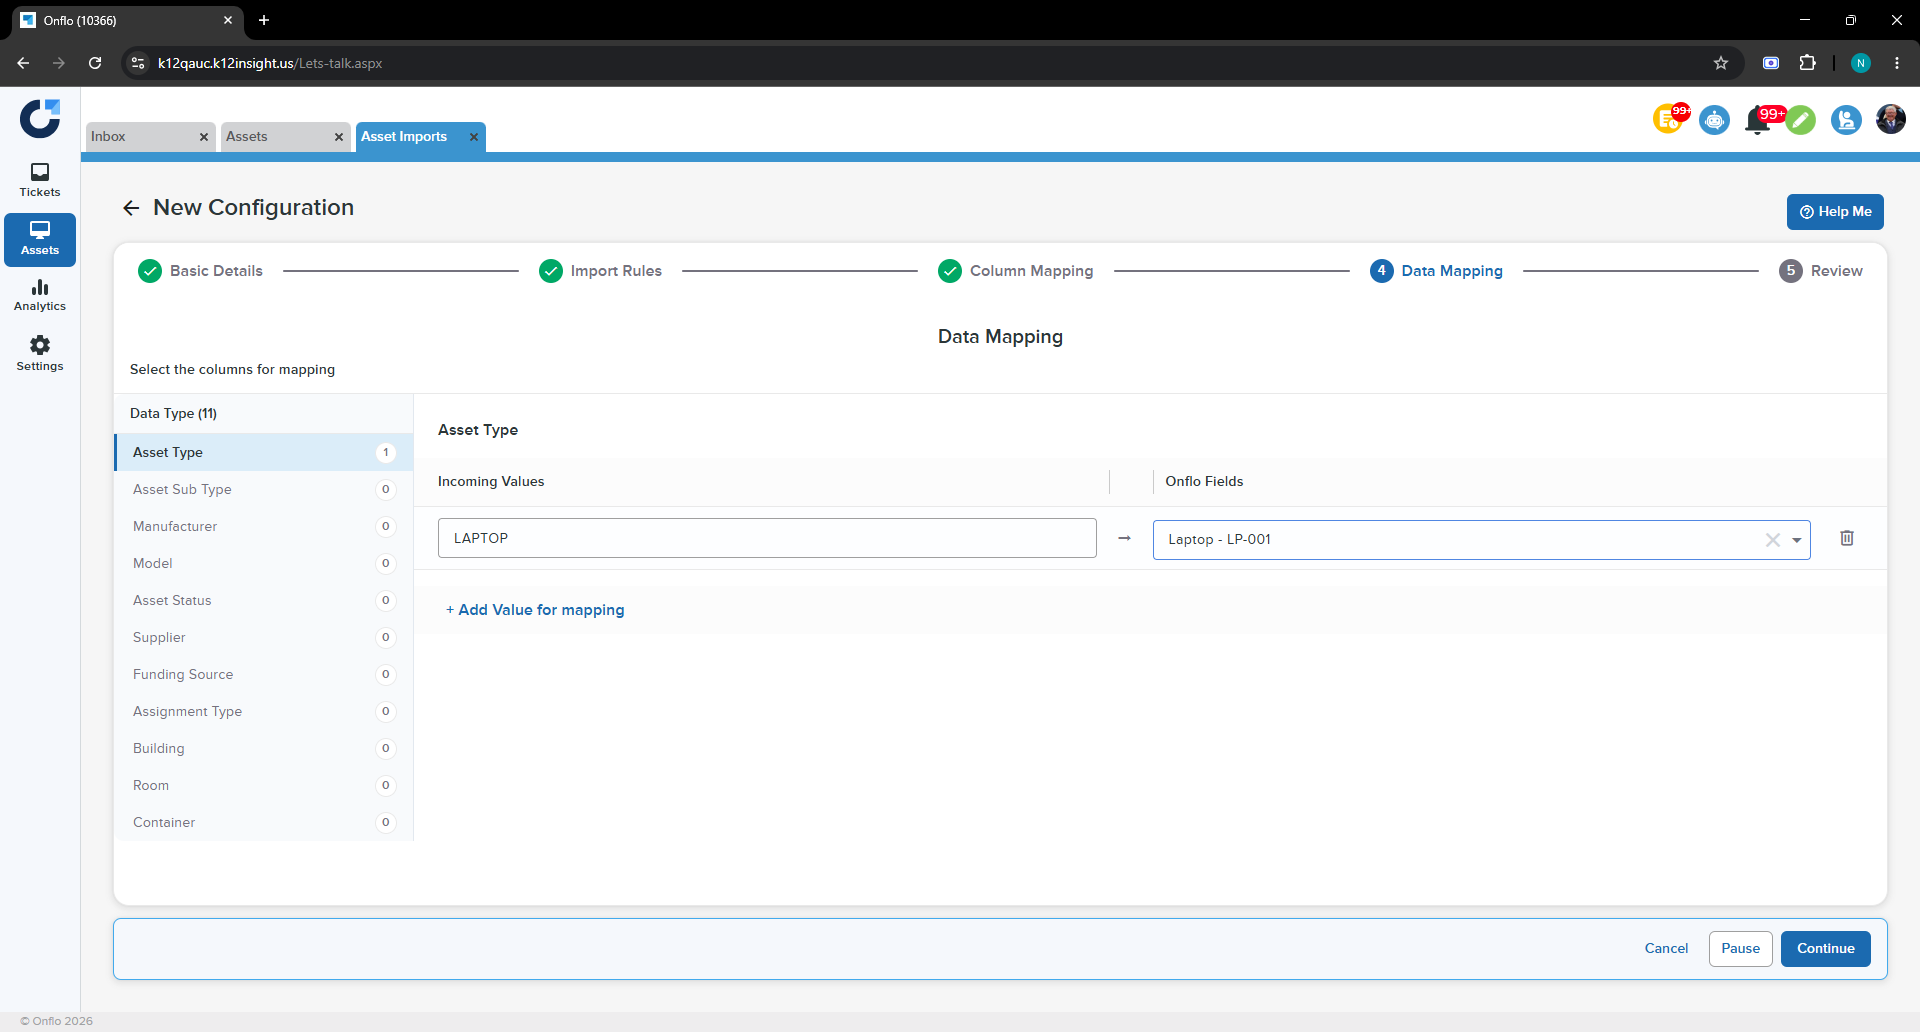
Step 4: Data Mapping
Data Mapping uses a two-pane layout. The left pane lists the data types relevant to the fields you mapped (Asset Type, Asset Sub Type, Manufacturer, Model, and so on), each with a count. On the right, add a mapping row by entering an Incoming value and choosing the matching Onflo record under Pick a target value; use + Add Value for mapping for additional rows.
Example
If your files label laptops as “Notebook,” add a row mapping the incoming value “Notebook” to the Onflo target “Laptop - LP-001,” so future imports translate it automatically.
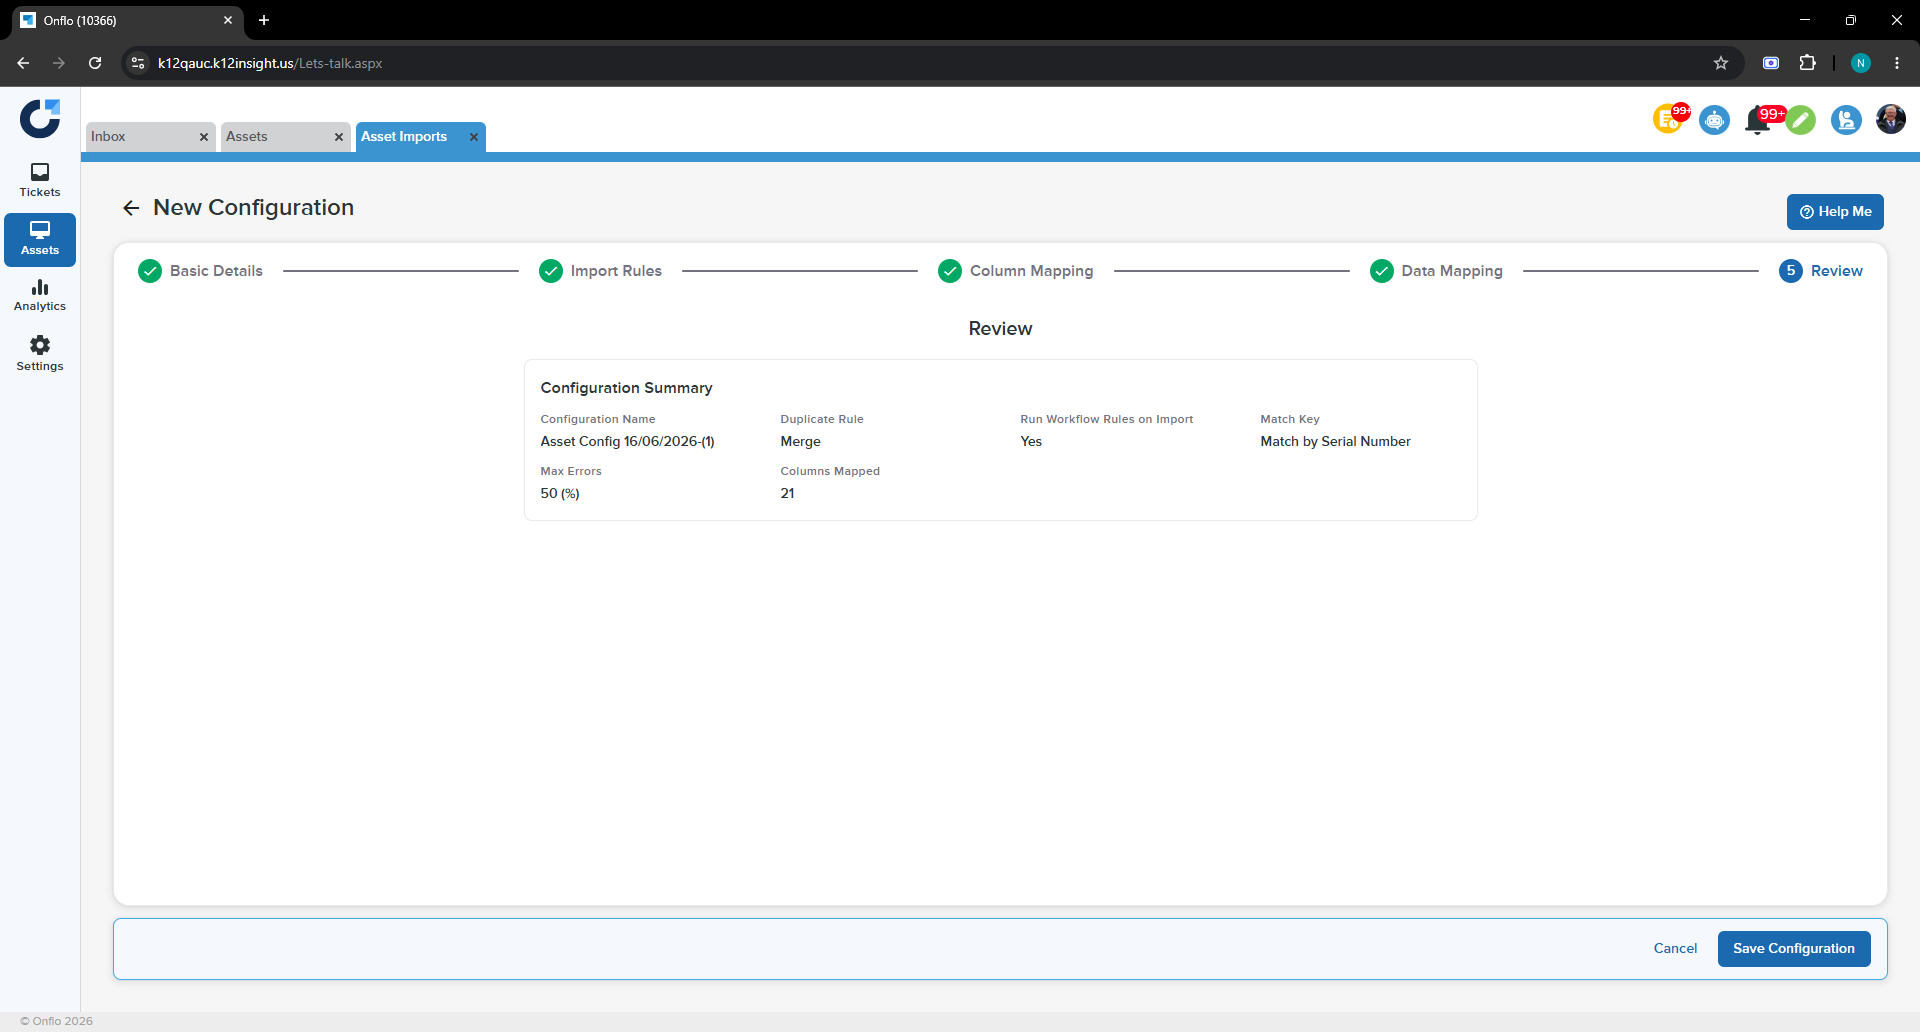
Step 5: Review
- Check the Configuration Summary: Configuration Name, Duplicate Rule, Run Workflow Rules on Import, Match Key, Max Errors, and Columns Mapped.
- Click Save Configuration. It then appears on the Configurations tab and in the import wizard’s configuration dropdown.
FAQ
What’s the difference between the New and Edit flows?
New starts mostly empty and shows only required fields first. Edit opens an existing configuration with every step pre-filled and is titled “Edit Configuration.”
Why do only the required fields show at first?
To keep the New flow simple. Use + Add Column for mapping to bring in any additional fields you need.
What does Stale mean and how do I fix it?
Stale means the asset fields changed since the configuration was saved, so its mappings may be out of date. Open the configuration with Edit, review the affected mappings, and save again.
Where is a saved configuration used?
In the import wizard — it appears in the Select Configuration dropdown on Step 1 (see Section 2).
Troubleshooting
- Can’t save the configuration — the Configuration Name is required; make sure Step 1 has a name.
- Configuration shows Stale — asset fields changed since it was saved; edit it to review and refresh the mappings.
- Can’t remove a field row in Column Mapping — required fields are locked and cannot be deleted; only added (optional) fields can be removed.