Automatically send Onflo ticket and asset information to your other business systems.
Overview
Webhooks let Onflo automatically send information to another system the moment something happens. When a ticket is created or an asset is added, Onflo can instantly push the details you choose - the subject, the description, the asset ID - into a system such as Salesforce, a Microsoft Teams channel, or an internal application. Nobody has to copy and paste anything.
Setting this up is a two-part job, and this guide follows that order:
1: Create the webhook in Settings.
This is where you tell Onflo the address of the other system and how to talk to it.
2: Use the webhook in a workflow.
This is where you decide when it fires (for example, whenever a new ticket is created) and what information gets sent.
Think of a webhook as an automatic phone call between two systems.
Imagine you have a colleague in another department who needs to know every time a new ticket comes in. Today, you have to remember to email them. A webhook is like giving Onflo their phone number and a script, and saying: “Every time a new ticket is created, call this number and read out the ticket subject and description.” Onflo makes the call instantly, every time, without being reminded.
The phone number is the Endpoint URL. The script is the information you choose to send. The “every time a new ticket is created” part is the workflow trigger.
Key Terms
Every field on the webhook screen uses one of these terms, so it is worth reading this section once before you start. You do not need any technical background to follow it.
Endpoint URL
The web address of the system that should receive the information. It always starts with https://.
Example: https://webhook.site/4b74c0ba-5b80--8e55-3ca683653317. Think of it as the delivery address on a parcel - Onflo needs to know exactly where to send the data. The other system’s administrator or vendor gives you this address; you never invent it yourself.
Request Method
How the delivery should be made. Onflo offers two options: POST and PUT.
POST means “here is something new, please add it.” Use this when each Onflo event should create a new record on the other side - for example, a new case in Salesforce for every new ticket. This can also be used to update data in other systems.
PUT means “here is the latest version, please save it.” Use this when the other system should update an existing record instead of creating another one.
If you are not sure which to pick, ask the team that owns the receiving system. They will know which one their address expects. Choosing the wrong one usually results in an error rather than duplicate data.
Request Format
The language the information is written in. All three options carry exactly the same content - they just arrange it differently, and the receiving system will only understand one of them.
JSON - the most common format used by modern systems. Choose this unless you have been told otherwise.
XML - an older format still used by some enterprise and finance systems.
FORM-ENCODED - the simplest format, a plain list of labels and values, like a web form being submitted.
A useful comparison: the same address can be written as an envelope, a spreadsheet row, or a line of text. The address is identical; only the packaging differs. The receiving system tells you which packaging it accepts.
Authentication
Proof that the message really is coming from you. Most systems will not accept data from a stranger, so they issue a credential first. Onflo supports four choices:
None - no proof required. Fine for testing, but rarely used for a live business system.
API Key - the receiving system gives you a Header Name and a Value, a bit like a named key and the key itself. You paste both in exactly as supplied.
Basic Authentication - a Username and Password, just like signing in to a website.
Bearer Token - a single long string of characters that acts as an all-in-one pass.
Whichever option you choose, the values are always supplied by the receiving system, never created by you. If a customer does not know their credential, they need to ask whoever administers that system.
Headers
Extra labels attached to the outside of the message, separate from the information inside it. Continuing the parcel comparison: the data you send is what is inside the box, and headers are the stickers on the outside - “Fragile”, “Department 12”, “Account 4471”. Some systems require a specific sticker before they will accept the parcel. You can add up to 5 headers, and most customers need none at all.
Placeholders
A placeholder is a fill-in-the-blank marker. Instead of typing one fixed ticket subject, you type {{ticket.subject}}, and Onflo swaps in the real subject of whichever ticket triggered the workflow.
It works exactly like a mail-merge field in a letter. You write “Dear {{name}}” once, and each printed letter shows a different real name. Ticket placeholders all begin with ticket. and asset placeholders all begin with asset. - so {{ticket.subject}} and {{asset.serialNumber}}. Onflo lists every available placeholder for you, so you never need to memorise or guess them.
Secret key
A private code Onflo attaches to every message it sends, which the receiving system can check to confirm the data genuinely came from Onflo and not from an impostor. Think of it as a wax seal on a letter. Onflo generates it automatically - you only ever need to copy it and give it to the receiving system’s technical team.
Payload
Simply the information being sent. If a colleague says “check the payload”, they mean “look at what was actually sent.”
200 OK
The receiving system’s way of saying “received, thank you.” 200 is the success code every system uses. Codes in the 400s usually mean the message was rejected - often wrong credentials or a wrong address - and codes in the 500s mean the receiving system itself had a problem.
Before you start
Collect these three things from the team that owns the receiving system before you open Onflo. Having them ready turns setup into a five-minute job.
The Endpoint URL they want Onflo to send to.
Which Request Method (POST or PUT) and Request Format (JSON, XML or FORM-ENCODED) their address expects.
Any credential required - an API key, a username and password, or a bearer token - plus any required headers.
You will also need access to Settings in Onflo, since both webhooks and workflows are configured there.
Part 1: Create a Webhook in Settings
Step 1. Open the Webhooks page
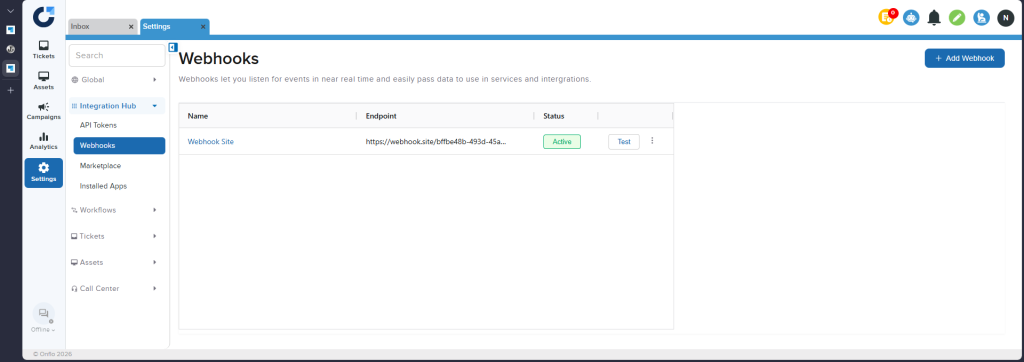
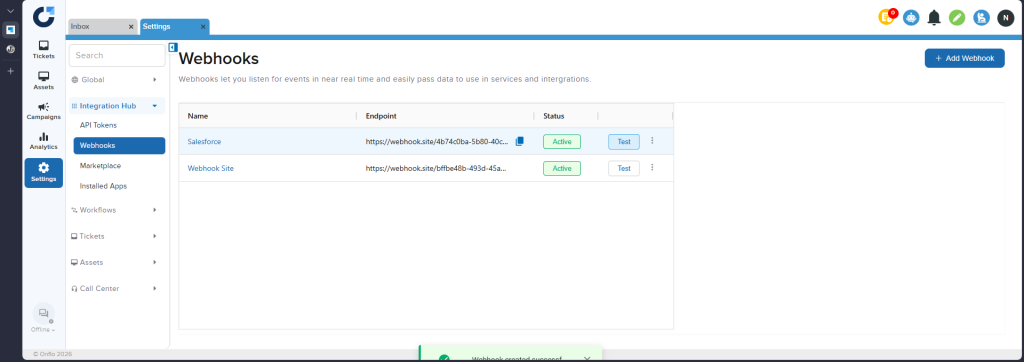
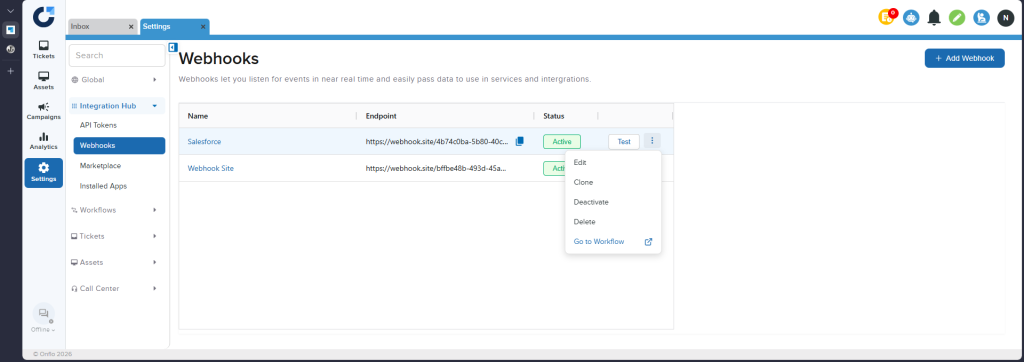
Go to Settings and, in the left-hand menu, open Integration Hub then Webhooks. This page lists every webhook in the account, with its Name, its Endpoint, its Status, and a Test button.
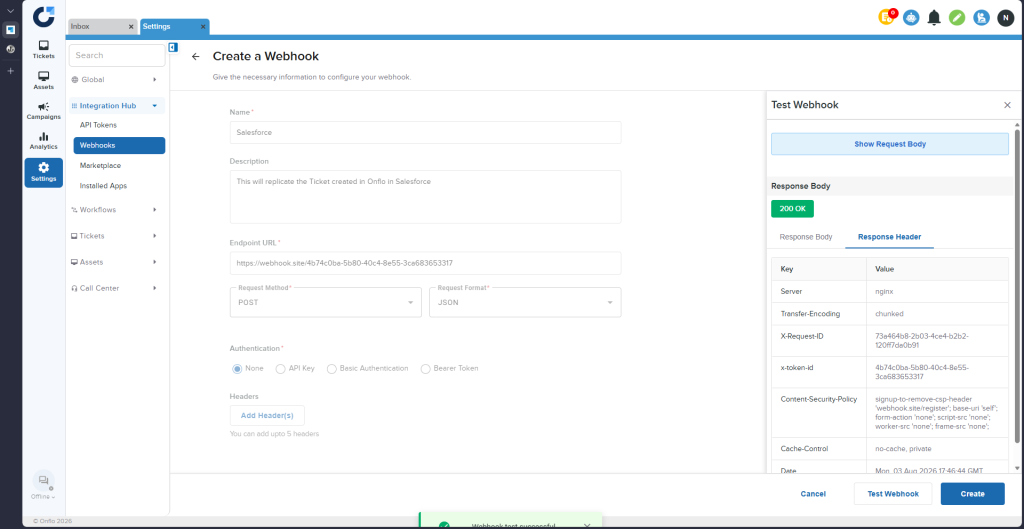
Step 2. Fill in the webhook details
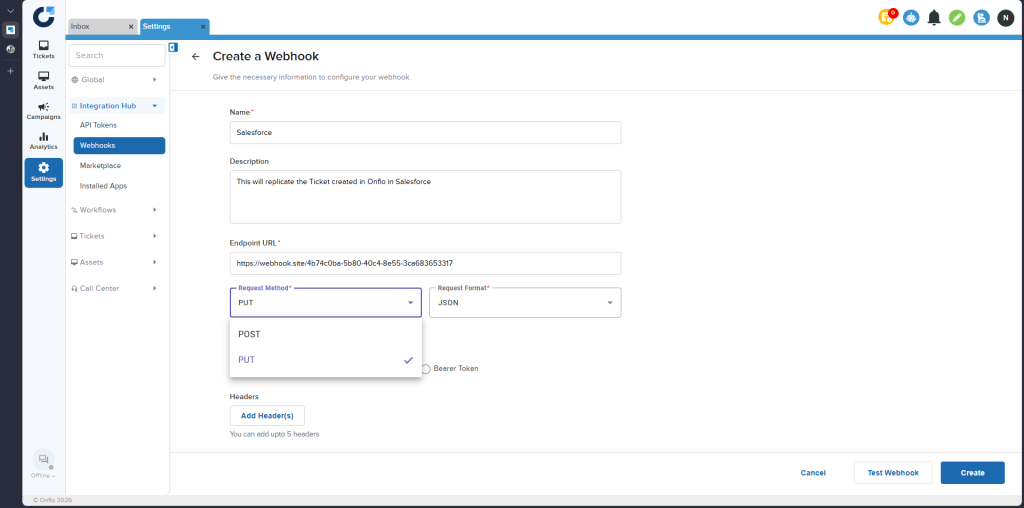
Click + Add Webhook at the top right to open the Create a Webhook screen, then complete the fields.
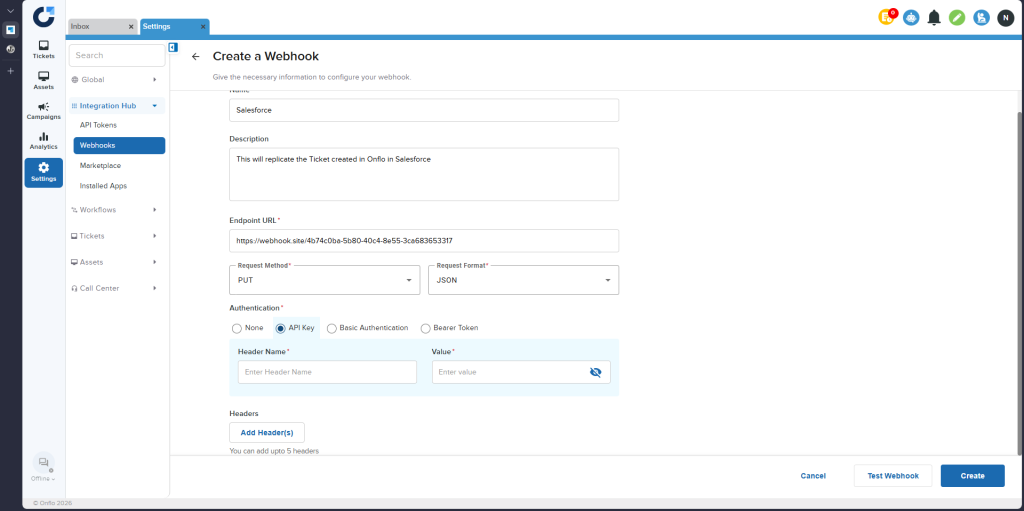
Name (required) - a short label you will recognise later. This is the name you will pick from a list when you build the workflow, so make it obvious: Salesforce, not Integration 2.
Description (optional but recommended) - one line explaining what this webhook does and why it exists, for example “This will replicate the Ticket created in Onflo in Salesforce”. Six months from now, this is the field that saves someone from guessing.
Endpoint URL (required) - paste the address supplied by the receiving system, exactly as given.
Step 3. Choose the Request Method
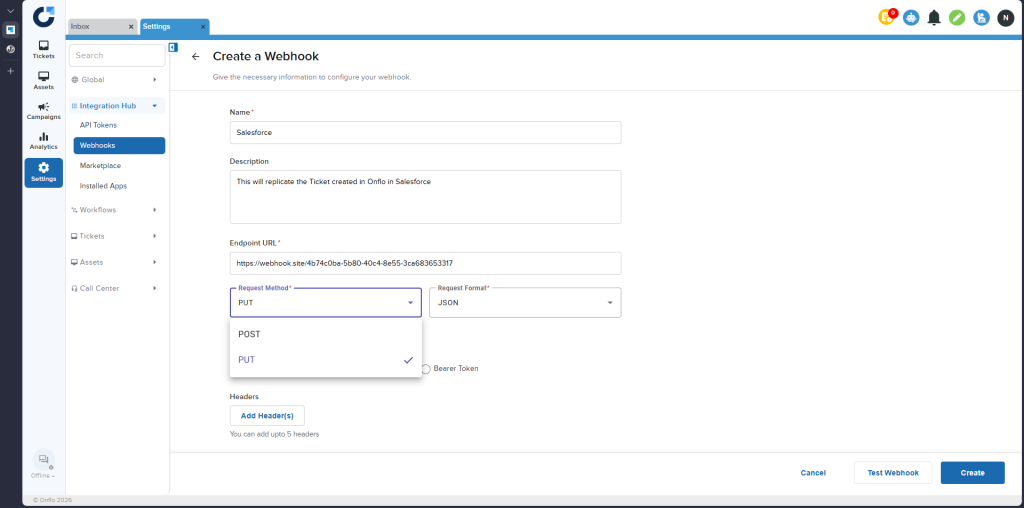
Open the Request Method list and choose POST or PUT, following the guidance in Key terms above. POST creates something new on the receiving side; PUT updates what is already there.
Step 4. Choose the Request Format
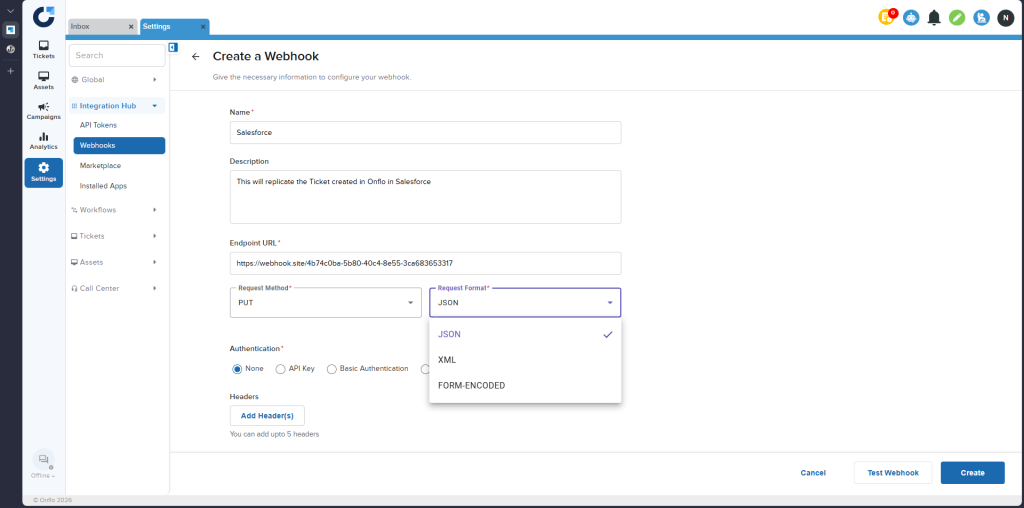
Open the Request Format list and choose JSON, XML or FORM-ENCODED. Match whatever the receiving system asked for - if nobody has specified, JSON is the safest default.
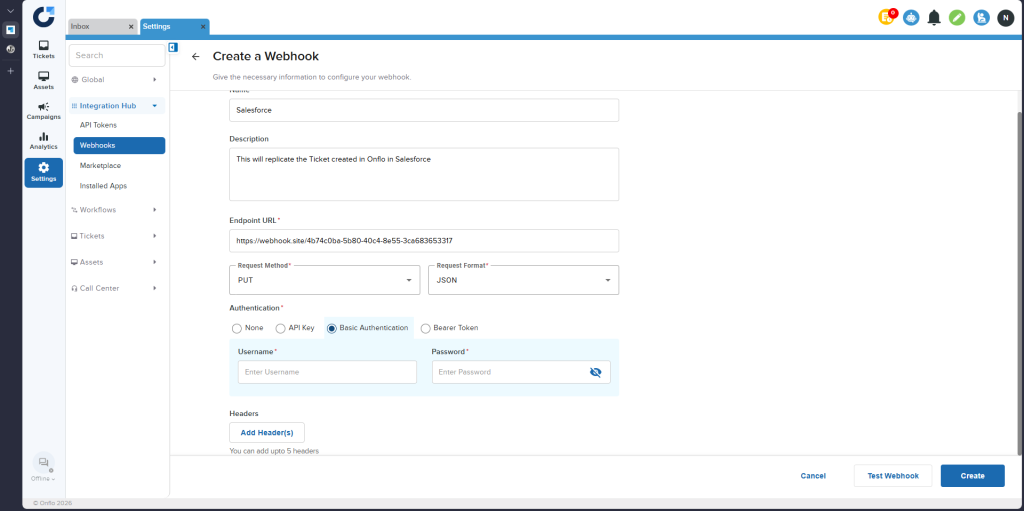
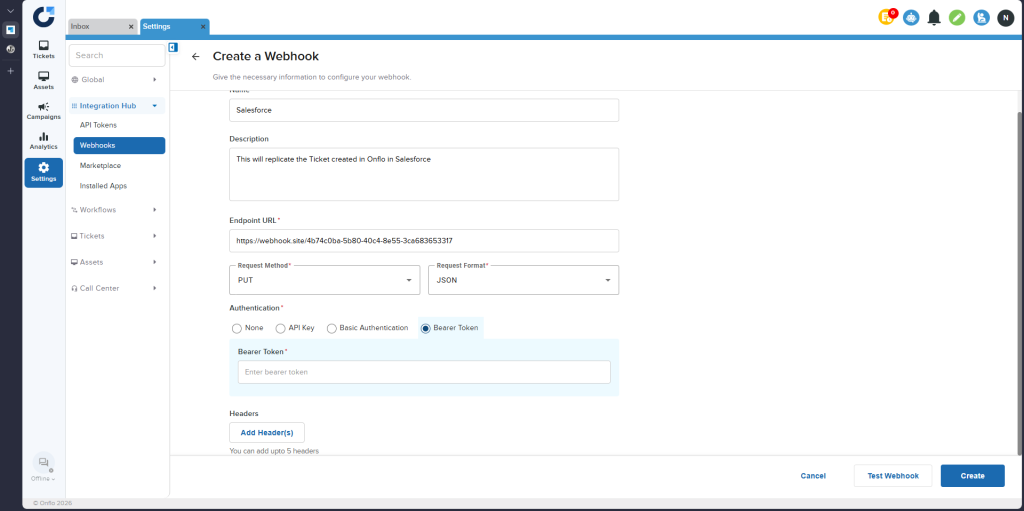
Step 5. Set up Authentication
Select the option the receiving system requires. Onflo shows the matching fields as soon as you choose, and every value should be pasted in exactly as supplied - these credentials are case-sensitive and a stray space will cause a rejection.
API Key
Enter the Header Name and the Value given to you. The value is hidden as you type; use the eye icon to reveal it if you need to check it.
Basic Authentication
Enter the Username and Password for the receiving system.
Bearer Token
Paste the token into the single Bearer Token field. Tokens are long, so copy and paste rather than typing them out.
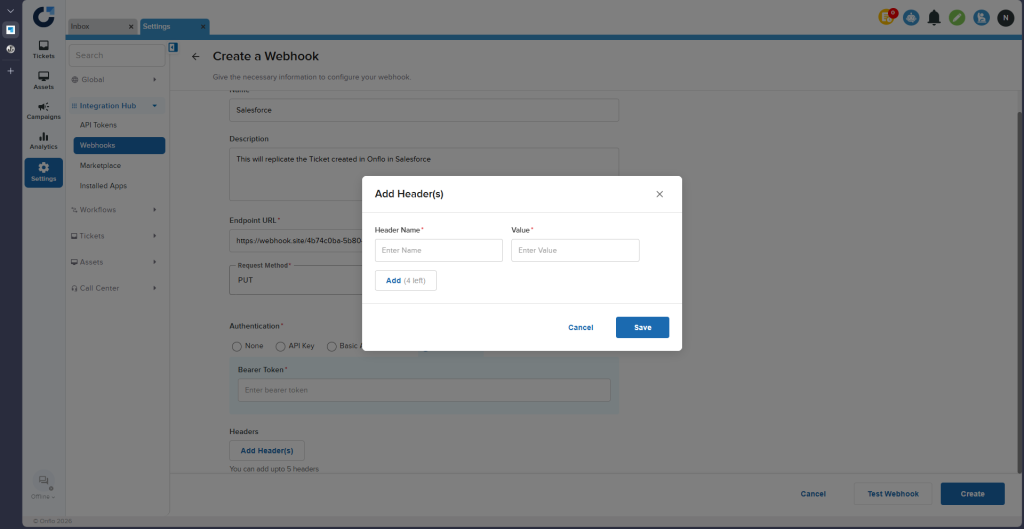
Step 6. Add headers if they are required
Click Add Header(s) to open the dialog, enter a Header Name and Value, then click Add. The button shows how many you have left - you can add up to 5 headers in total. Click Save when you are done.
Most customers need no headers at all. Only add one if the receiving system explicitly asked for it.
Step 7. Test the webhook before saving
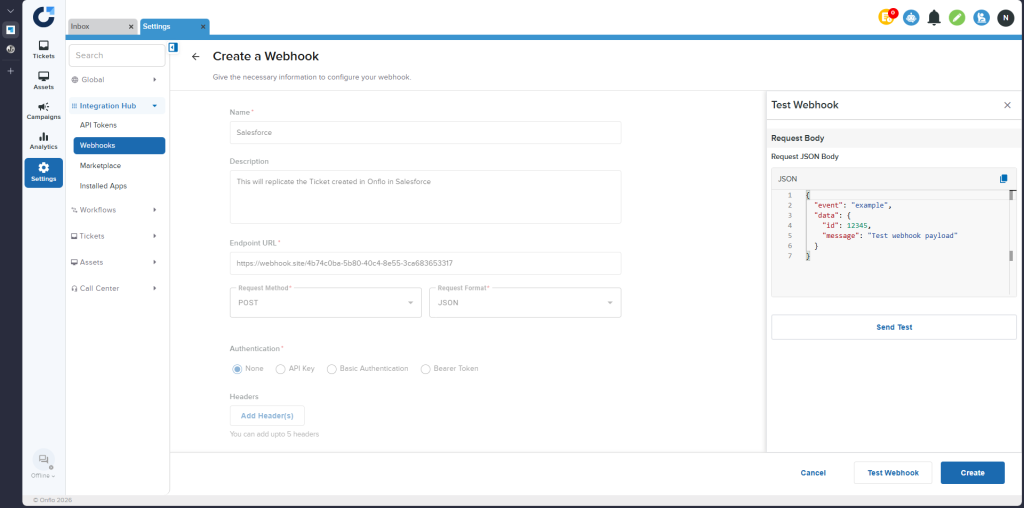
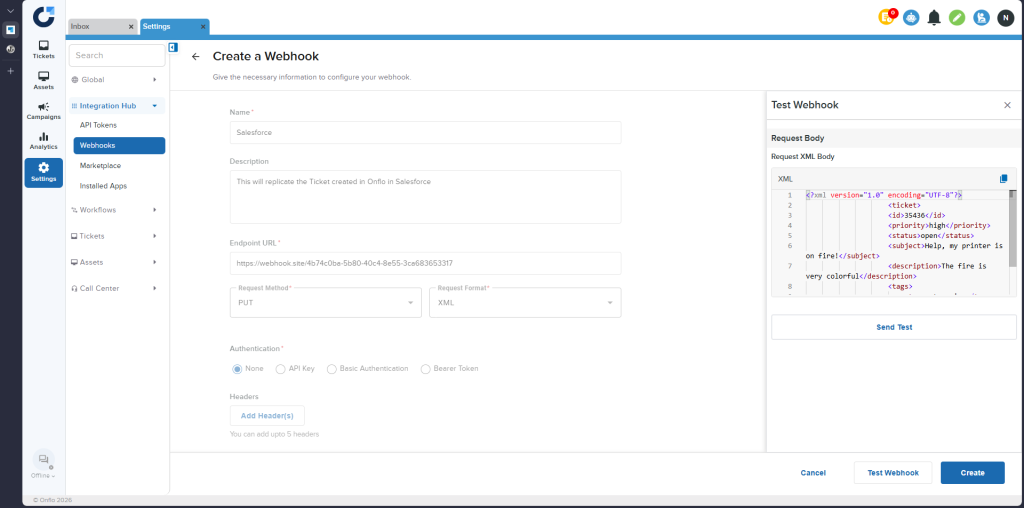
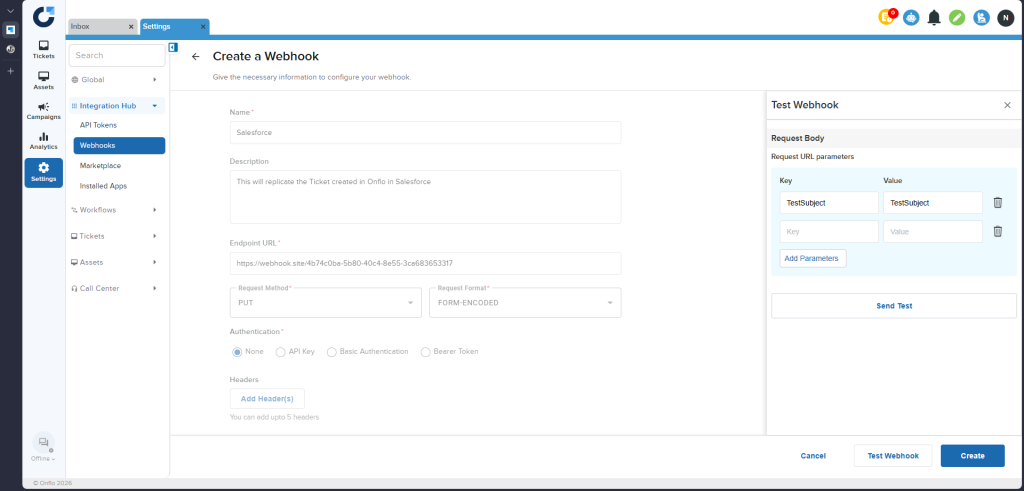
Click Test Webhook at the bottom of the screen. A panel opens on the right with a sample message already prepared, so you can confirm the connection works before you commit to anything. The sample changes to match the Request Format you selected.
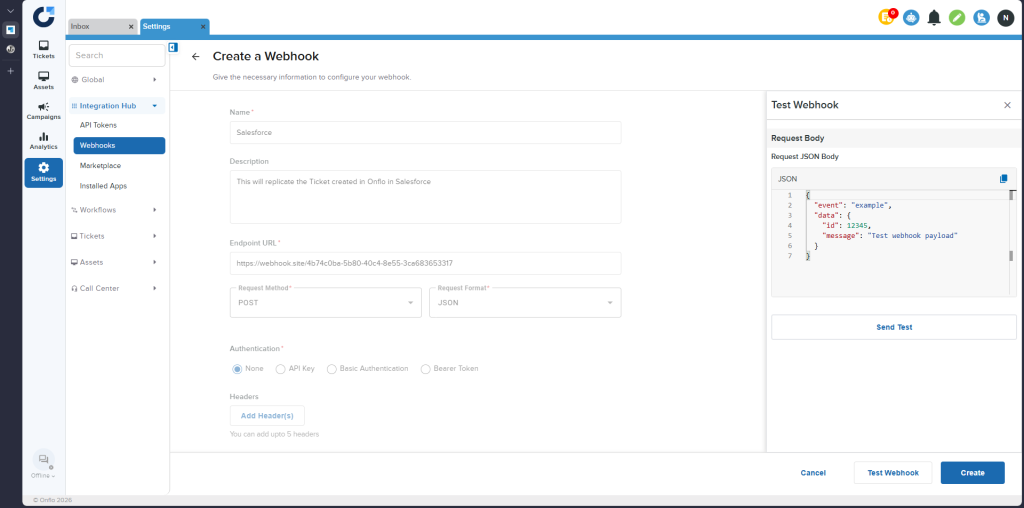
With JSON selected, the panel shows a Request JSON Body containing a small example message.
With XML selected, the same sample appears as a Request XML Body.
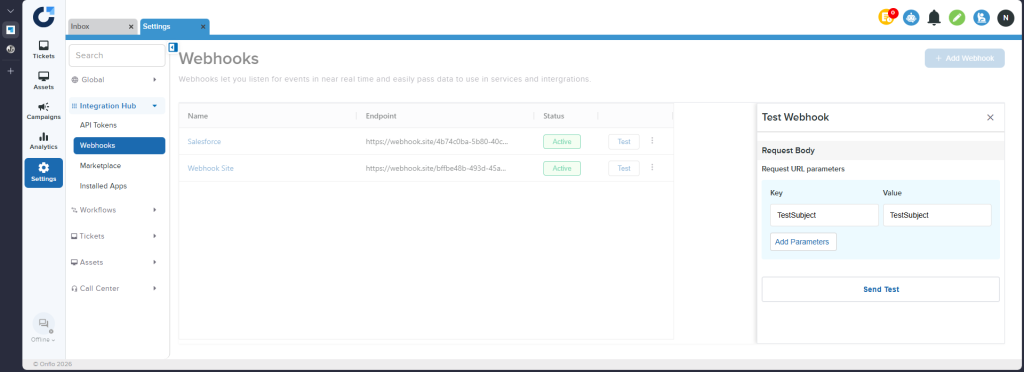
With FORM-ENCODED selected, you enter Request URL parameters instead - a simple list of Key and Value pairs. Use Add Parameters to add more rows, or the bin icon to remove one.
Click Send Test. A Webhook test successful confirmation appears, along with the response from the receiving system. A green 200 OK badge means the message was accepted. The Response Body tab shows what the other system sent back.
The Response Header tab lists the technical labels that came back with the reply. You will rarely need this, but it is useful evidence when a customer’s technical team is investigating a problem.
Use Show Request Body to switch back and re-check exactly what was sent.
Step 8. Create the webhook
Once the test succeeds, click Create. A Webhook created successfully message appears and the new webhook is added to the list with a green Active badge.
The webhook now exists, but it is not doing anything yet. It only sends data once you use it inside a workflow - that is Part 3.
Part 2: Manage Existing Webhooks
Test any webhook from the list
Every row on the Webhooks page has a Test button, so you can re-check a connection at any time without opening or editing the webhook. This is the quickest first step whenever a customer reports that data has stopped arriving.
Row actions
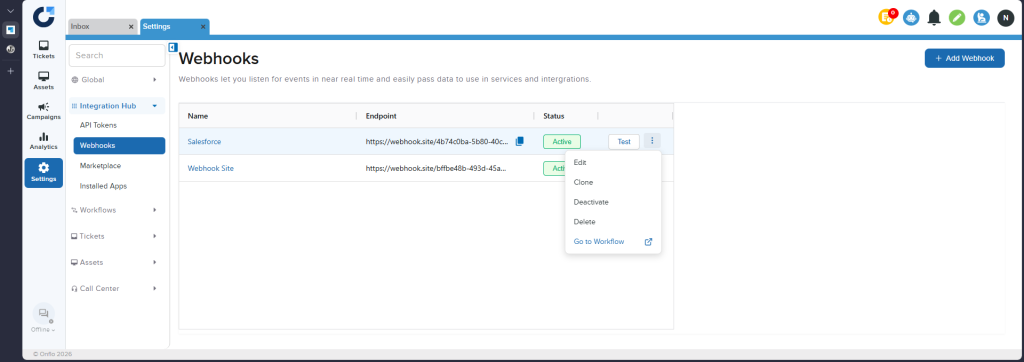
The three-dot menu at the end of each row offers Edit, Clone, Deactivate, Delete and Go to Workflow.
Edit - change any detail of the webhook.
Clone - copy it as the starting point for a similar one. Handy when a customer needs several webhooks pointing at the same system with different data.
Deactivate - pause it without deleting it.
Delete - remove it permanently.
Go to Workflow - jump straight to the workflows that use this webhook.
Deactivate and reactivate
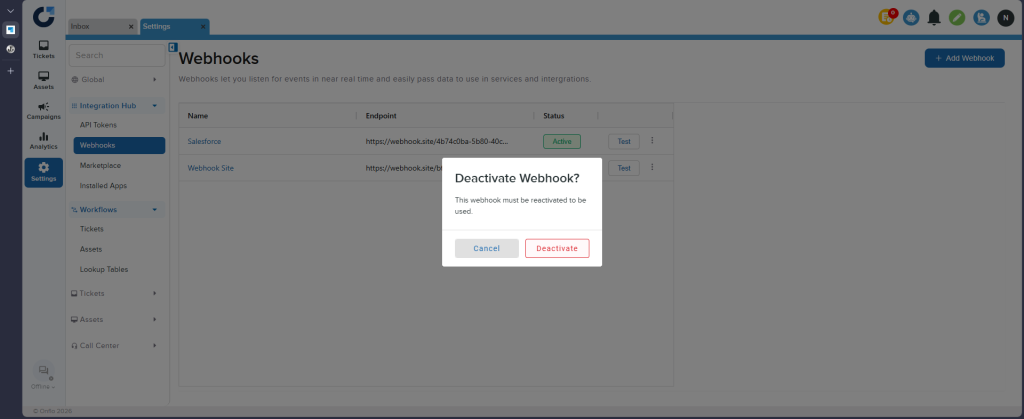
Choosing Deactivate asks for confirmation and warns that “This webhook must be reactivated to be used.” Deactivating is the right choice when a customer wants to pause an integration temporarily - during a system migration, for example - because it keeps all the settings and credentials intact.
A deactivated webhook shows a grey Inactive badge, and its menu now offers Activate to switch it back on.
Always suggest Deactivate before Delete - deleting loses the settings and credentials for good.
The webhook detail page
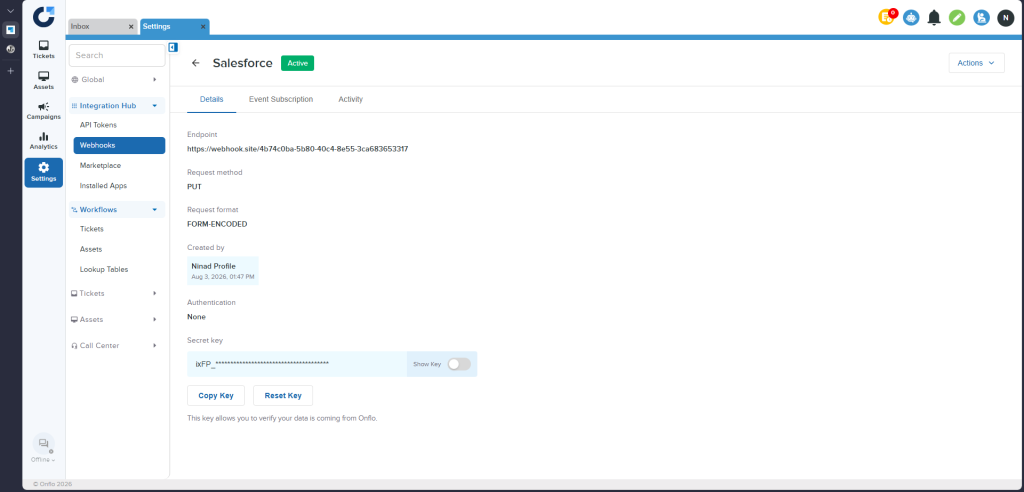
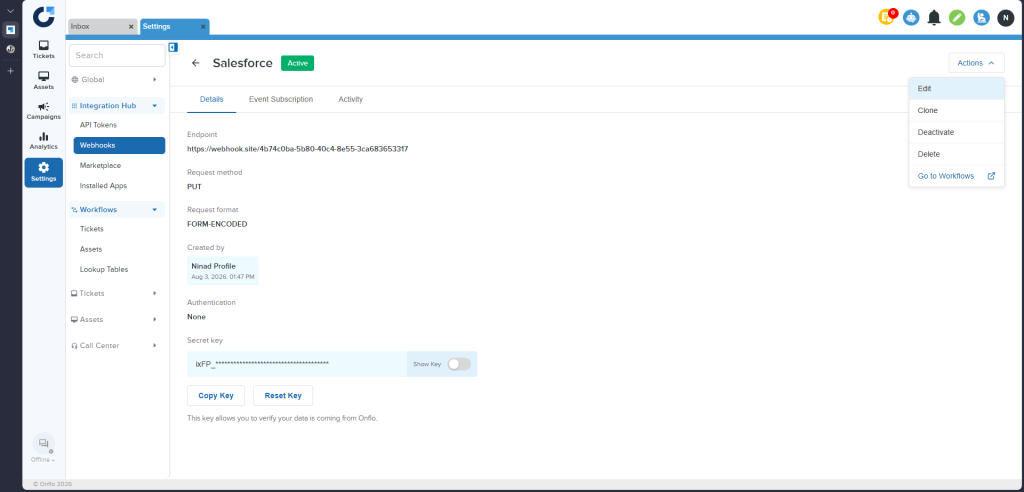
Click a webhook’s name to open its detail page. Three tabs are available - Details, Event Subscription and Activity - and an Actions menu sits at the top right.
The Details tab summarises the Endpoint, Request method, Request format, who Created it and when, and the Authentication type. Below that sits the Secret key, hidden by default with a Show Key toggle, plus Copy Key and Reset Key buttons and the note “This key allows you to verify your data is coming from Onflo.”
Use Copy Key to send the secret key to the receiving system’s technical team. Reset Key replaces it with a new one, which means the receiving system must be updated with the new key or it may start rejecting Onflo’s messages.
The Actions menu on this page mirrors the row menu: Edit, Clone, Deactivate, Delete and Go to Workflows.
Part 3 - Use a Webhook in a Ticket workflow
A workflow is the “when this happens, do that” rule. Creating the webhook gave Onflo the phone number; the workflow decides when to make the call and what to say.
Step 1. Open the workflow
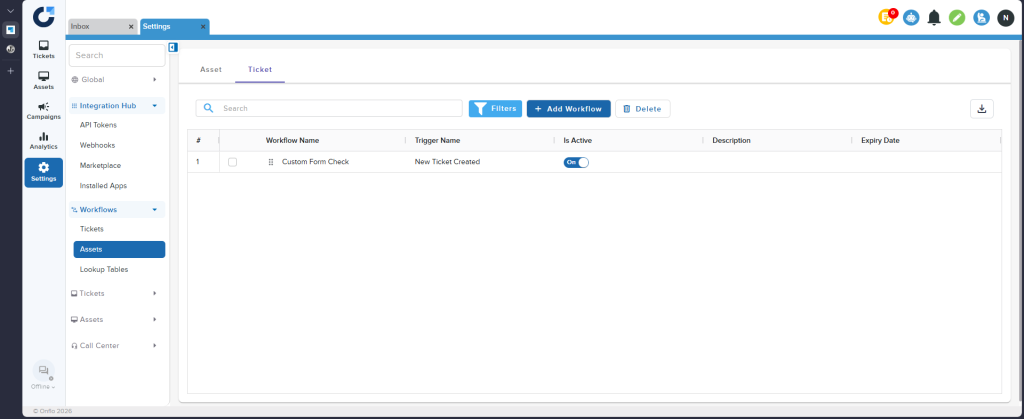
Go to Settings > Workflows and choose Tickets. Use + Add Workflow for a new rule, or click an existing workflow name to edit it. The list shows each Workflow Name, its Trigger Name, whether it Is Active, its Description and any Expiry Date.
Step 2. Add the Trigger Webhook action
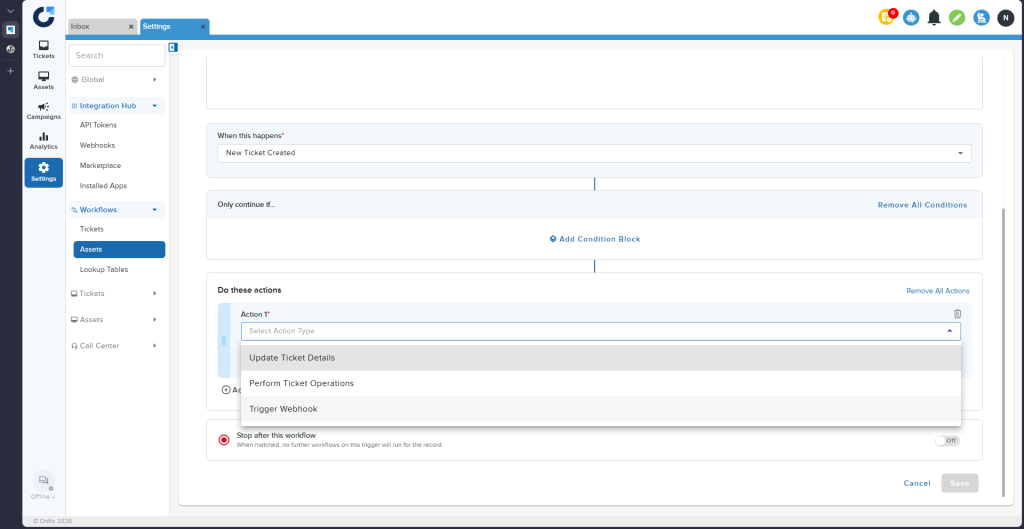
Inside the workflow, When this happens sets the trigger - for example New Ticket Created. Only continue if... lets you narrow things down with conditions, so the webhook only fires for the tickets you care about. Under Do these actions, open Select Action Type and choose Trigger Webhook. The other options in that list are Update Ticket Details and Perform Ticket Operations.
Step 3. Pick the webhook
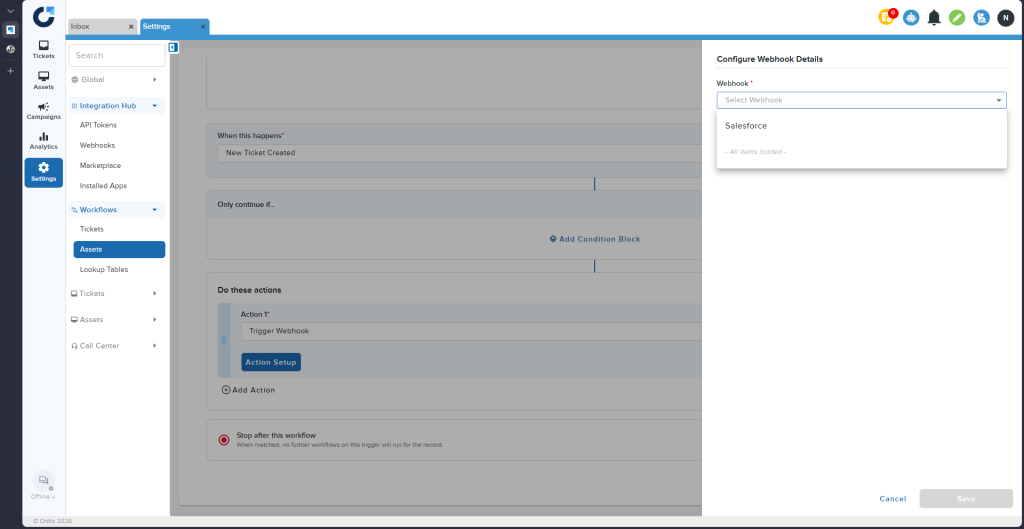
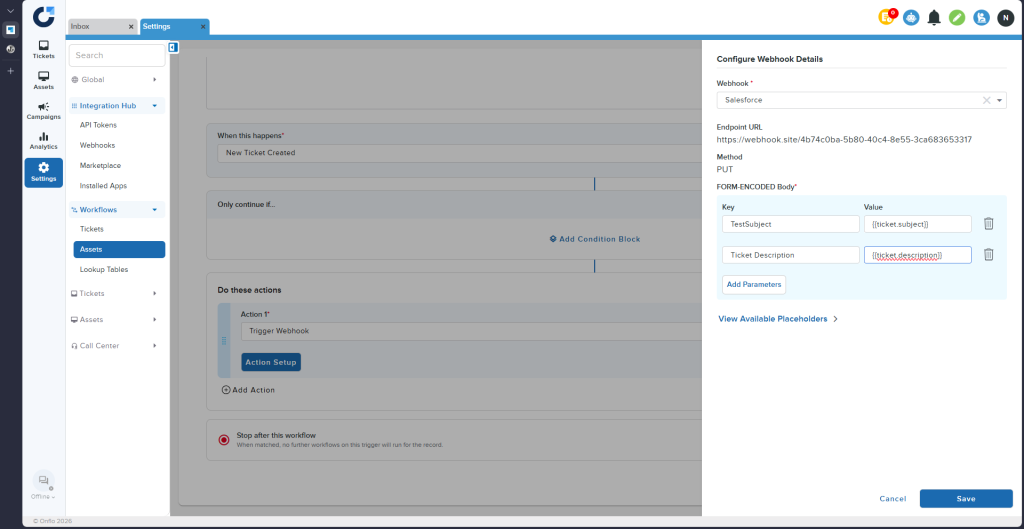
Click Action Setup. The Configure Webhook Details panel opens. Open the Webhook list and choose the webhook you created in Part 1 - only active webhooks appear here.
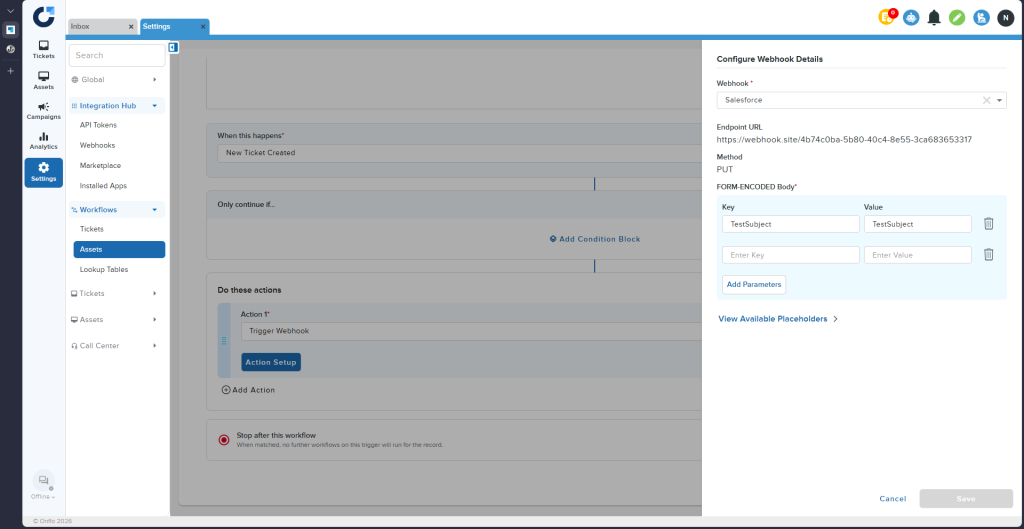
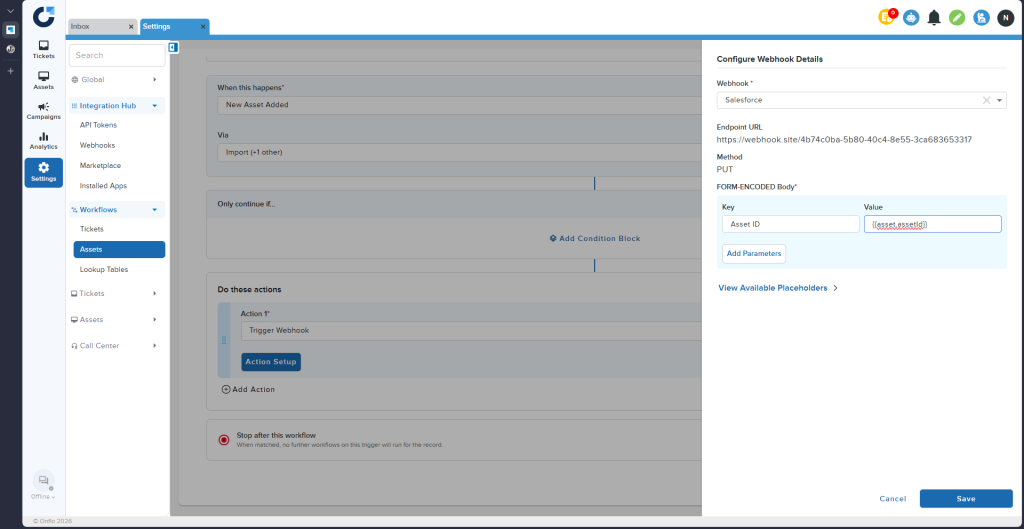
Once selected, the panel confirms the Endpoint URL and Method from the webhook’s settings, so you can see at a glance that you picked the right one. Below that, you build the message body - a table of Key and Value rows. Use Add Parameters to add rows and the bin icon to remove them.
Think of each row as one line on a form you are filling in for the other system. The Key is the label - the name the receiving system expects, so it must be spelled exactly as their team specified. The Value is what goes in that box, and this is where placeholders come in.
Step 4. Insert placeholders as the values
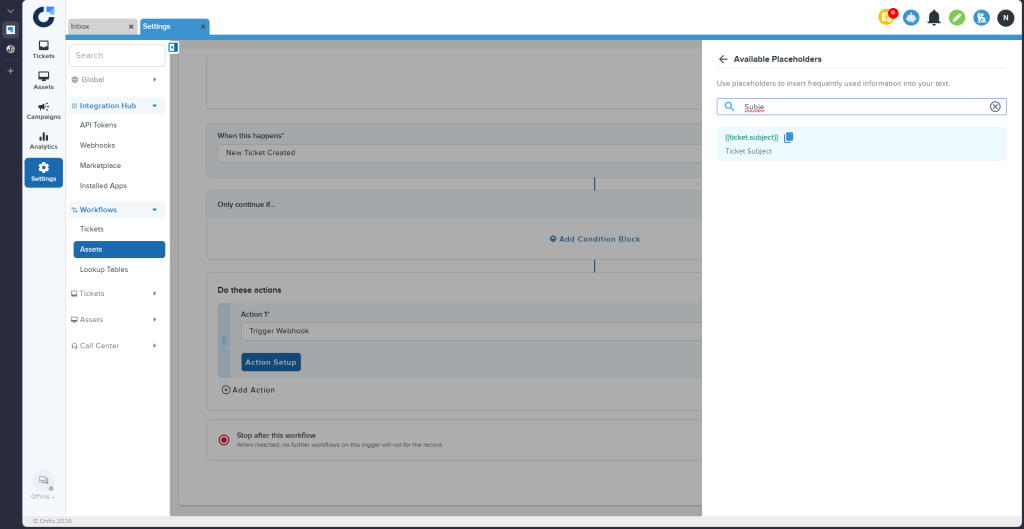
Click View Available Placeholders to open the full list. Every entry shows the placeholder itself, such as {{ticket.caseno}}, with its plain-English meaning underneath, such as Ticket Number.
Use the Search box to find one quickly - typing “Subje” narrows the list to {{ticket.subject}}.
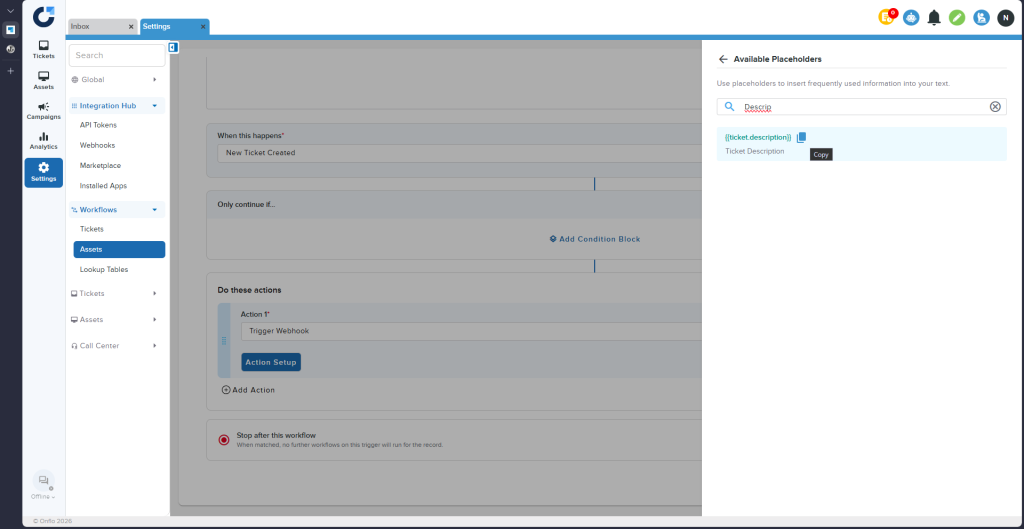
Hover over a placeholder and a Copy icon appears. Click it to copy the placeholder, then paste it into the Value box for the matching row. Copying rather than typing avoids the single most common mistake - a mistyped placeholder, which sends the literal text instead of the real data.
Step 5. Save
Repeat until every row has a Key and a Value, then click Save. In the example below, the receiving system will get the ticket’s subject under the key TestSubject and its description under the key Ticket Description.
Save the workflow itself as well, and make sure it is switched on in the workflow list. From this point on, every ticket that matches the trigger and conditions sends its data automatically.
Part 4 - Use a Webhook in an Asset Workflow
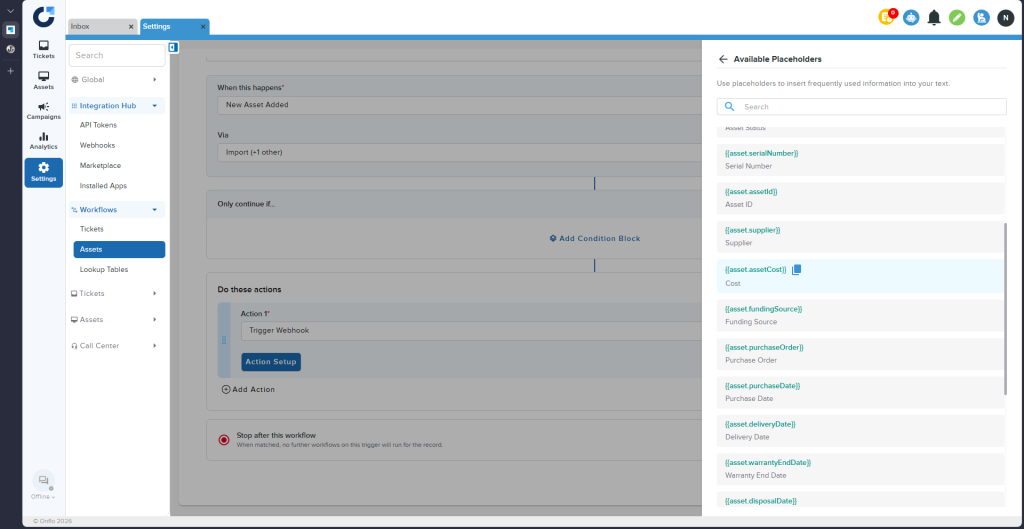
Asset workflows work in exactly the same way; only the trigger and the placeholders differ. Go to Settings > Workflows and choose Assets, then follow the same steps: pick a trigger, add the Trigger Webhook action, open Action Setup, select your webhook and map the body.
An asset trigger such as New Asset Added also offers a Via field, so you can restrict the rule to assets added a particular way - for example only those added by Import. This is useful when a customer only wants their asset register to sync during bulk imports and not on every manual edit.
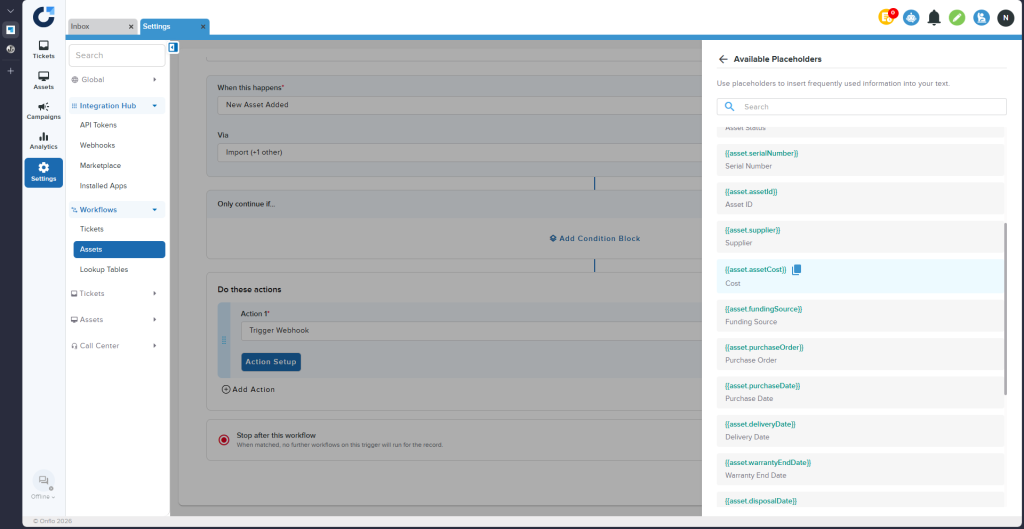
The Available Placeholders panel now lists asset fields instead of ticket fields - Serial Number, Asset ID, Supplier, Cost, Funding Source, Purchase Order, Purchase Date, Delivery Date, Warranty End Date, Disposal Date and more. They all begin with asset. rather than ticket.
Ticket placeholders only work in Ticket workflows, and asset placeholders only in Asset workflows.
This is the second most common setup mistake. If someone pastes {{ticket.subject}} into an Asset workflow, there is no ticket involved, so there is nothing for Onflo to fill in. Always open the placeholder list from inside the workflow you are editing and only use what it offers you.
Confirming that it worked
There are three independent places to check, and between them they answer almost every “did it fire?” question a customer will ask.
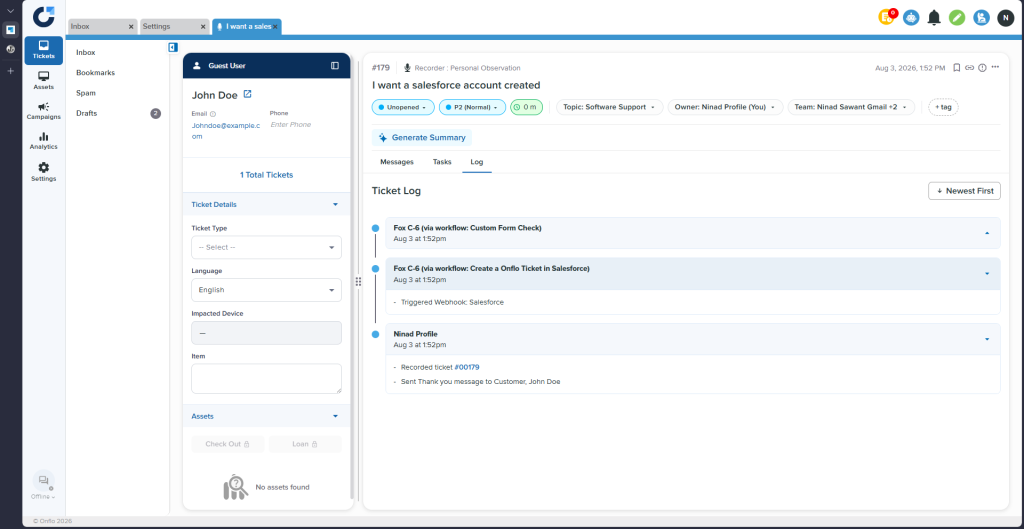
1. The Ticket Log
Open the ticket and go to the Log tab. Each workflow that ran is listed with a timestamp, and a webhook action appears as Triggered Webhook: followed by the webhook’s name. If you can see that line, Onflo did its job and sent the data.
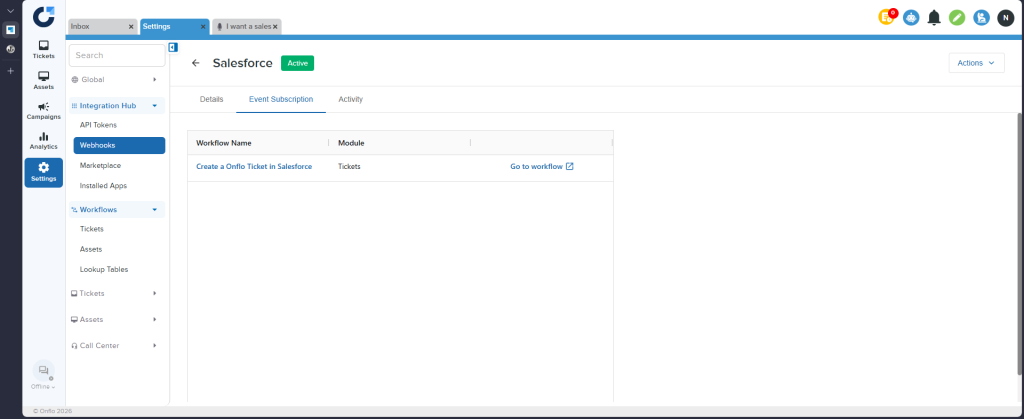
2. The Event Subscription tab
On the webhook’s detail page, Event Subscription lists every workflow currently using this webhook, with its Module (Tickets or Assets) and a Go to workflow link. If a customer says nothing is being sent, check here first - an empty list means the webhook was created but never attached to a workflow, which is the single most common cause.
3. The Activity tab
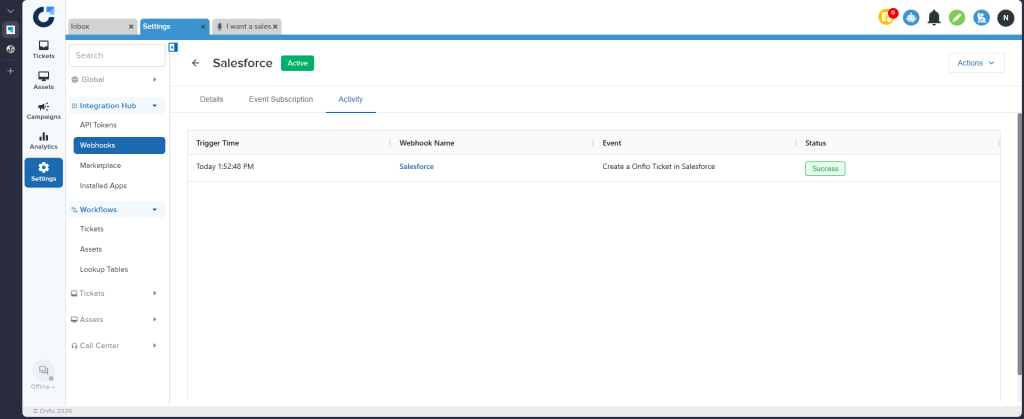
Activity is the delivery history. Each attempt shows the Trigger Time, the Webhook Name, the Event that caused it, and a Status such as a green Success. This is the definitive record of whether a message left Onflo and how the other system answered.
Frequently asked questions
Do I need to be technical to set up a webhook?
No. You do need three pieces of information from the team that owns the receiving system - the endpoint URL, the method and format, and any credential. Once you have those, everything in Onflo is filling in labelled fields and copying placeholders from a list.
Where do I get the Endpoint URL and credentials?
Always from the receiving system, never from Onflo. Whoever administers Salesforce, Teams or the internal application will provide them. Onflo cannot generate or look them up.
Can one webhook be used in more than one workflow?
Yes. Create it once and select it in as many Ticket and Asset workflows as you need. The Event Subscription tab shows you everywhere it is being used.
Can one workflow trigger more than one webhook?
Yes. Use Add Action in the workflow to add another Trigger Webhook action and configure it separately.
What is the difference between Deactivate and Delete?
Deactivate pauses the webhook but keeps every setting and credential, so Activate brings it straight back. Delete removes it permanently and it must be rebuilt from scratch. When a customer is unsure, deactivate.
Does testing a webhook send real customer data?
No. Test Webhook sends a small sample message that Onflo prepares, not a real ticket or asset. It is safe to use while you are setting things up. Do bear in mind that the receiving system will still record having received something.
How many headers can I add?
Up to 5. The Add button shows how many you have left. Most integrations need none.
What happens if I reset the Secret key?
Onflo starts using a new key immediately. If the receiving system is checking the old one, it may begin rejecting messages until its technical team is given the new key. Only reset when there is a reason to, such as a suspected leak.
Why is my placeholder appearing as literal text in the other system?
Almost always a typo, or a ticket placeholder used in an Asset workflow (or the reverse). Delete the value, reopen View Available Placeholders, and copy it with the Copy icon.
Troubleshooting
Nothing is being sent at all - check the webhook is Active, check the Event Subscription tab actually lists a workflow, and check the workflow itself is switched on in the workflow list.
The test fails with a 400-range code - the message reached the other system and was rejected. Usually the credentials or the Endpoint URL. Re-copy both, watching for trailing spaces.
The test fails with a 500-range code - the other system had an internal problem. Nothing in Onflo will fix it; the customer needs to contact that system’s support team.
The test cannot connect at all - check the Endpoint URL is complete, starts with https://, and has not expired. Temporary testing addresses such as webhook.site links stop working after a while.
Data arrives but the wrong fields are populated - the Key names must match exactly what the receiving system expects, including capitalisation. Confirm the expected key names with their team.
Data arrives but some values are empty - the placeholder is valid but that field was blank on the ticket or asset. Check the record itself rather than the webhook.
Placeholders appear as literal text - a typo, or the wrong type of placeholder for the workflow. Re-copy from the placeholder panel.
It worked before and has now stopped - check the Activity tab for when it last succeeded, then ask whether the credential was rotated, the Secret key was reset, or the endpoint moved.
A reliable rule of thumb: if Test Webhook succeeds but no live data is arriving, the problem is in the workflow. If Test Webhook itself fails, the problem is in the webhook settings or the receiving system.
For the families you serve, and for the teams serving themFamilies have more school options than ever, and every ticket is a chance to build trust. Onflo helps your team deliver on that, for the people you serve and for
What Is Onflo? A unified service desk that makes it simple for your community to reach you, and even simpler for your team to keep work moving, turning every request into meaningful action. Every request. One place. Before Onflo Requests
Setting Up Your District's Terms & Conditions Page for SMS Compliance Onflo uses Twilio to power SMS messaging, which means any district sending text notifications through Onflo must complete Twilio's A2P 10DLC (Application-to-Person, 10-Digit Long Code) registration. This is a