
How customers create and manage the tokens that let their software connect to the Onflo API
Overview
API Tokens is a feature in Onflo Settings that lets a customer generate a secure key which their own software can use to connect to the Onflo API. Onflo describes it on the page itself as: “API tokens authenticate your applications when making API requests. Generate tokens with custom expiration dates and manage their lifecycle securely.”
In everyday terms: if a customer wants their own system (a student information system, an HR platform, a reporting tool, or a script their IT team wrote) to create tickets in Onflo or look up assets automatically, that system needs a way to prove it is allowed to do so. The API token is that proof. The customer generates it once inside Onflo, hands it to whoever is building the connection, and their software includes it with every request it sends to Onflo.
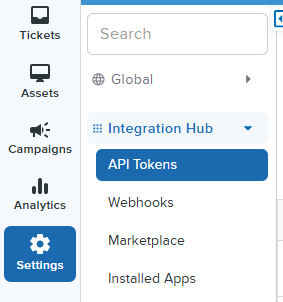
You will find the feature under Settings → Integration Hub → API Tokens.

Key Terms
You do not need to be technical to support this feature, but you will hear these words in tickets and on calls. Here is what each one actually means, with an everyday comparison.
API
Short for Application Programming Interface. It is a service counter that one piece of software uses to talk to another. A person uses the Onflo screens; a piece of software uses the Onflo API. Same building, different door.
Example: a school district’s student system wants to raise an Onflo ticket automatically every time a new laptop is issued. Nobody types it in. The student system sends a message through the Onflo API and the ticket appears.
API token
A long secret string of characters that acts as a key. It is what proves the request is coming from someone allowed to use that Onflo account.
Example: think of a hotel keycard. The scanner at the door does not check your face or your name; it only checks that the card is genuine and has not expired. An API token works the same way — and just like a keycard, anyone holding it can get in, so it must not be shared casually.
Bearer token
The way the token is attached to a request. “Bearer” literally means “whoever bears (carries) this”. The Onflo API documentation shows the authorisation type as Bearer Token.
Example: a cinema ticket. The usher does not care who bought it — whoever is holding it gets a seat. This is exactly why a leaked token is a real problem, and why Onflo lets customers expire, deactivate, or delete one.
Endpoint
One specific thing the API can do, each with its own web address. The Onflo API groups its endpoints into two areas: Tickets and Assets (IT Asset Management).
Example: the same office building has different counters — one to raise a ticket (“Create Ticket”), one to search for a laptop (“Search Asset”). Each counter is an endpoint. The token gets you into the building; the endpoint is which counter you walk up to.
Request and response
A request is the message the customer’s software sends to Onflo. A response is what Onflo sends back — for example a confirmation that reads “Ticket created successfully.”
Header
Information written on the outside of the request rather than inside the message itself. The token travels in a header.
Example: the address and stamp go on the outside of the envelope; the letter goes inside. The token is on the envelope.
Why every token starts with “eyJhbGci…”
Onflo tokens use a standard technical format (a JSON Web Token, often shortened to JWT). Every token of this type begins with the same few characters, which is why the Identifier column on the API Tokens page shows “eyJhbGci……” for every row. It is not an error and it does not mean two tokens are the same — it is just the shared beginning of the format, in the same way that every UK phone number starts with a zero.
Expiry
The date the token stops working. Onflo requires every token to have one, and offers 30 days, 60 days, 90 days, or a Custom date.
Example: a hotel keycard programmed to stop working at checkout. If it is lost after that, it is harmless.
Masked
Hidden so it cannot be read back. After a token is saved, Onflo shows only the harmless beginning of it and permanently hides the rest.
Example: a bank statement showing only the last four digits of a card number. Enough to recognise which card it is, not enough to spend money.
Postman and the Onflo API Hub
Postman is a widely used tool that developers use to try out an API by hand before wiring it into their own software. Onflo publishes its API documentation in a Postman-style catalogue at apihub.onflo.com, which is where a customer’s developer goes to see what the API can do.
Example: a test kitchen. You try the recipe there before putting it on the restaurant menu.
cURL
A single line of text that sends one request to an API. The Onflo API Hub shows a ready-made cURL example for every endpoint so a developer can copy it, paste in their token, and see it work immediately. If a customer sends you something starting with “curl --location …”, that is what it is.
Key Features
- Self-service generation — a customer creates their own tokens inside Onflo Settings; they do not need to raise a ticket with Onflo to get one.
- Named tokens — every token is given a name (for example “TopGear” or “Postman”) so the customer can tell at a glance which system each token belongs to.
- Choice of expiry — 30, 60, or 90 days, or any custom date chosen from a calendar. Onflo shows the resulting date in plain language before the token is generated, for example “Expires on 1st November, 2026”.
- Shown once, then masked — the full token is visible only at the moment it is generated, with Copy token and Download as .txt buttons. After saving, it is permanently masked.
- Lifecycle management in one list — every token appears in a single table with its status, when it was created, who created it, when it was last used, and when it expires.
- Clear status badges — Active in green, Expired in red, so an out-of-date token is obvious immediately.
- Last Used tracking — the list shows when each token was last used (or “Never used…”), which makes it easy to spot a token that is no longer needed.
- Attribution — the Created by column records which Onflo user generated each token.
- Search — tokens can be found by token name or by creator name.
- Rename, deactivate, regenerate, delete — the ⋮ menu on each row offers the actions relevant to that token’s current state.
Before You Begin
- Ensure you can access: Settings → Integration Hub → API Tokens in Onflo.
- Know which system the token is for, so it can be given a meaningful name. One token per connected system is much easier to manage than one shared token.
- Store the token somewhere safe before generating it — a password manager or the IT team’s secrets store. Not an email, a chat message, or a support ticket.
- If a developer or vendor is building the integration, agree in advance who will hold the token, because it can only be copied once.
How to Create an API Token
Step 1 — Open the API Tokens page
- Go to Settings.
- Open Integration Hub and select API Tokens.
- The page lists any tokens that already exist for the account. If this is the customer’s first token, the list will be empty.
Step 2 — Start a new token
- Click + Add Token at the top right of the API Tokens page.
- The Add a New Token page opens.

Step 3 — Name the token and choose when it expires
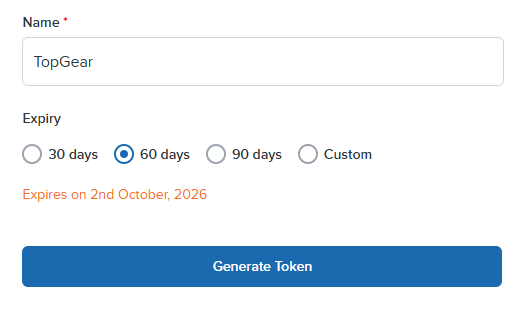
- In Name, type a name that identifies the system this token is for. This field is required (marked with a red asterisk). In the example below the name is “TopGear”.
- Under Expiry, choose 30 days, 60 days, 90 days, or Custom.
- Onflo shows the exact resulting date underneath in orange text, for example “Expires on 2nd October, 2026”, so the customer can confirm it before going further.
Tip: which expiry should a customer choose?
A shorter expiry is safer but means renewing more often. A good rule of thumb: 30 days for testing and trials, 90 days for a live integration that someone will remember to renew, and a custom date when it needs to line up with something specific such as the end of a school year or the end of a contract.
Step 4 (optional) — Pick a custom expiry date
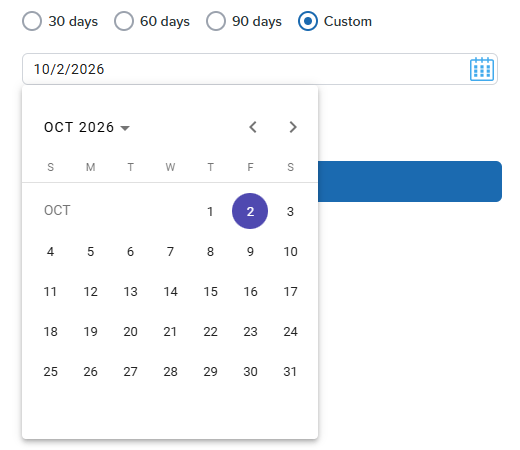
- Select the Custom option under Expiry.
- A date field appears with a calendar icon. Click it to open the calendar.
- Choose the date the token should stop working. The selected date is filled into the field.
Step 5 — Generate the token
- Click Generate Token.
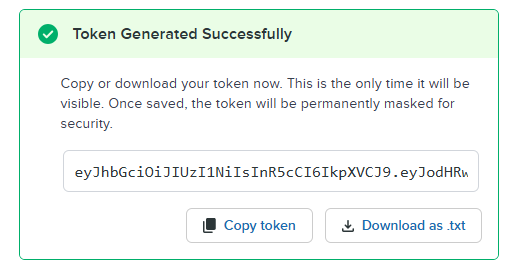
- A green Token Generated Successfully panel appears containing the full token.
- Onflo warns in the panel: “Copy or download your token now. This is the only time it will be visible. Once saved, the token will be permanently masked for security.”
- Click Copy token to copy it to the clipboard, or Download as .txt to save it as a text file.
- Store it somewhere safe straight away — ideally a password manager or the IT team’s secrets store.
This is the single most important point in the whole feature
The full token can never be viewed again after this screen. If the customer clicks away, closes the tab, or saves without copying it, the token value is gone for good — the entry will still exist in the list, but nobody will be able to read the secret again. There is no “show me the token” button anywhere in Onflo, and Onflo Support cannot retrieve it either. The only way forward at that point is to create a new token.
Step 6 — Save
- Once the token has been copied or downloaded, click Save at the bottom right of the page. Save only becomes available after a token has been generated.
- The new token now appears in the API Tokens list.
- Use Cancel instead if the customer decides not to keep it.

Reading the API Tokens List
Every token the account has ever created appears here, whatever its state. The search box at the top finds tokens by token name or by creator name.

The columns mean the following.
- Token Name — the name the customer gave it when creating it.
- Identifier — a shortened, safe preview of the token (“eyJhbGci……”). This is not the usable token and cannot be used to connect to anything.
- Created by — the Onflo user who generated it.
- Created at — the date and time it was generated.
- Last Used — when a request last arrived using this token, shown as a date plus a friendly age such as “25 days ago”. A token that has never been used shows “Never used…”, which is a very useful clue when a customer says their integration “isn’t working” — it usually means their software has not successfully reached Onflo at all.
- Expiry — the expiry date, with a plain-language note underneath: “Expires in 90 days” while it is still valid, or “Expired 3 days ago” once it has lapsed.
- Status — a green Active badge or a red Expired badge.
- ⋮ — the actions menu for that row.
The three right-hand columns are the ones worth looking at first, because between them they answer almost every question a customer will ask about a token.
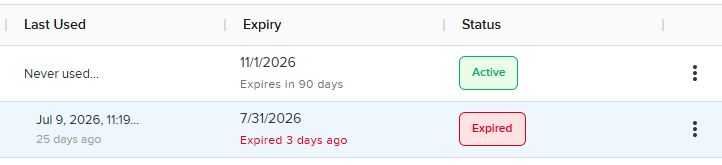
The actions available depend on the token’s status
Onflo only offers the actions that make sense for the state a token is in, so the ⋮ menu deliberately looks different on an Active row than on an Expired row. This is not a bug, and it is a common source of “I can’t find the option” questions.
Managing an Active Token
On a token with a green Active badge, the ⋮ menu offers Edit and Deactivate.
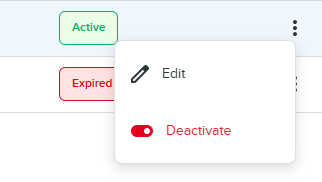
Editing and Renaming a Token
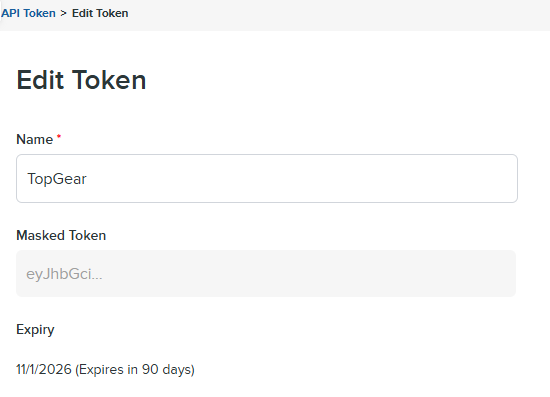
Choosing Edit opens the Edit Token page. Here the customer can change the Name. The token itself is shown in a greyed-out Masked Token field reading “eyJhbGci...” which cannot be selected or copied, and the Expiry is shown as read-only text, for example “11/1/2026 (Expires in 90 days)”.
This screen is the clearest way to show a customer why the token cannot be recovered — Onflo itself displays only the masked version. Renaming is safe and does not affect any live integration: the name is a label for humans, not something the customer’s software sends.
Deactivate or Switch a Token Off
Deactivate turns the token off before its expiry date. This is the action to reach for when a token may have been exposed, when a vendor’s contract ends, or when an integration is being retired. It is shown in red because it will stop any software currently using that token from connecting.
Always check before deactivating
Be sure to determine which system is using the token. Deactivating a token that a live integration depends on will stop that integration immediately. The Last Used column is a good sanity check: a token used minutes ago is clearly in active service.
Managing an Expired token
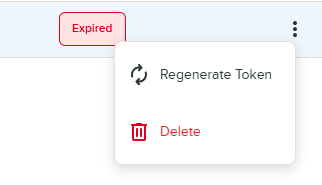
On a token with a red Expired badge, the ⋮ menu offers Regenerate Token and Delete.
Regenerate Token — issues a fresh token for that same entry, so the customer can get a working token again without setting the whole thing up from scratch. As with any new token, the new value will need to be copied and given to whoever runs the integration; the old value will not start working again.
Delete — removes the entry from the list entirely. Use this for tokens that are no longer needed at all. Deleting removes the record, including its history, so if the customer may still want the entry for reference, deactivating or leaving it expired is the gentler option.
Using the token with the Onflo API
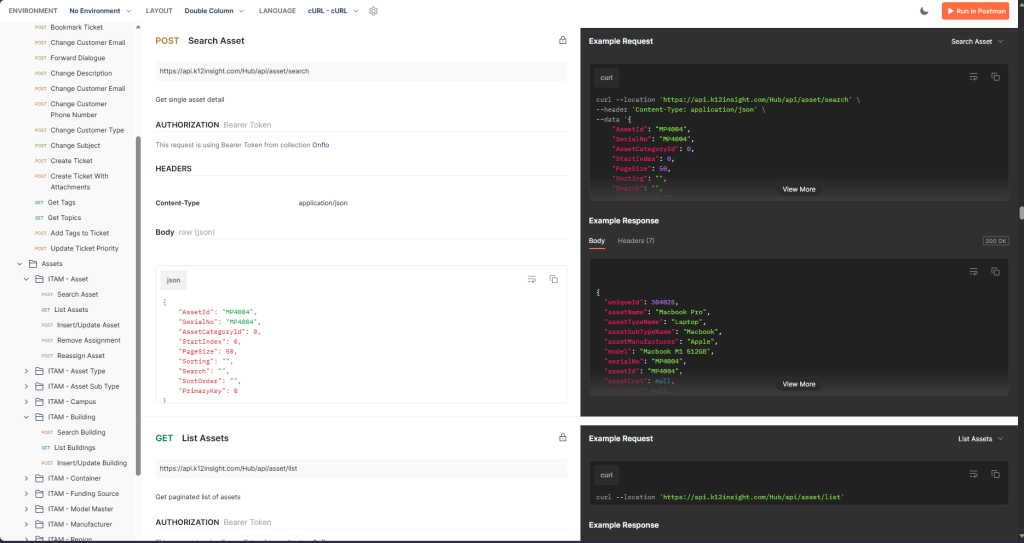
Onflo publishes its API documentation at apihub.onflo.com. The collection is called Onflo API Collection, is hosted at https://api.k12insight.com/Hub, and is organised under a V1 version structure. It covers two areas:
- Tickets (creating tickets, retrieving details, updating properties, replying to customers, adding comments, forwarding, managing contact details, bookmarking)
- Assets (IT Asset Management) (assets, asset types and sub types, manufacturers, funding sources, rooms, campuses, regions, special areas and containers).
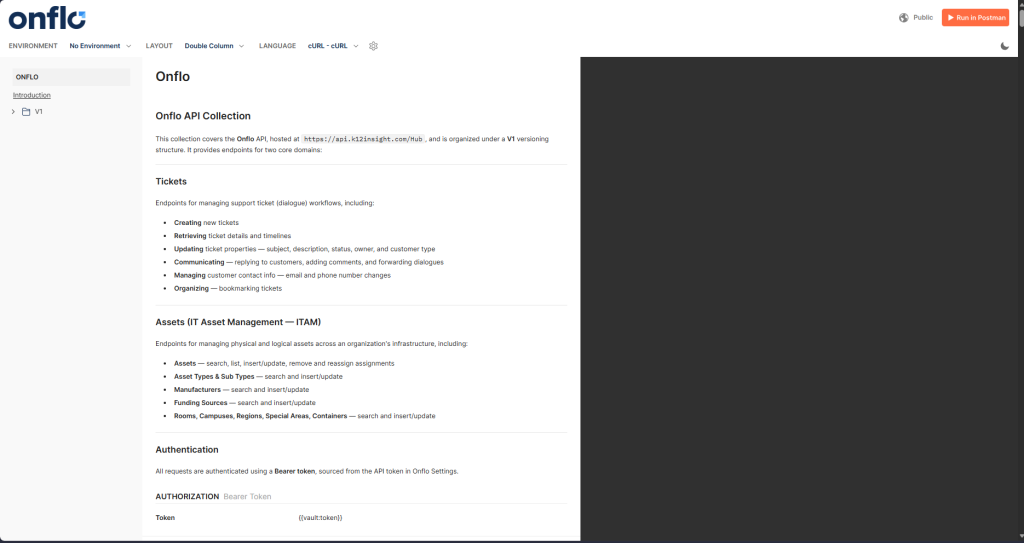
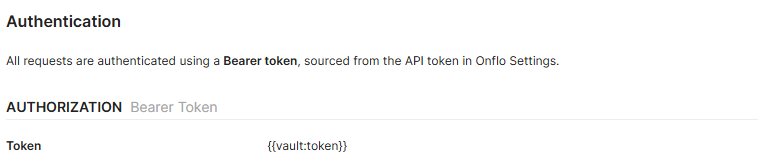
The Authentication section on that page is the sentence that links the two features together. It states plainly: “All requests are authenticated using a Bearer token, sourced from the API token in Onflo Settings.“ That is exactly the token created in the steps earlier in this document.
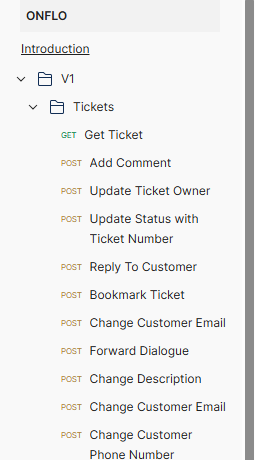
Expanding the collection in the left-hand panel reveals the individual endpoints, each labelled with the kind of request it is — GET to read information, POST to send or change something.
Each endpoint page shows its address, a table of the information the request must include, a ready-to-run cURL example, and an example of what Onflo sends back.
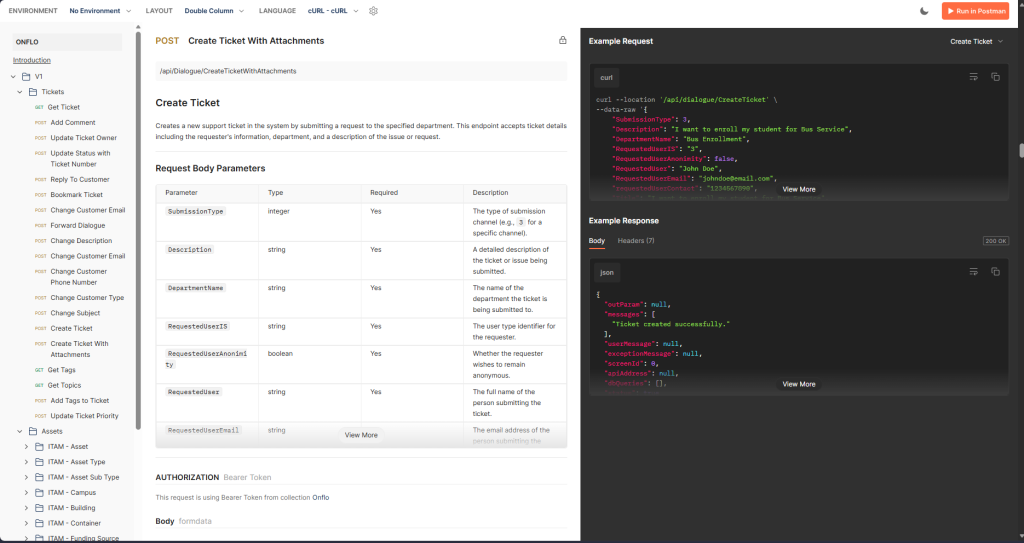
Every endpoint page carries the same authorization note, confirming that the request will not work without the customer’s API token.

The asset endpoints work the same way. The Run in Postman button at the top right of the API Hub lets a developer load the whole collection into Postman and try it against their own token.
What this means in practice
Clients who want to push their tickets into Onflo automatically need two things: an API token from Onflo Settings, and a developer who works from apihub.onflo.com. Nothing else needs to be switched on by Onflo, and no Onflo involvement is needed to generate the token.
Keeping Tokens Safe
Because a Bearer token works for whoever holds it, these habits matter. They are worth repeating to any customer setting up their first integration.
- One token per system. If a token needs to be switched off, only that one integration is affected — and the Last Used column actually tells you something useful.
- Name tokens after the system that uses them, not after a person. People change roles; systems stay.
- Set the shortest expiry that is practical and diarise the renewal date before the token expires, not after.
- Deactivate tokens that are no longer needed, including when a vendor relationship or a staff member’s project ends.
- Review the list periodically. A token showing “Never used…” weeks after it was created is either a broken integration or one that was abandoned — both are worth cleaning up.
- If a token might have been exposed, deactivate it and create a new one. There is no way to “change the password” on an existing token; replacing it is the fix.
Frequently asked questions
Can I see my token again after I have saved it?
No. The full token is shown only once, at the moment it is generated. Onflo states this on screen and then permanently masks the value. This is deliberate — it means that even someone with access to the account cannot read an existing token back out of it. If the value has been lost, create a new token.
Can Onflo Support look up my token for me?
No. Onflo cannot retrieve a saved token either, for the same reason. Support can help the customer create a replacement.
Why does every token look the same in the Identifier column?
Because all Onflo tokens use the same standard format, they all begin with the same few characters (“eyJhbGci”). The Identifier column shows only that harmless beginning. Use the Token Name column to tell tokens apart.
Do I have to set an expiry date?
Yes. Onflo requires an expiry on every token — 30, 60, or 90 days, or a custom date of the customer’s choosing. There is no “never expires” option, which is a deliberate security decision.
What happens to my integration when the token expires?
It stops being able to connect. The token’s Status badge changes to a red Expired and the Expiry column shows how long ago it lapsed, for example “Expired 3 days ago”. The customer’s software will start being refused. This is why renewing before the expiry date, rather than after, matters.
Can I extend the expiry date on a token I already have?
The Edit Token page allows the Name to be changed; the Expiry is shown there as read-only information. For an expired token, Regenerate Token is the route to getting a working token again.
How many tokens can I have?
The customer can create more than one — the example screenshots show two side by side — and using a separate token per connected system is the recommended approach.
Does renaming a token break my integration?
No. The name is just a label shown in Onflo. The customer’s software never sends the name, only the token value.
What is the difference between Deactivate and Delete?
Deactivate switches off a token that is currently Active, while keeping the entry in the list. Delete removes the entry altogether and appears on expired tokens. If in doubt, deactivating is the more cautious choice because the record stays visible.
My developer is asking for an “API key” / “bearer token” / “authentication token” — is that the same thing?
Yes. Different developers use different words for it. What they need is a token generated from Settings → Integration Hub → API Tokens.
Where does my developer find out what the API can actually do?
At apihub.onflo.com, which lists every available endpoint for Tickets and Assets with worked examples.
Troubleshooting
- “Our integration suddenly stopped working.” Check the Status and Expiry columns first. An expired token is by far the most common cause, and the list makes it obvious — a red Expired badge with a note such as “Expired 3 days ago”. The fix is Regenerate Token, then getting the new value to whoever runs the integration.
- “It has never worked at all.” Check the Last Used column. If it says “Never used…”, no request carrying that token has ever reached Onflo, so the problem is on the customer’s side — the token may not have been pasted in, or their system may not be reaching Onflo at all. If Last Used shows a recent time, the token is definitely being received and the issue lies elsewhere.
- “We lost the token.” It cannot be recovered by anyone, including Onflo. Create a new token (or use Regenerate Token on an expired entry) and copy the value straight into a password manager this time.
- “I clicked Save without copying the token.” Same situation — the value is unrecoverable. A new token is needed.
- “I can’t find the Regenerate option.” Regenerate Token and Delete appear on Expired tokens. On an Active token the ⋮ menu shows Edit and Deactivate instead. Ask which badge the row is showing.
- “I can’t find Deactivate.” Likewise, Deactivate only appears on an Active token.
- “The Save button is greyed out.” On the Add a New Token page, Save only becomes available after the token has been generated. Enter a name, choose an expiry, and click Generate Token first.
- “Which of these tokens is the one my vendor uses?” The Identifier column cannot distinguish them because every token starts with the same characters. Use Token Name, Created by, Created at, and Last Used together to work it out — and take the opportunity to rename tokens meaningfully via Edit.
- “Two of my tokens have the same name.” Names are labels, not unique identifiers. Rename them via Edit so the list is readable, then use Created at to tell which is which.